The ABCs of Azure Identity Governance Tools

Discover the main Azure mechanisms for governing identities and providing access permissions.
In our previous post, we reviewed the basics of the Azure role-based access control (RBAC) mechanism, which lets users define and enforce fine-grained access to the resources in their Azure tenant.
In this post, we’ll review the main Azure mechanisms that help you govern identities in your environment and provide access permissions in a way that lowers the chance they will be excessive. The purpose of these mechanisms is, of course, to bring you closer to achieving least privilege on access to your cloud resources. That is, allowing all access necessary to performing the business function while not enabling access that is not necessary.
We focus our review on four tools:
- Access Review
- Entitlement Management
- Privileged Identity Management
- Conditional Access
All are nice to use when designing and implementing an access management strategy - and show that Microsoft cares about least privilege principles and helping customers get a solid grip on the permissions granted in their environments. However, the tools are lacking in certain areas.
By the end of this article you should have a good understanding of how to use these Azure tools, what you should (and shouldn’t) use them for, where they fall short and how to overcome their limitations with complementary automated analysis.
Access review
Access review is probably the main tool Azure provides for tracking and inferring access recommendations from user activity. The main ways in which users are granted access to Azure resources are role assignments (as discussed in our post about Azure RBAC), group memberships (where the group itself has a role assignment) and privileged role assignments, or by adding the user or group to an enterprise application. Access reviews are audits that check if the users assigned access through one of these mechanisms have not signed in in the past 30 days. If they haven’t, Azure recommends removing the access. Access reviews can be carried out on groups/teams, applications, AD roles or roles that apply to AD resources.
For example, let’s say we want to check if the users belonging to a specific group are still active and, if not, remove them from the group. This could be especially useful when considering sensitive groups that include htguest users you can’t really track otherwise.
Under “Identity Governance” you will find the “Access reviews” tab, which allows you to create a new access review.
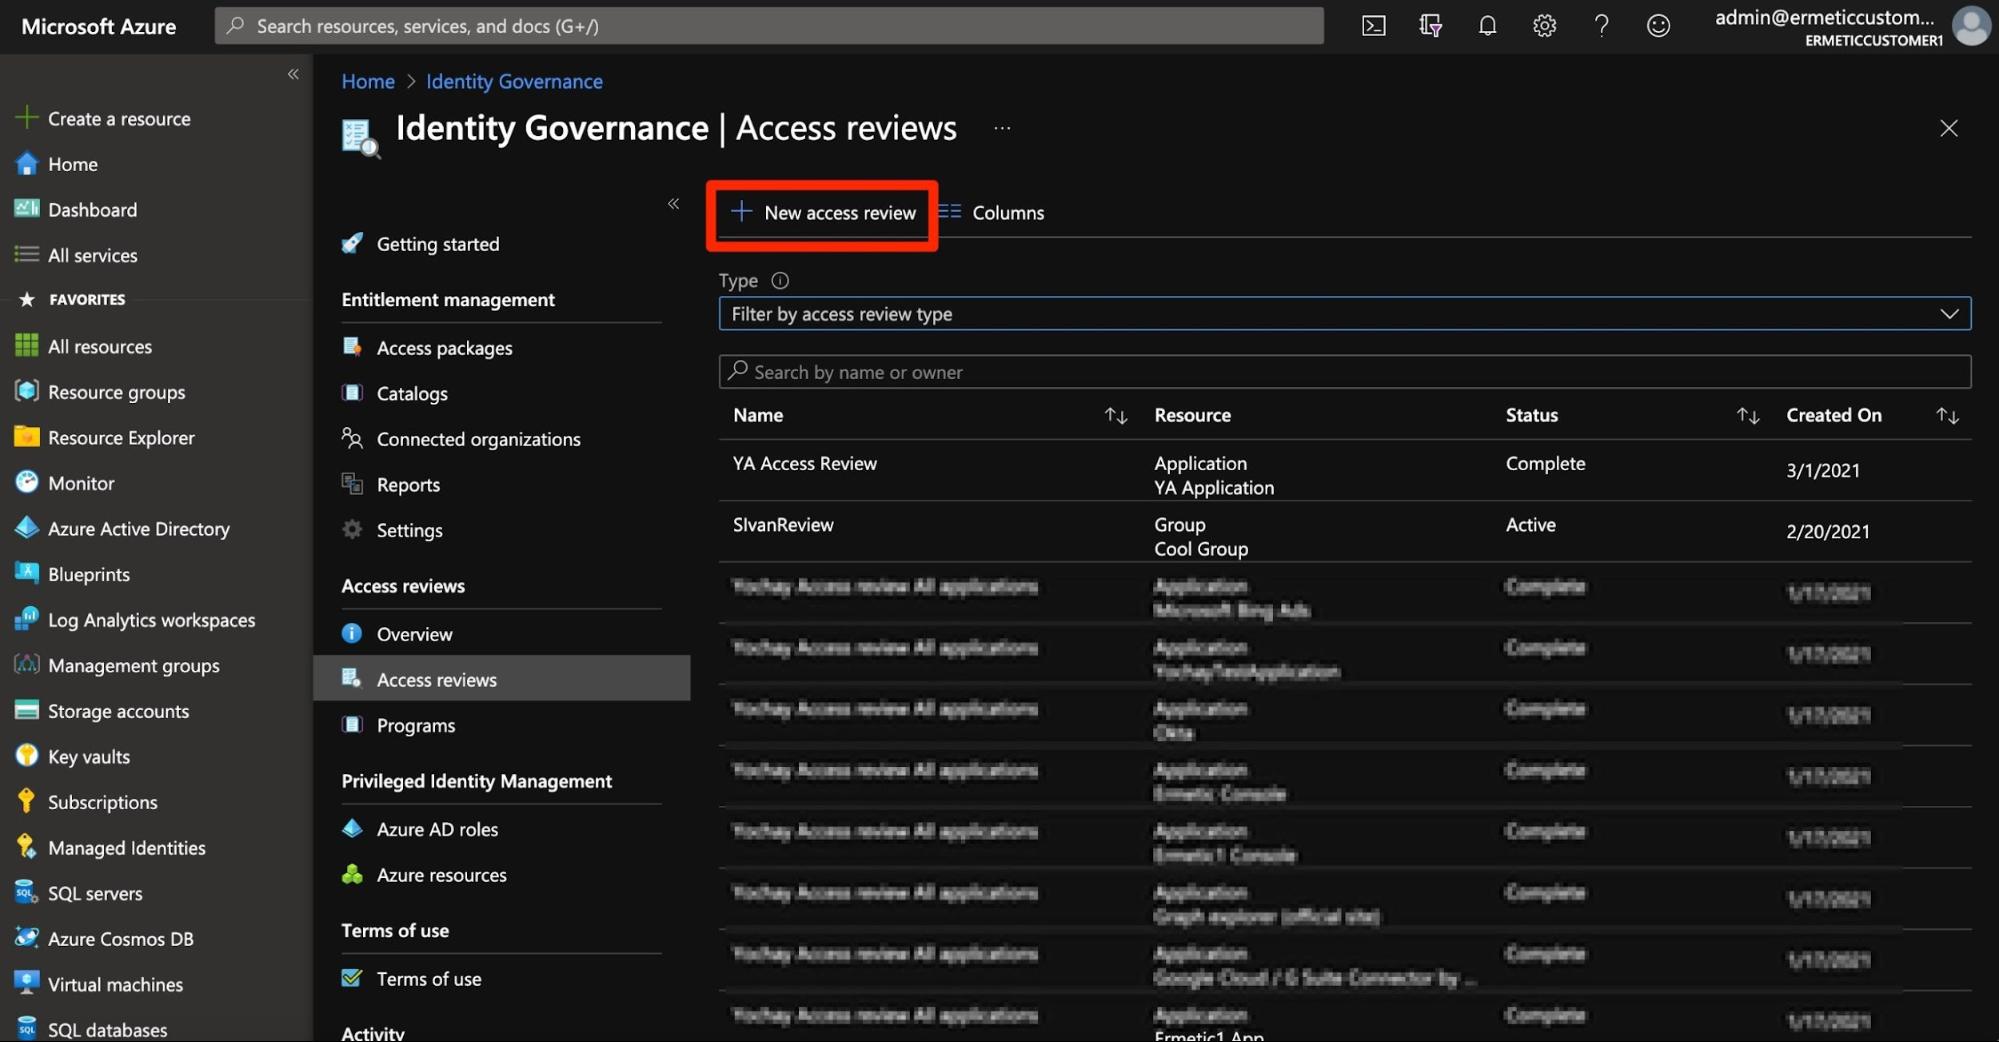
Figure 1 - Creating a new access review
You can then configure the access review to review the group you are interested in. Note that, as mentioned, you can also configure it to apply to an application; that is, instead of tracking users belonging to a group, you can track users granted access to an application.
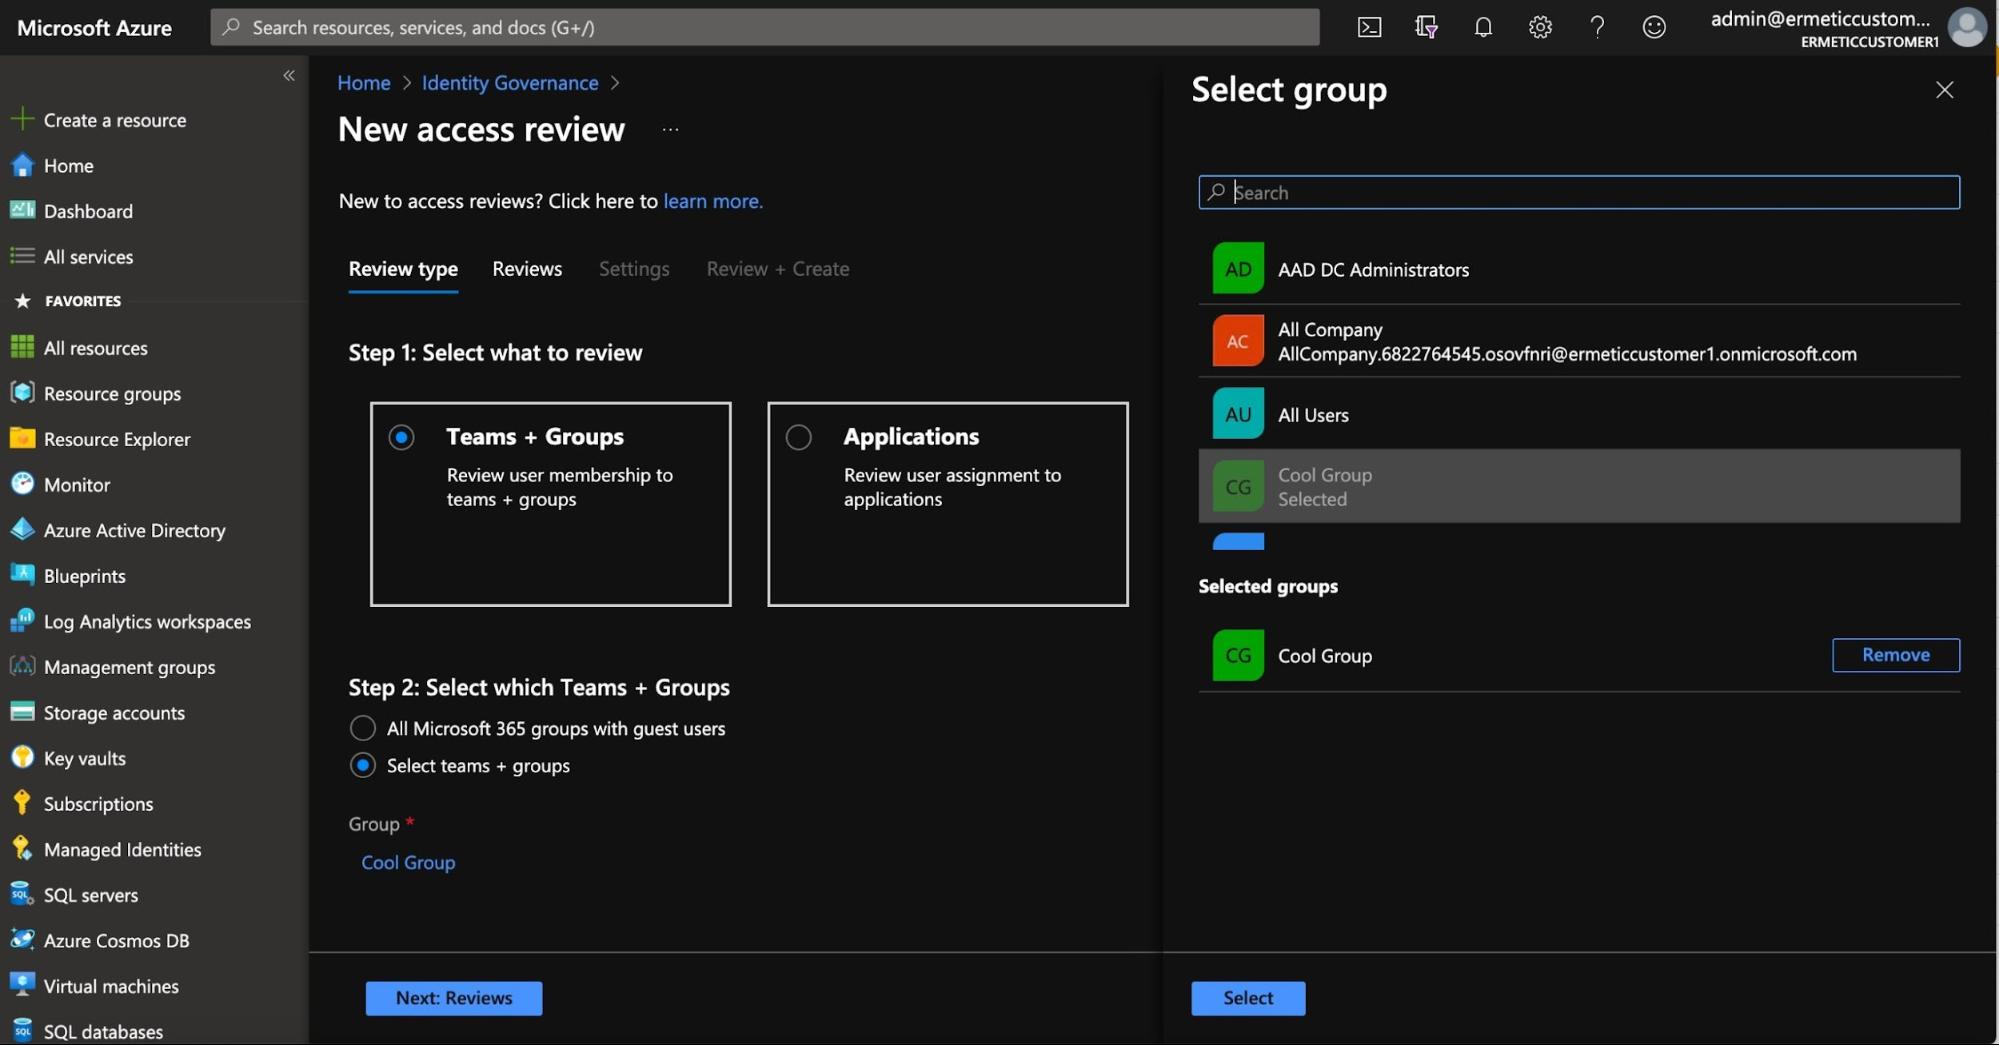
Figure 2 - Choosing the group the access review will apply to
You can then configure the access review settings, such as if it is to run one time or to recur. You can also set its “duration,” which specifies how long the results will be available for a response by reviewers.
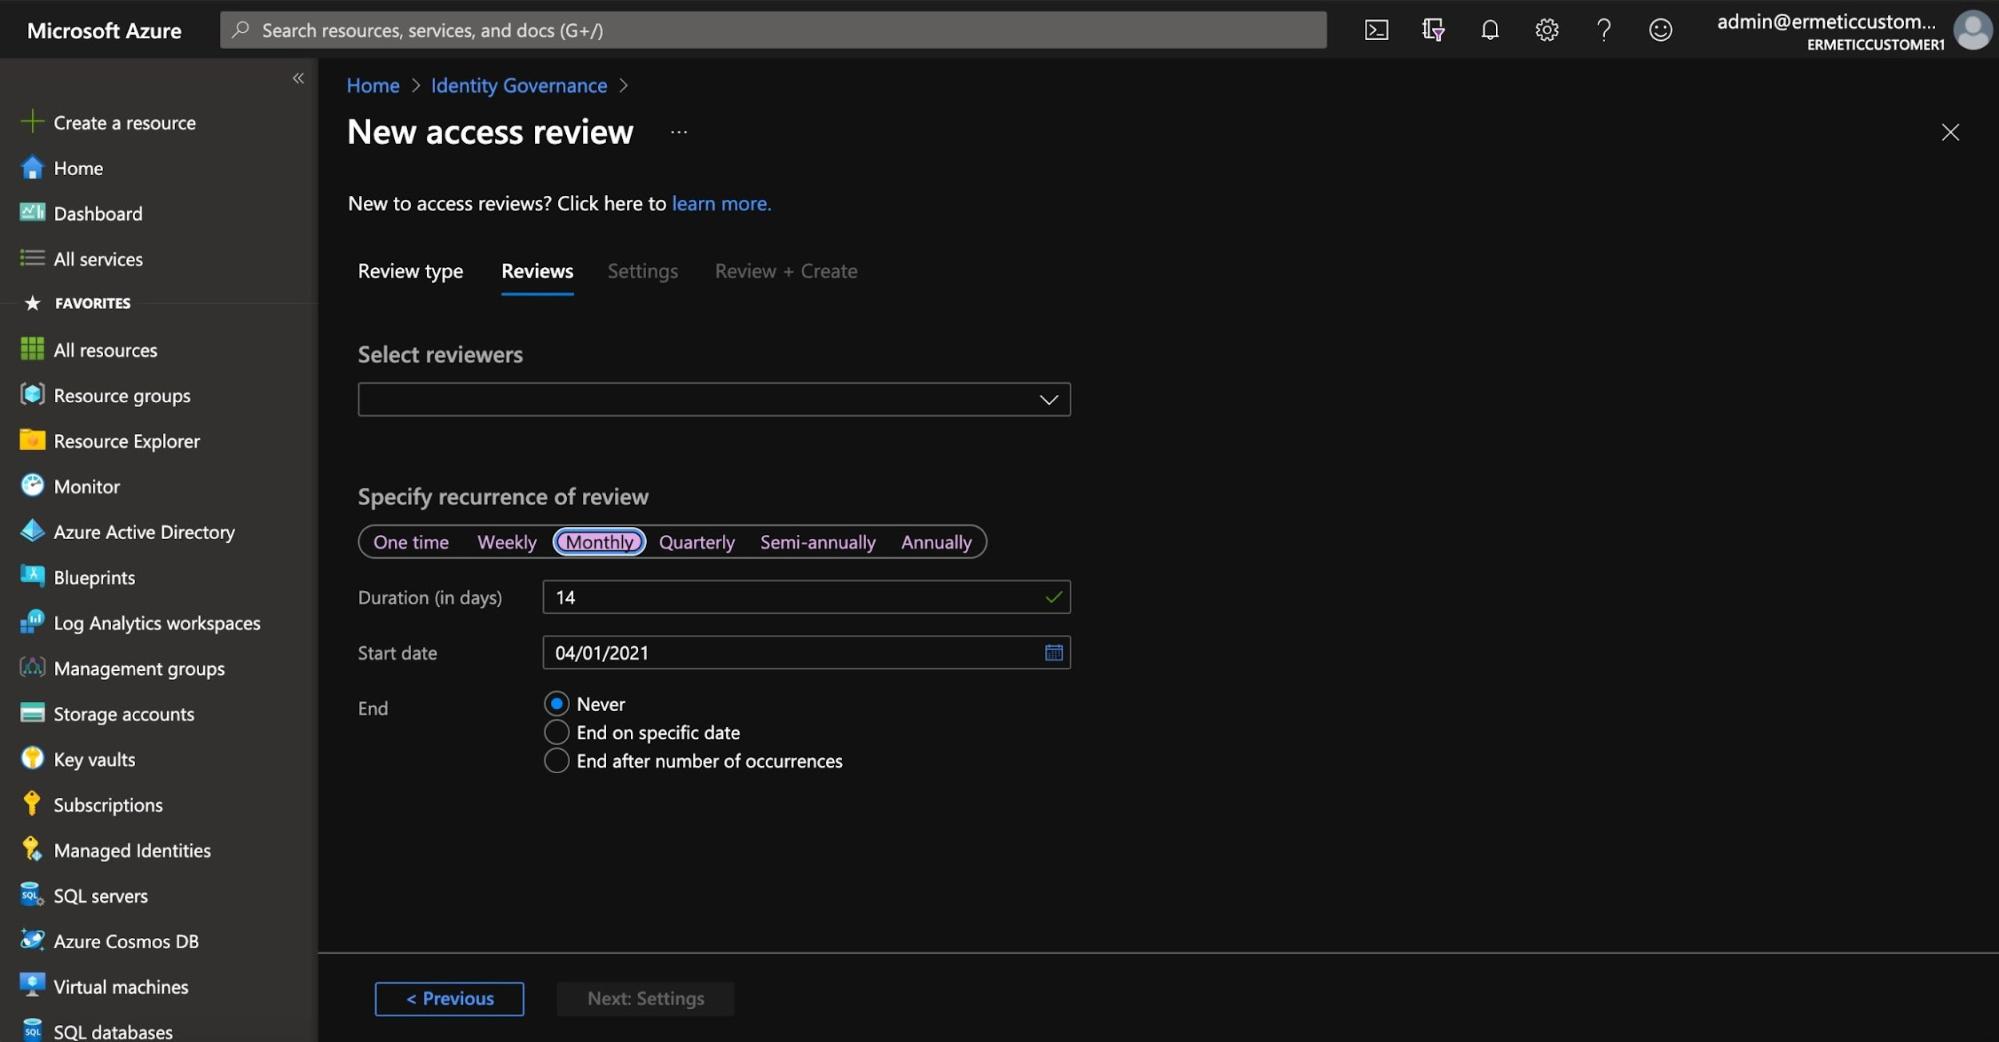
Figure 3 - Configuring the access review
One of the interesting features of access reviews is that the review process can be centralized or distributed. The reviewers can be dedicated users or groups (say, analysts from the security team or a person in charge of IAM in the organization). Or, in the distributed paradigm, say in the case of reviewing group memberships, the reviewers can be the group owners or the manager of each user in the group - or even the users themselves.
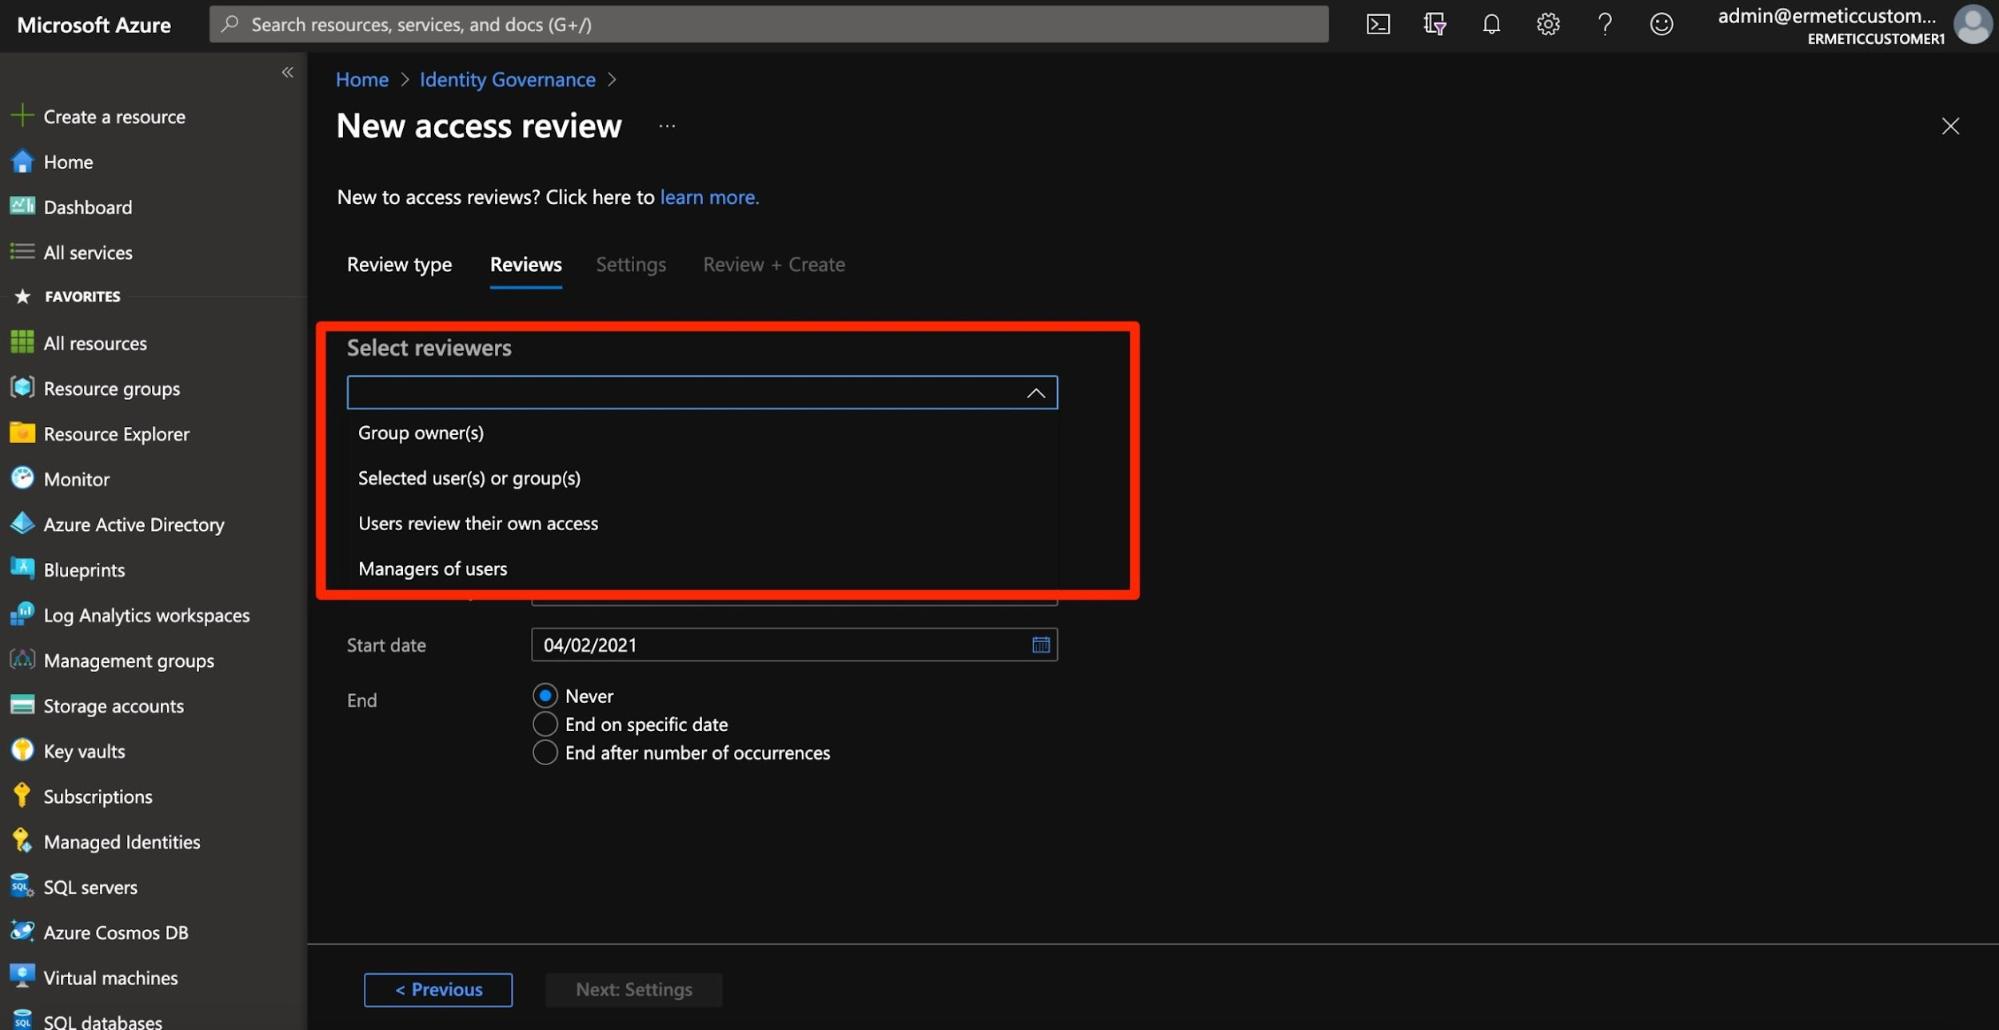
Figure 4 - Choosing reviewers for the access review
Access reviews can also be created for Azure AD roles (which we will discuss later when we talk about the PIM mechanism) and for roles on Azure resources (granted via RBAC).
Once the review is active, users can perform the review and approve or deny the user’s membership in the group, access to the application, and more, based on the recommendation provided by the review.
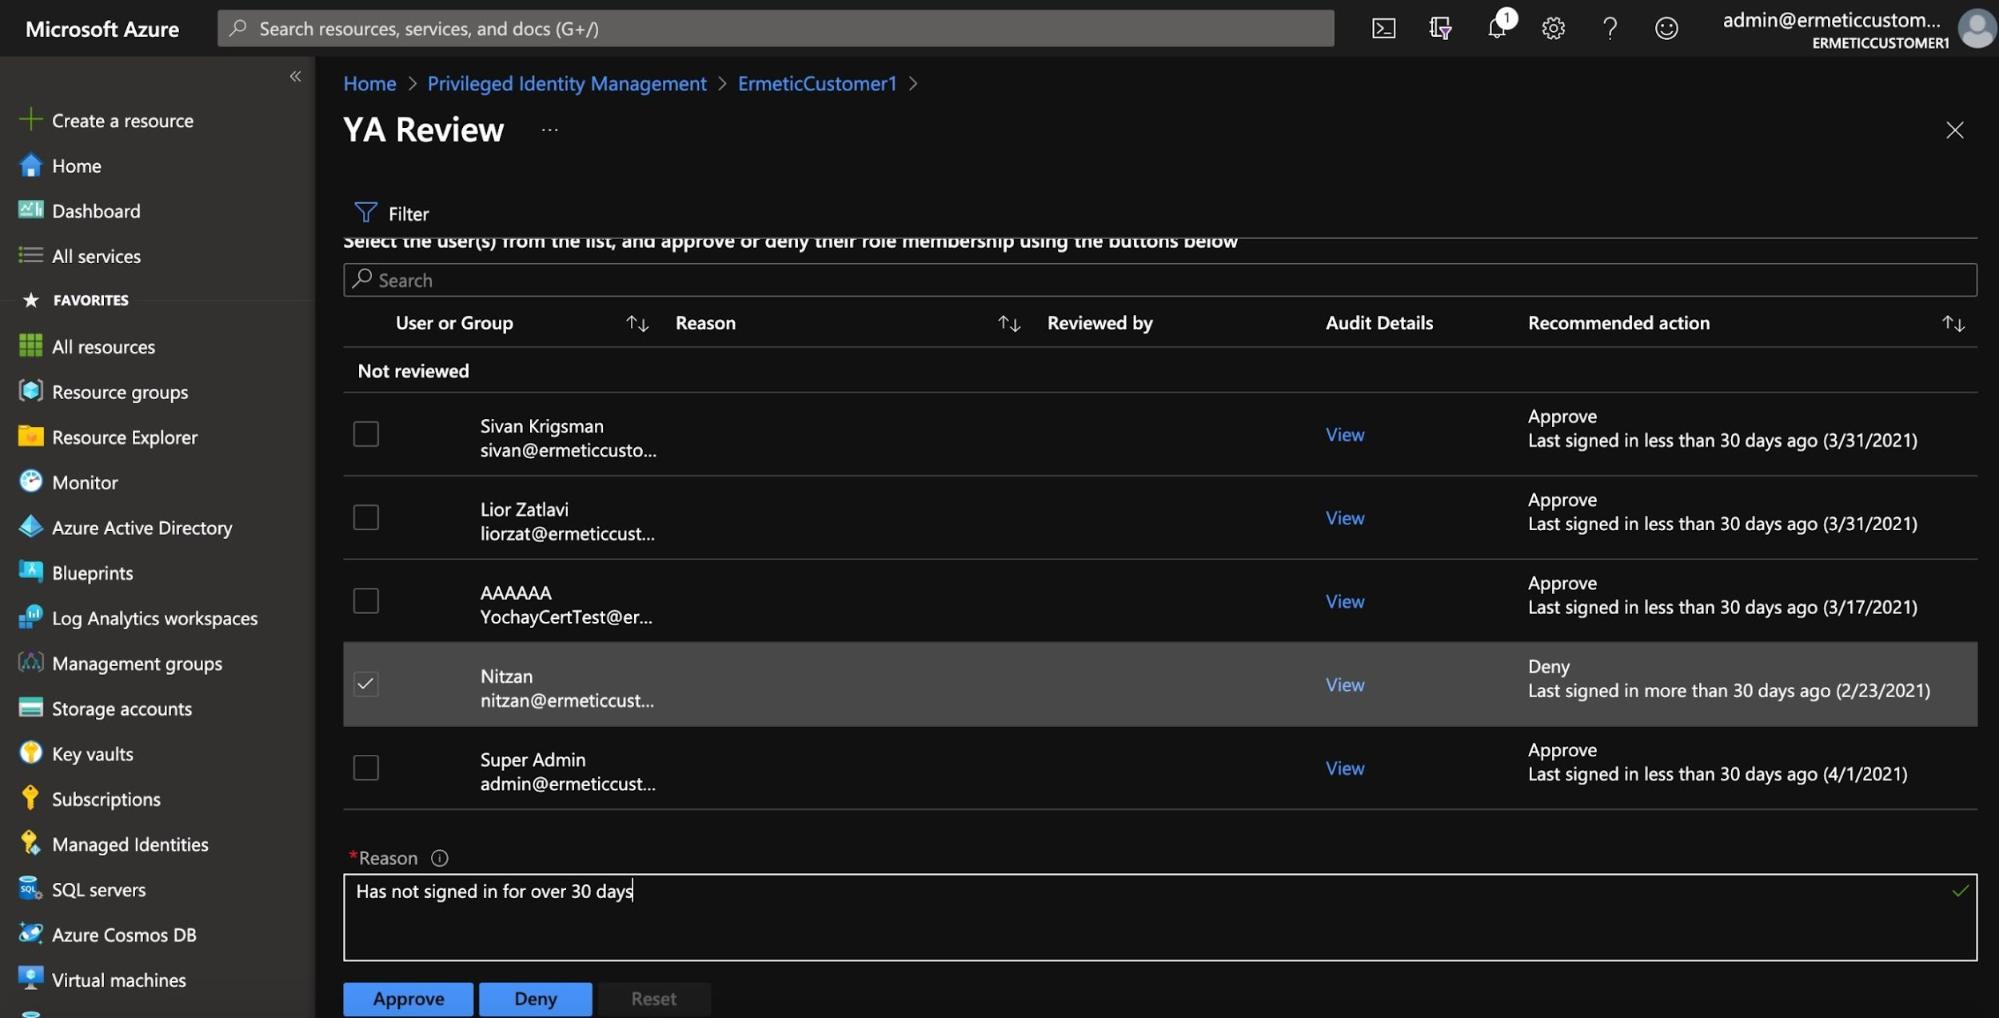
Figure 5 - Responding to access review recommendations
The review can also be configured so that changes are applied automatically once the duration of the review is complete or specifically if reviewers have not responded.
While the test criteria for making the recommendation - not signing in for 30 days - is a bit naïve (we’ll address this later), the practice of automatically and systematically reviewing the access necessity of users to resources in these contexts is extremely important.
Entitlement management
Another Azure mechanism that helps in managing the access granted users to resources is entitlement management. As its name implies, this tool offers a more structured manner for providing users with entitlements to resources. If you recall from our ”Deconstructing RBAC in Azure” post, a role assignment is the combination of a security principal that is granted access to resources along with a certain role (which is a set of permissions). Azure entitlement management allows for the creation of “access packages,” which are a set of combinations of roles and resources to which specific access permissions will apply. Assigning a user to an access package is similar to creating role assignments for that user for all the roles and resources to which they apply.
Here’s how it works. First, you need to create a “catalog.” A catalog is a collection of resources from which access packages can be created.

Figure 6 - Creating a new catalog for entitlement management
After creating the catalog, you need to add resources to it. Currently you can add groups and teams, applications and SharePoint sites.
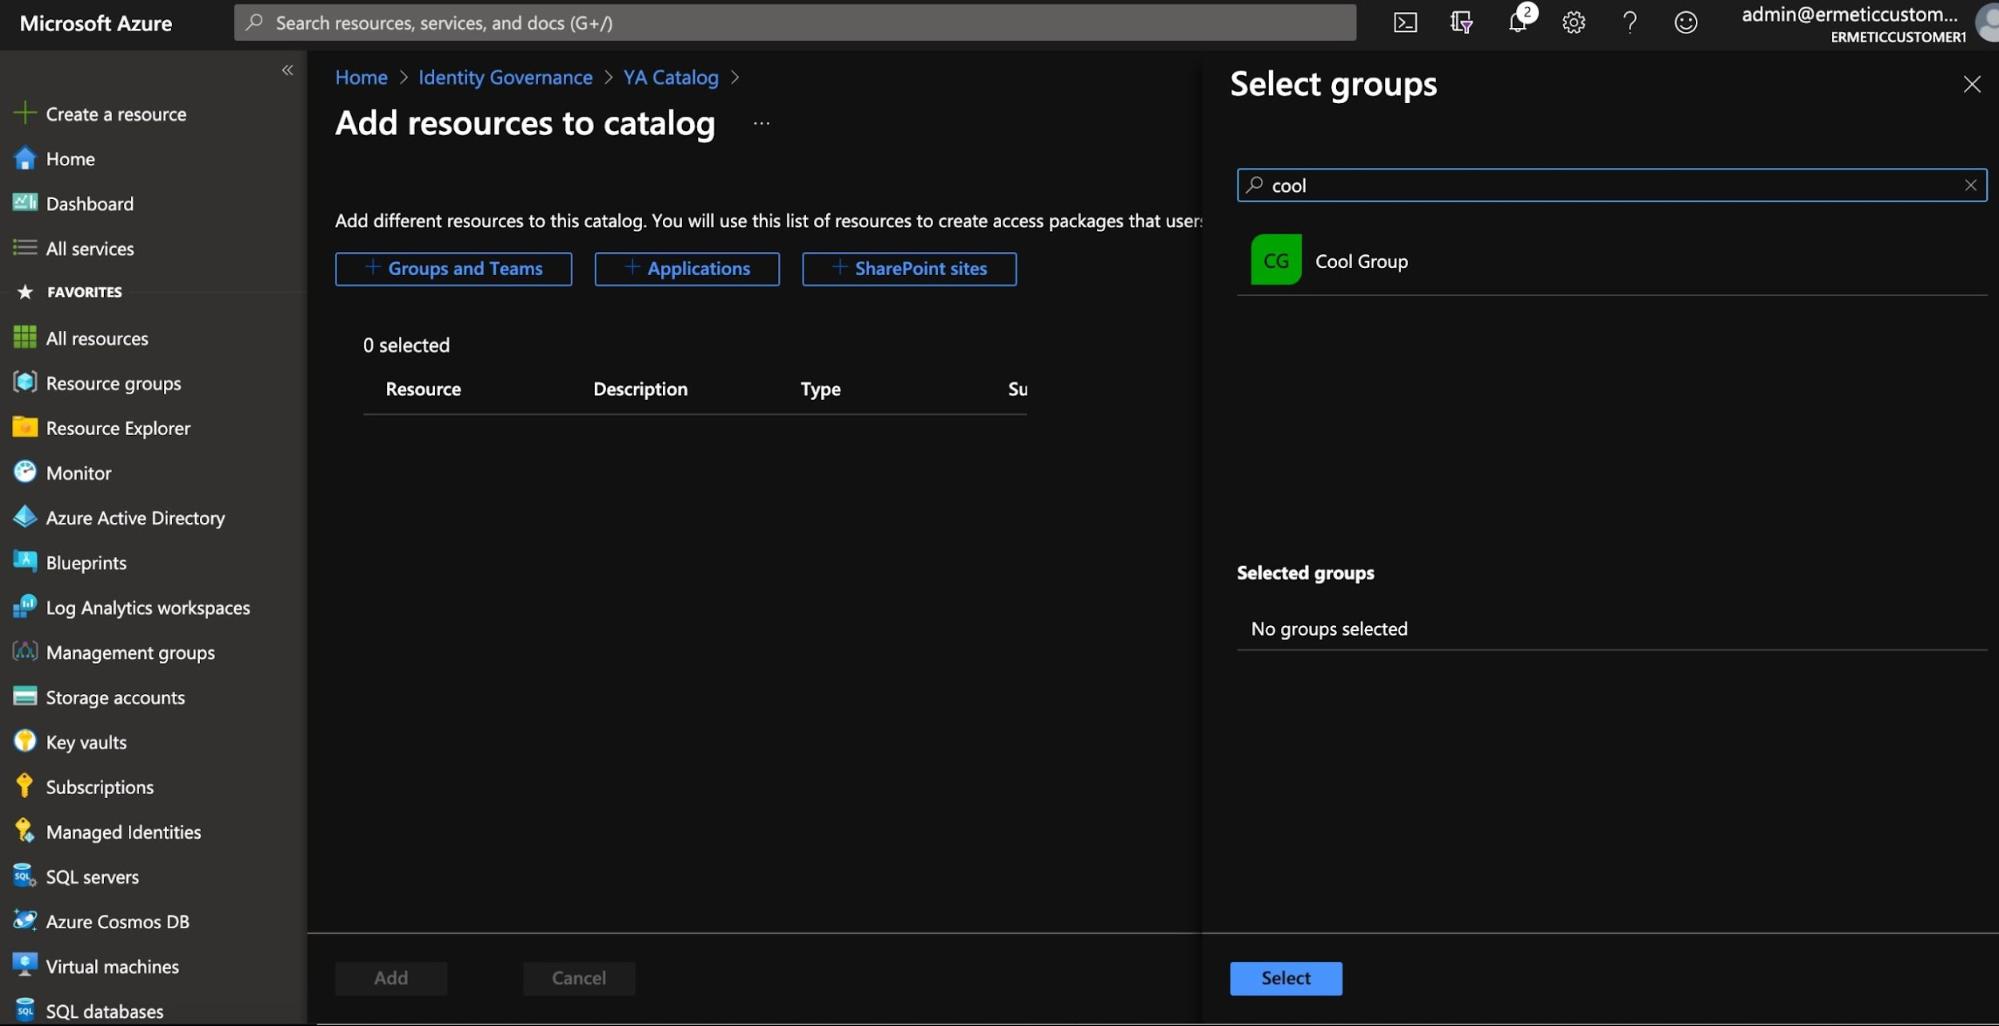
Figure 7 - Adding resources to a catalog
You then need to create an access package which will contain the resources used for an assignment and their corresponding roles (or “resource roles,” as we will soon see). When you create an access package, you also define the “initial policy” to be applied when assigning it, such as the amount of time the assignment will be active and whether or not it will be automatically audited using an access review. You also determine if users (from your directory or connected directories) can request access to the access package and even allow the requests to be confirmed automatically without approval.
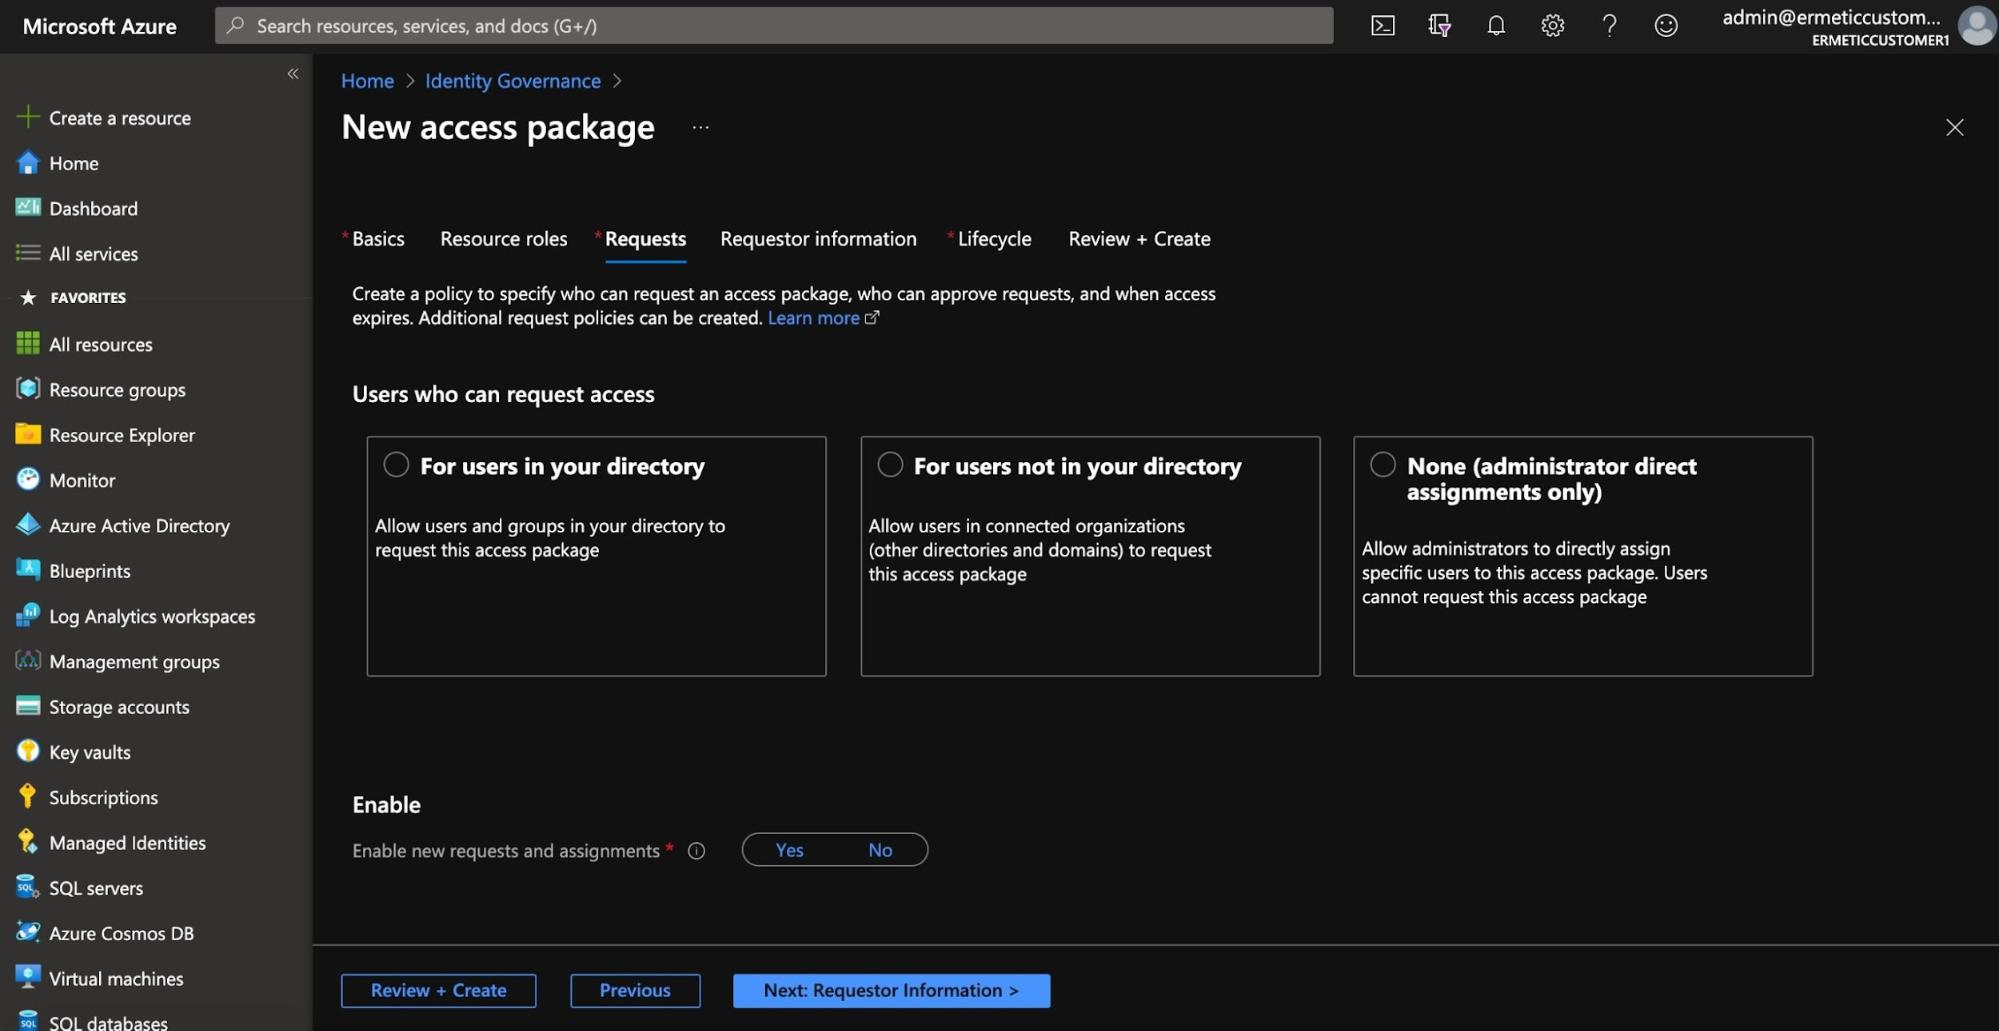
Figure 8 - Configuring request settings when creating a new access package
You need to add resources and select the roles that will populate the access package:
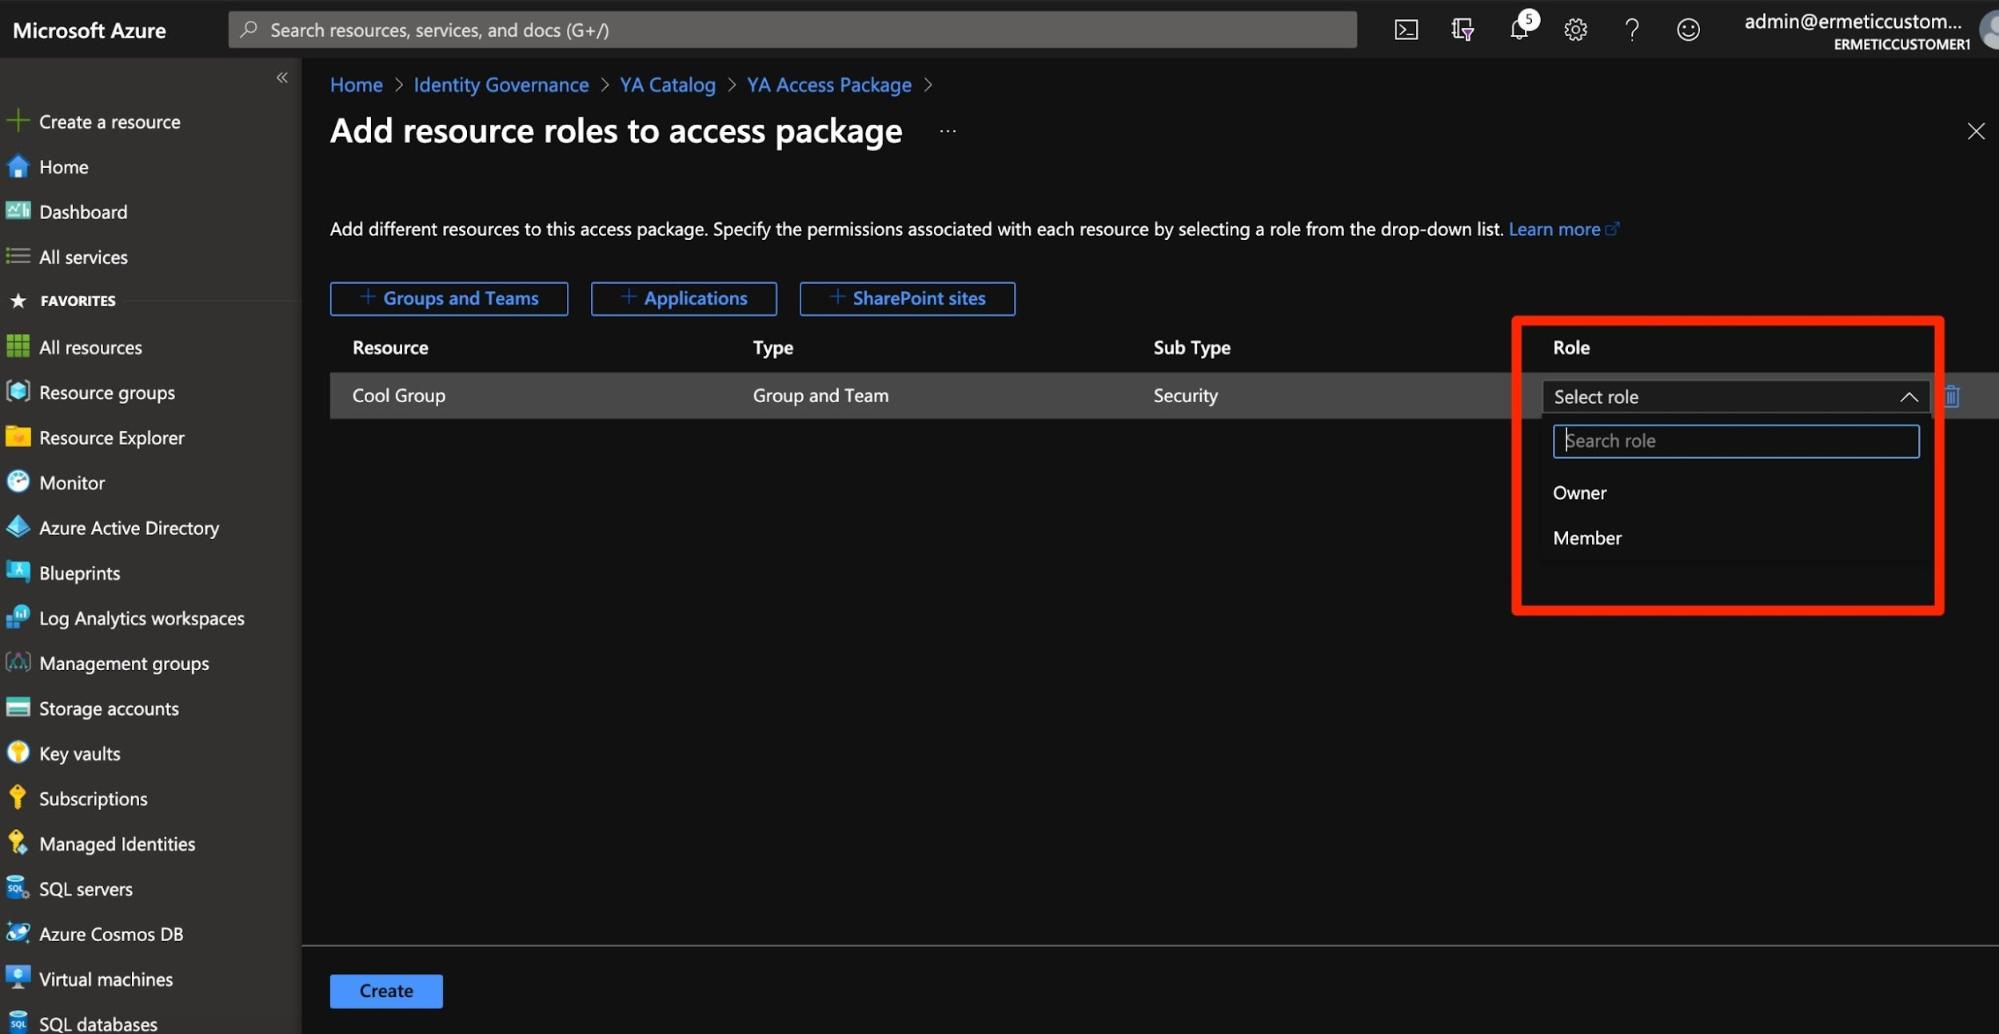
Figure 9 - Adding a resource role to a group inside an access package
For example, in Figure 9 we see a group included in an access package for which we can assign the owner or member role. By this point it should be pretty evident that what can be configured in an access package is rather limited - both by the types of resources that can be used and by the types of roles that can be applied.
Once created, an access package can be assigned to users or can be requested by users (if there’s a policy which allows it).
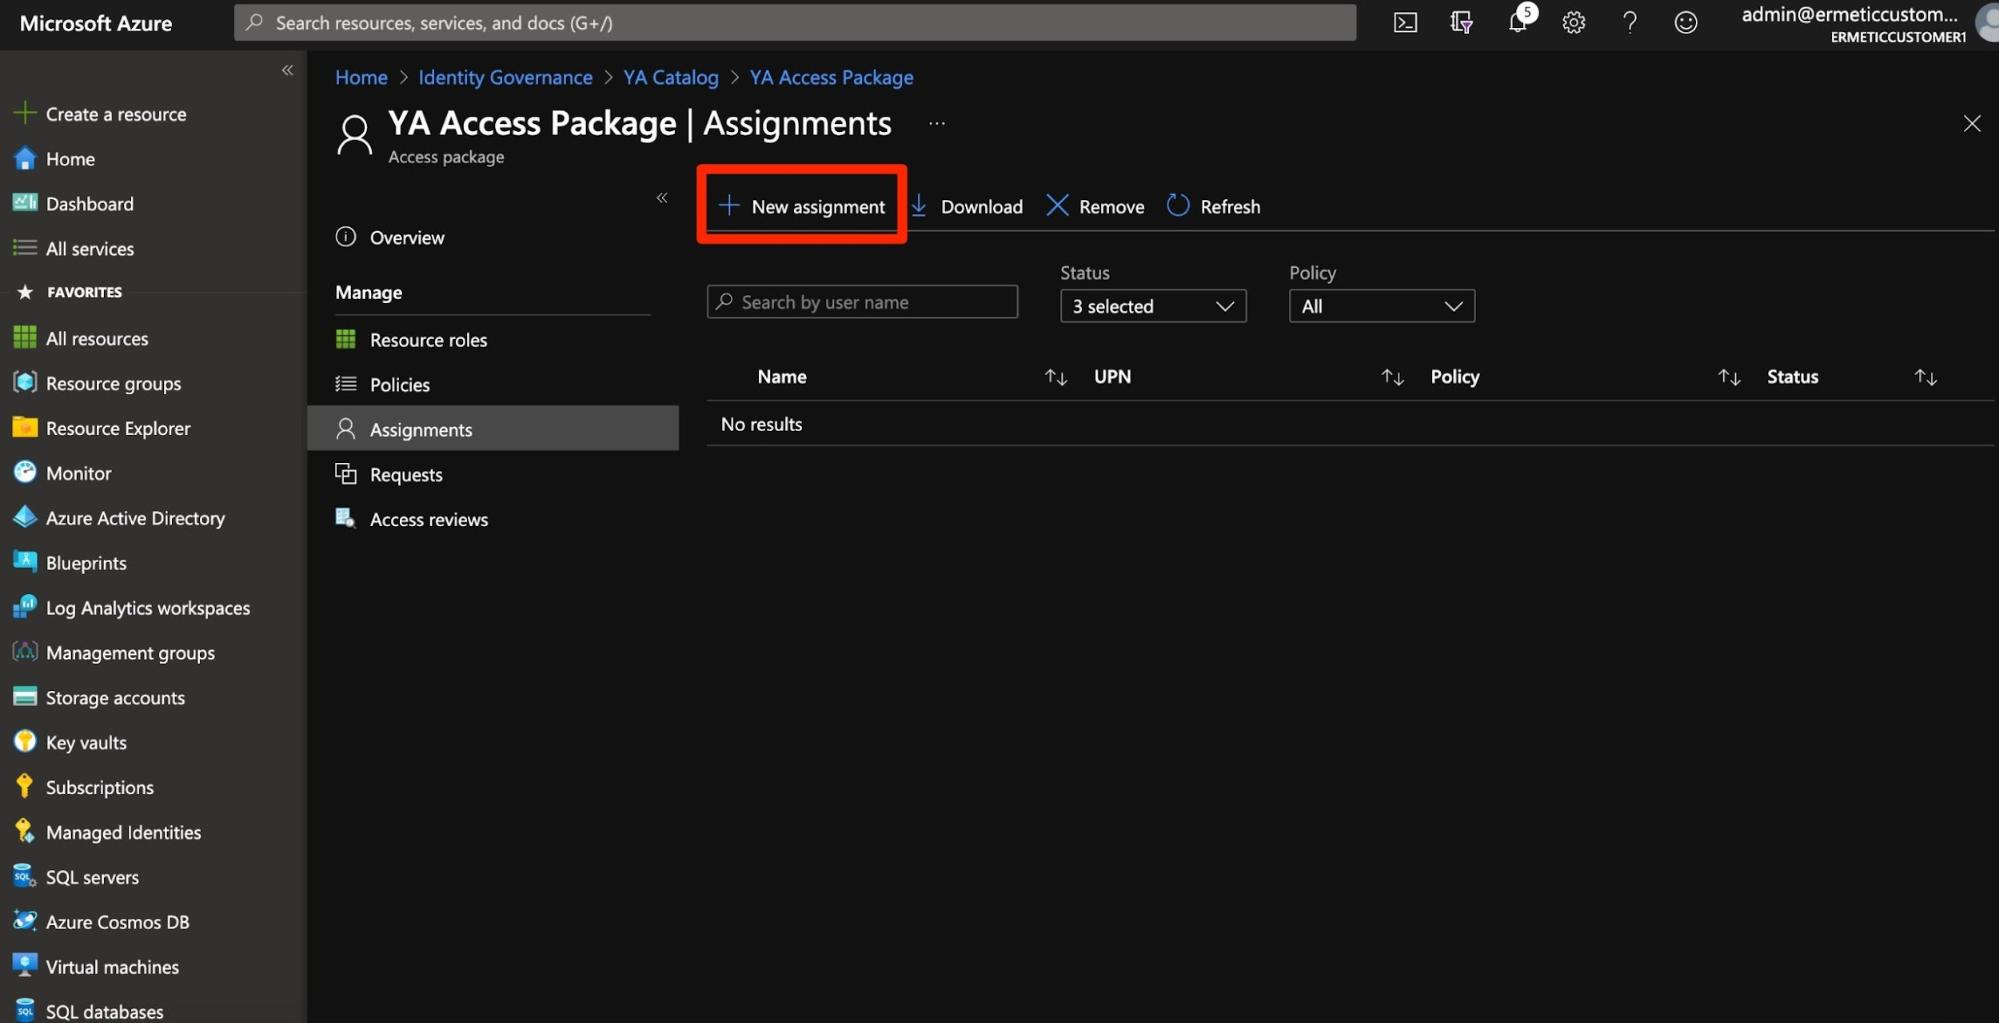
Figure 10 - Manually creating an assignment to an access package
Alternatively, if allowed by the policy, users can request access to a package. For this, they first need to access the package using the access portal link.
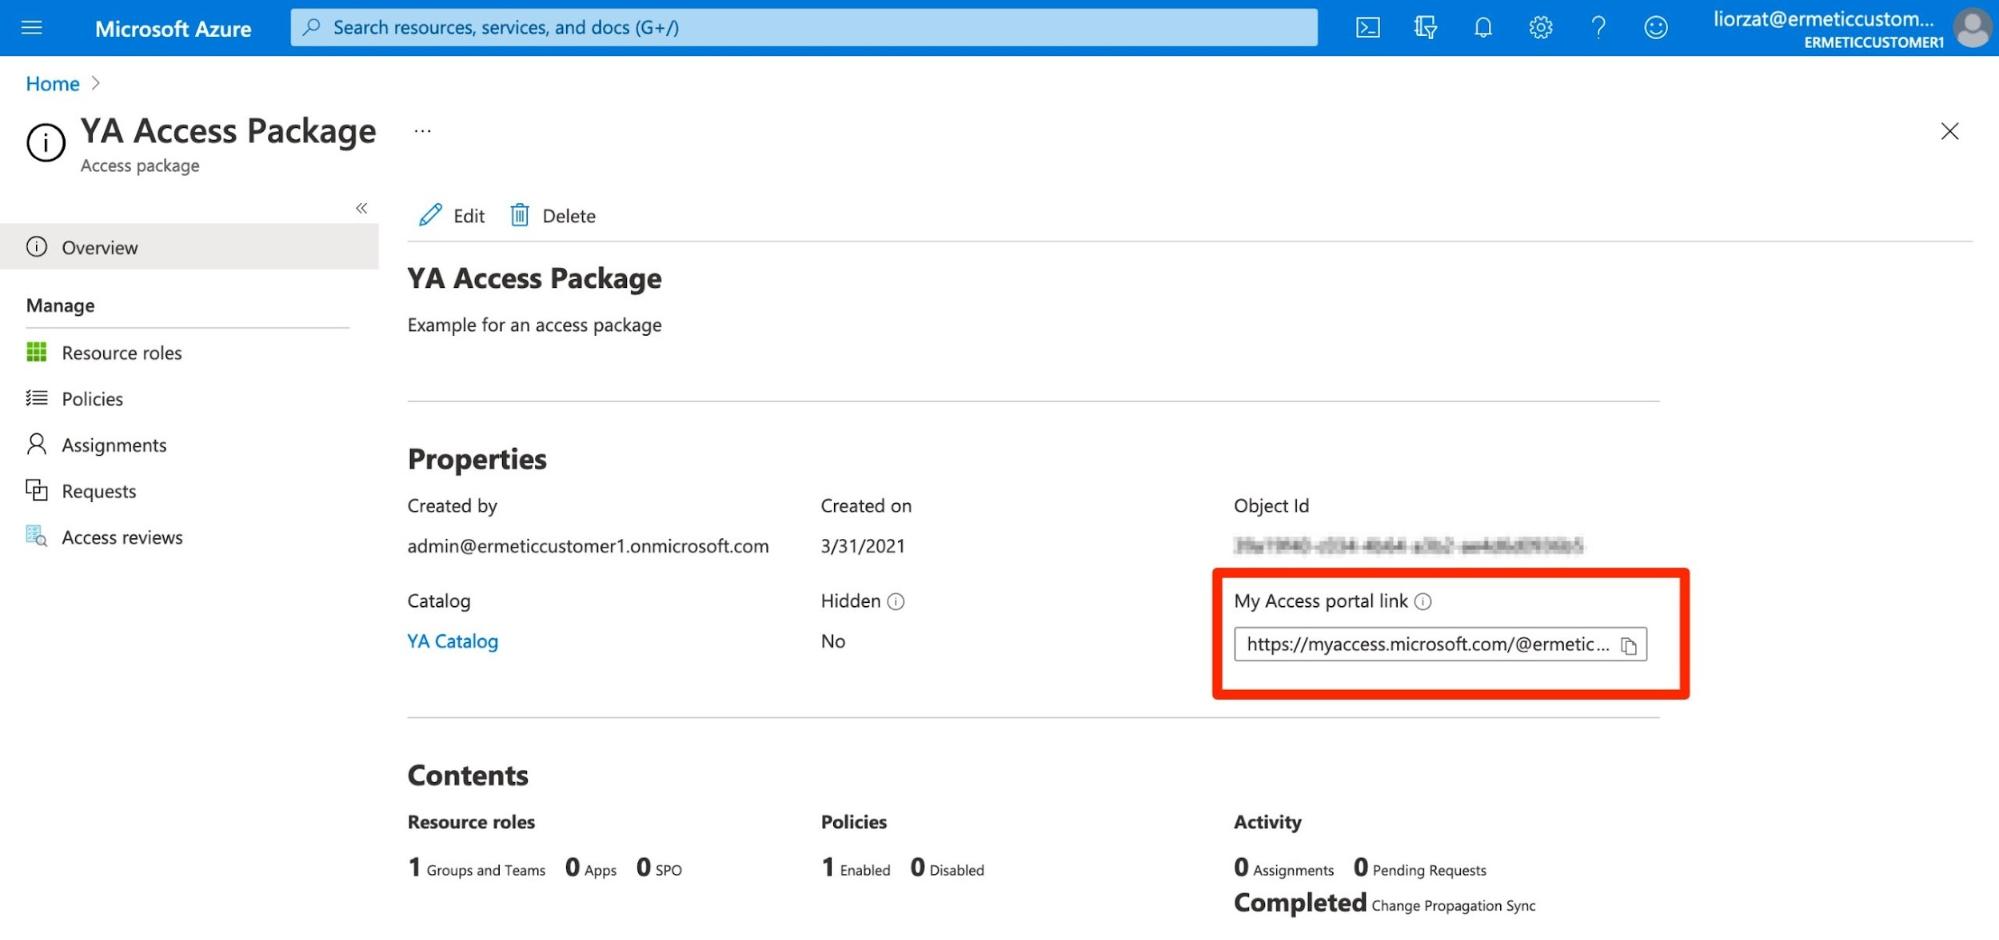
Figure 11 - Access portal link for a package
They can then fill out a request to be approved (if approval is required by the policy on the access package).
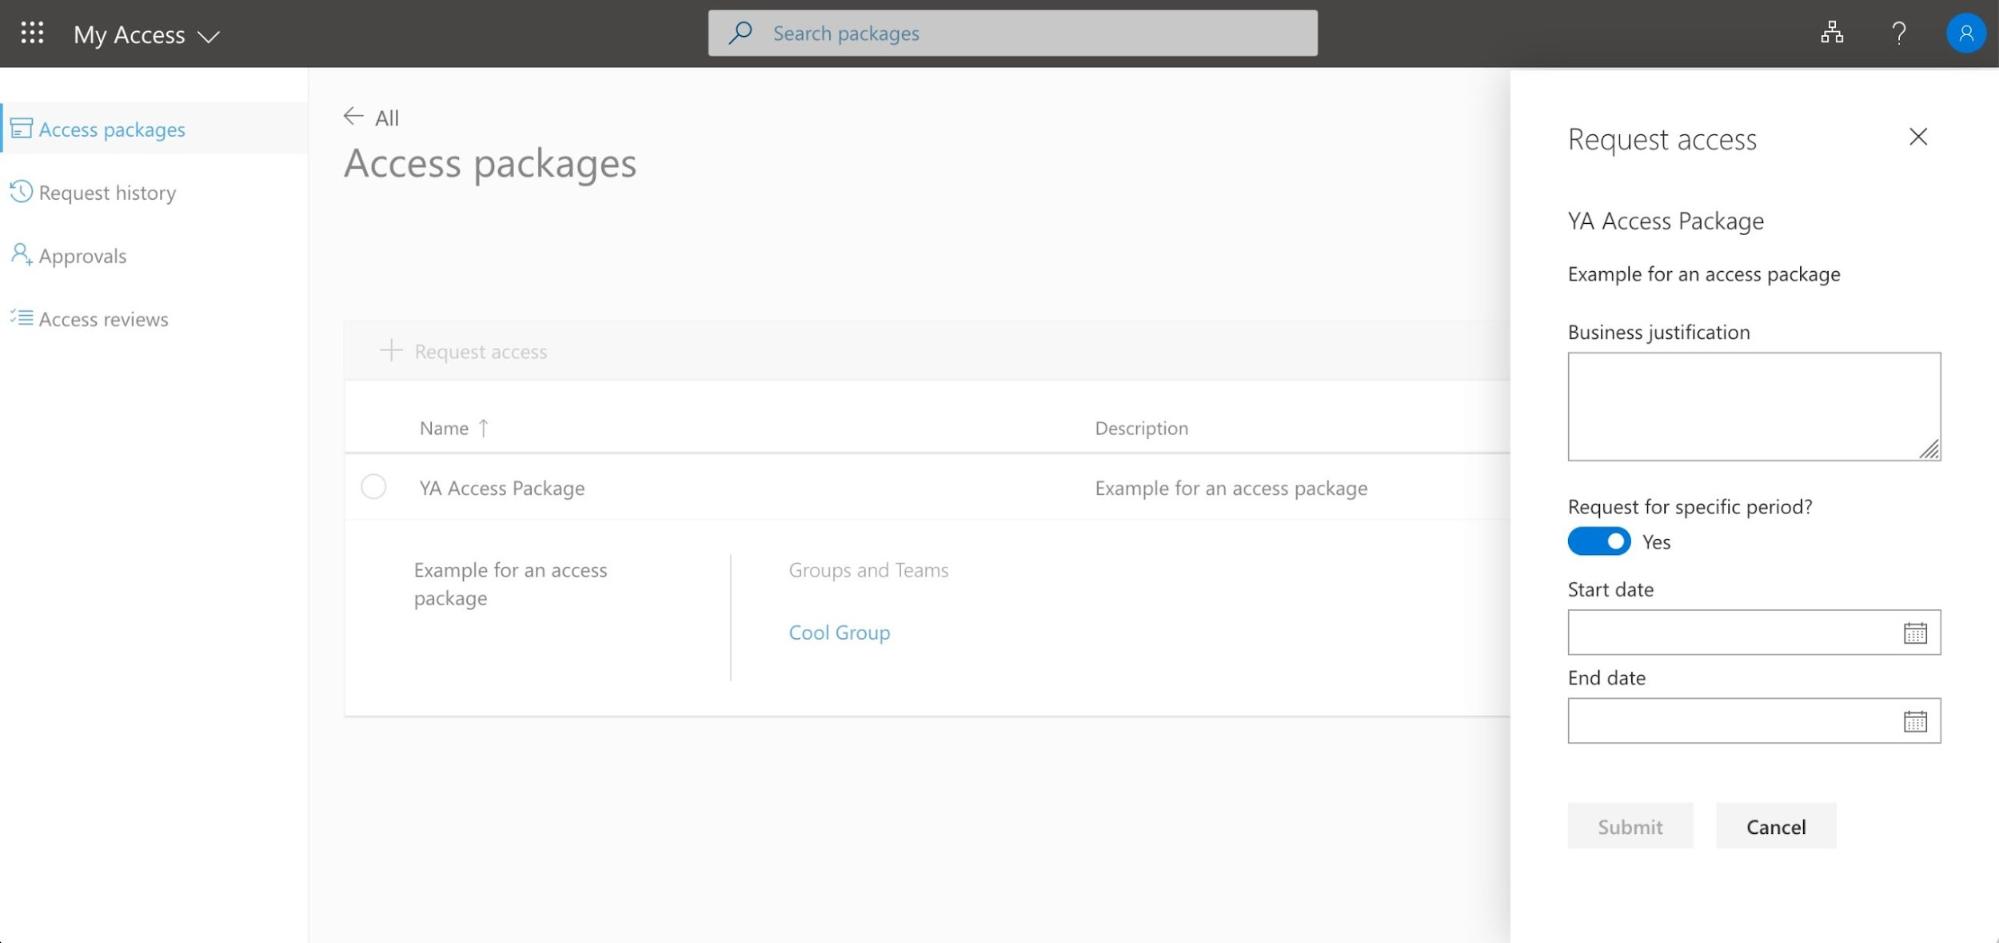
Figure 12 - Requesting access to an access package
Privilege Identity Management
Another important identity management tool that Azure offers is Privileged Identity Management (or PIM). Based on the understanding that some roles are very sensitive and should thus have special mechanisms for managing access to them, Azure PIM allows you to grant access based on the concept of eligibility - that is, defining that a user should theoretically be able to use a role but not necessarily have active access all the time. Users can have an assignment for which they’re eligible and activate it only when needed - and have on demand access for only a specific period of time. This distinction is very important as it allows the user to get the access needed but not have it active (i.e. creating exposure to breaches) all the time.
For example, let’s take a role such as application administrator. You can configure its settings so that its activation: requires MFA; must be approved and justified; is active for only a few hours once approved; and more. (see Figure 13).
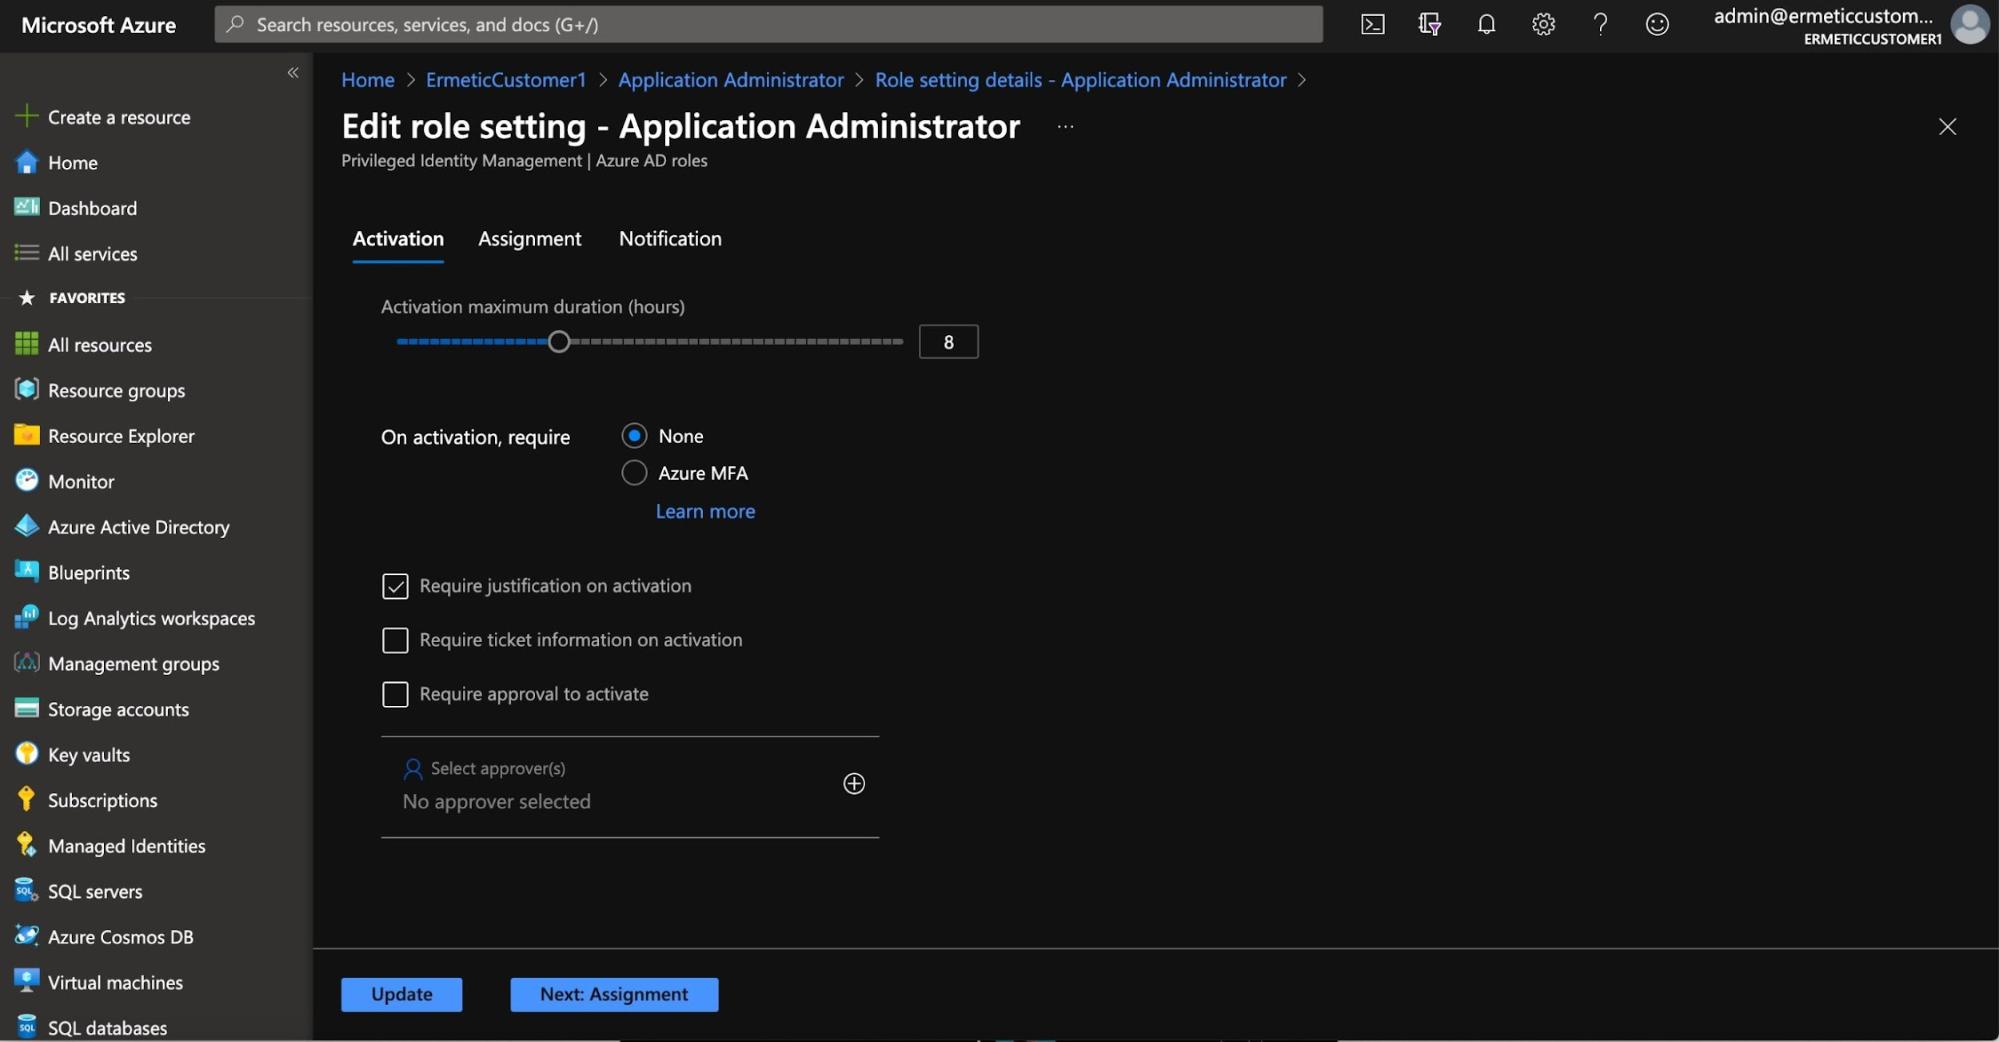
Figure 13 - Settings for a role in the Azure PIM tool
You can then assign the role to a user for a specific app by configuring the scope of the assignment (see Figure 14). In addition, you can specify that the role is eligible for the assignment for a certain period of time (see Figure 15). That is, even the eligibility won’t be permanent.
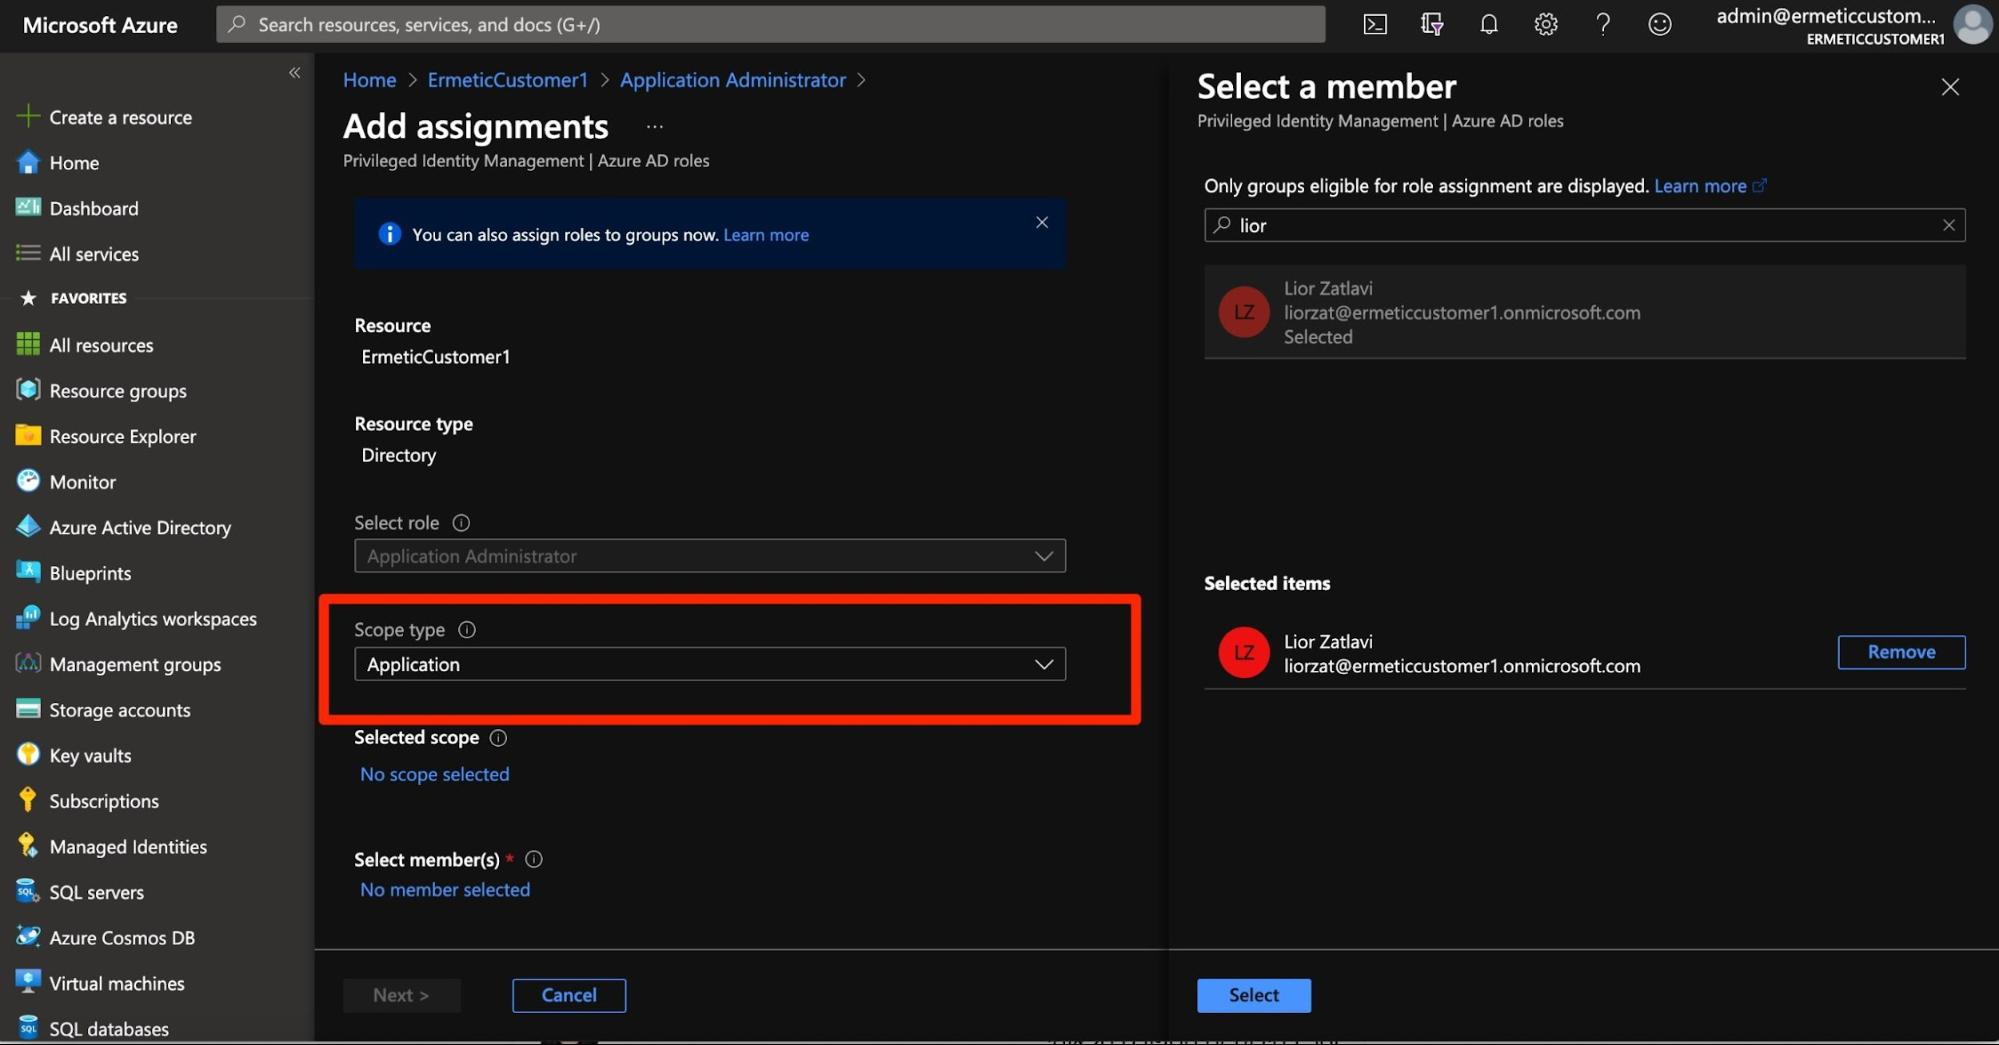
Figure 14 - Assigning a role (and configuring its scope) to a user
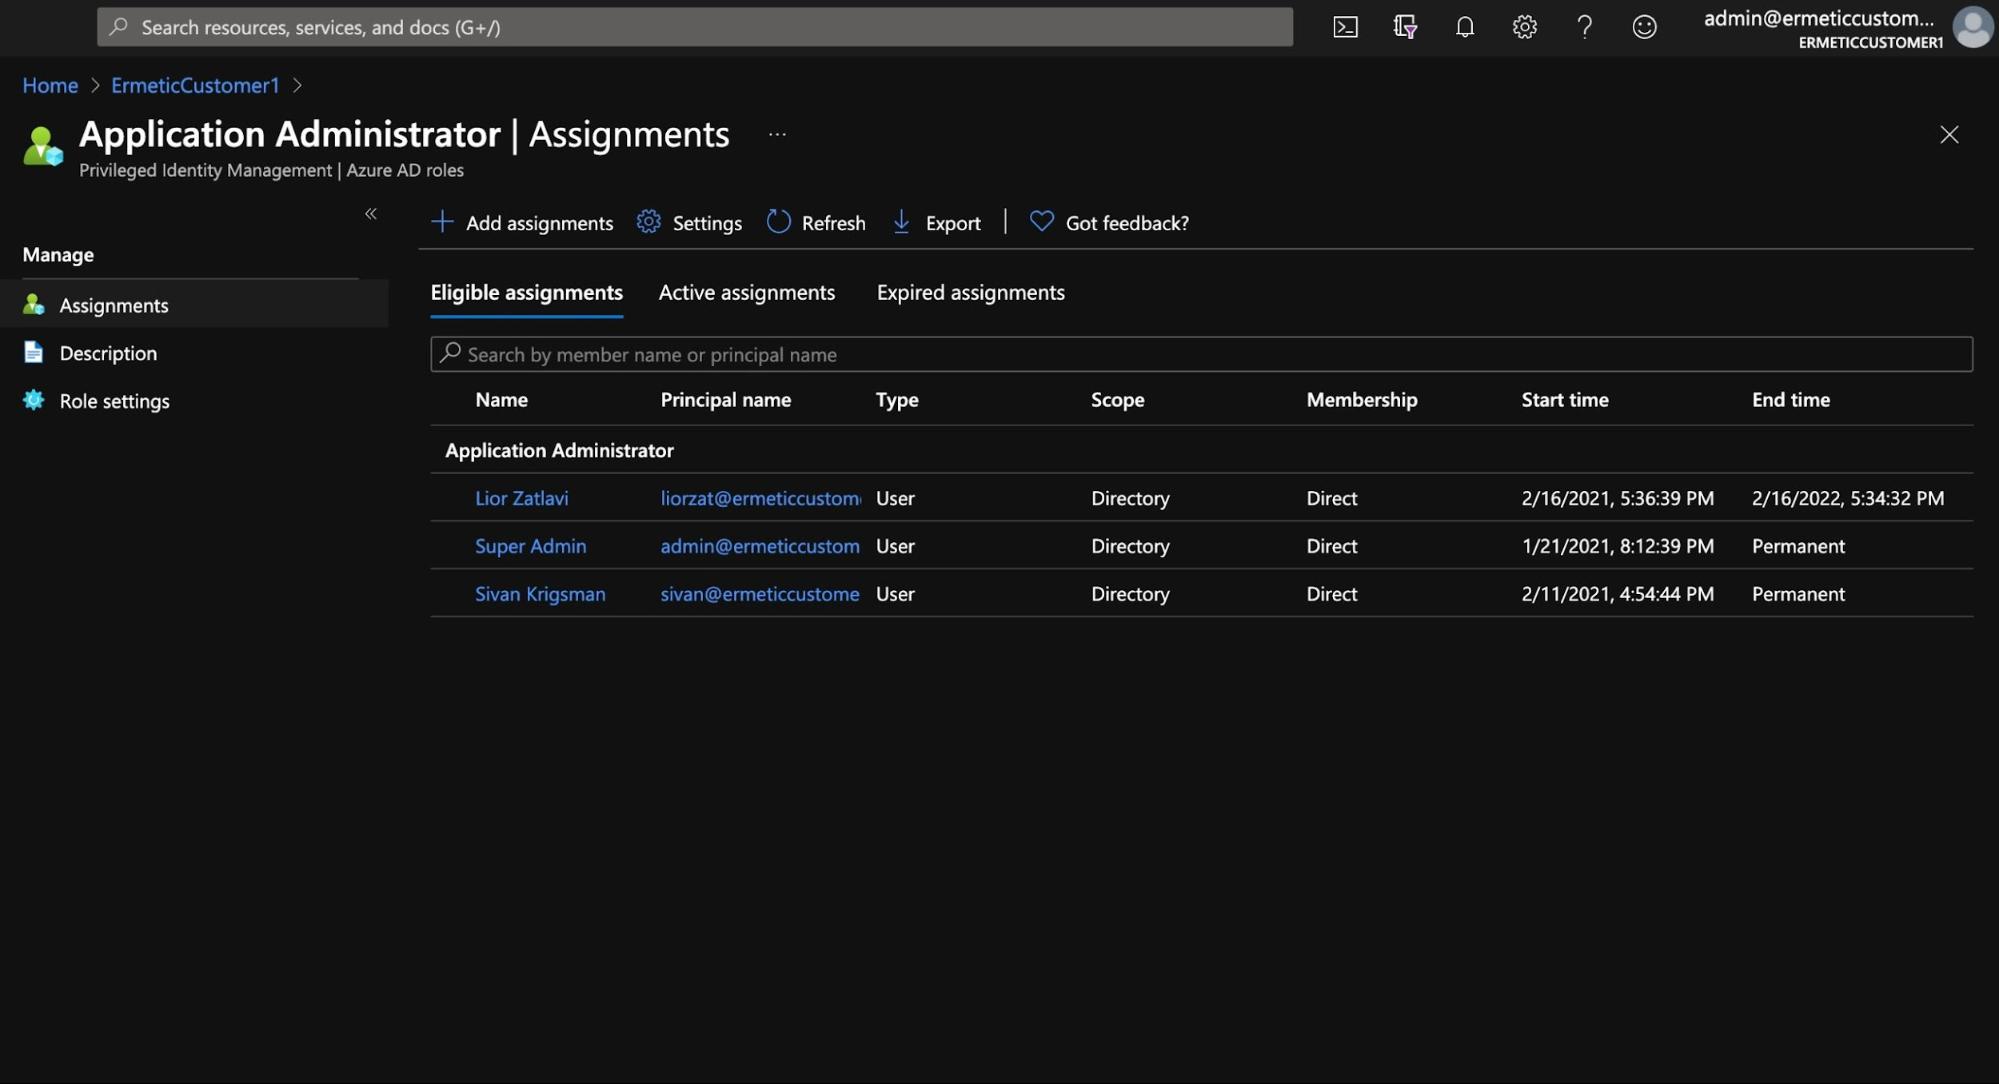
Figure 15 - Eligible assignments for a role. Note that the first row has an “End time” configured, as eligibility for that user is not permanent.
The user can request to activate the assignment, in which case the request needs to be approved by an approver (or, based on the role configuration, can be automatically approved).
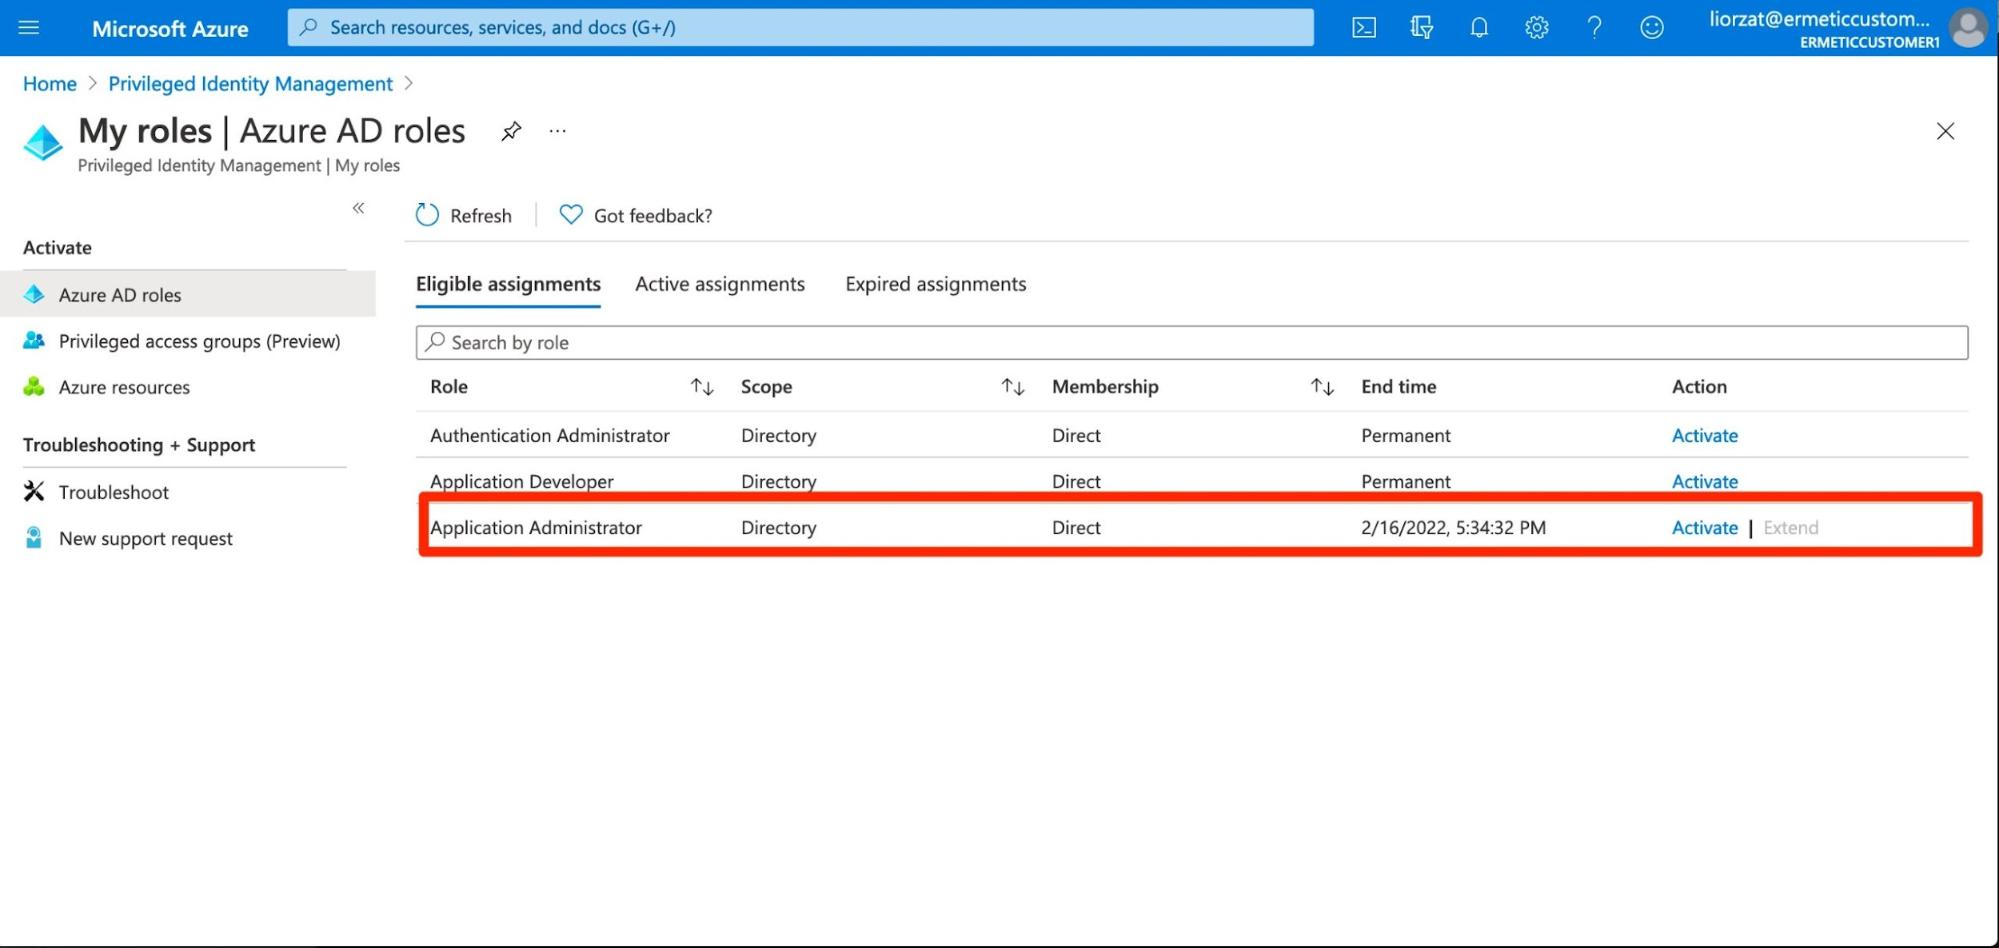
Figure 16 - User’s view of non permanent role eligibility and where the activation function is.
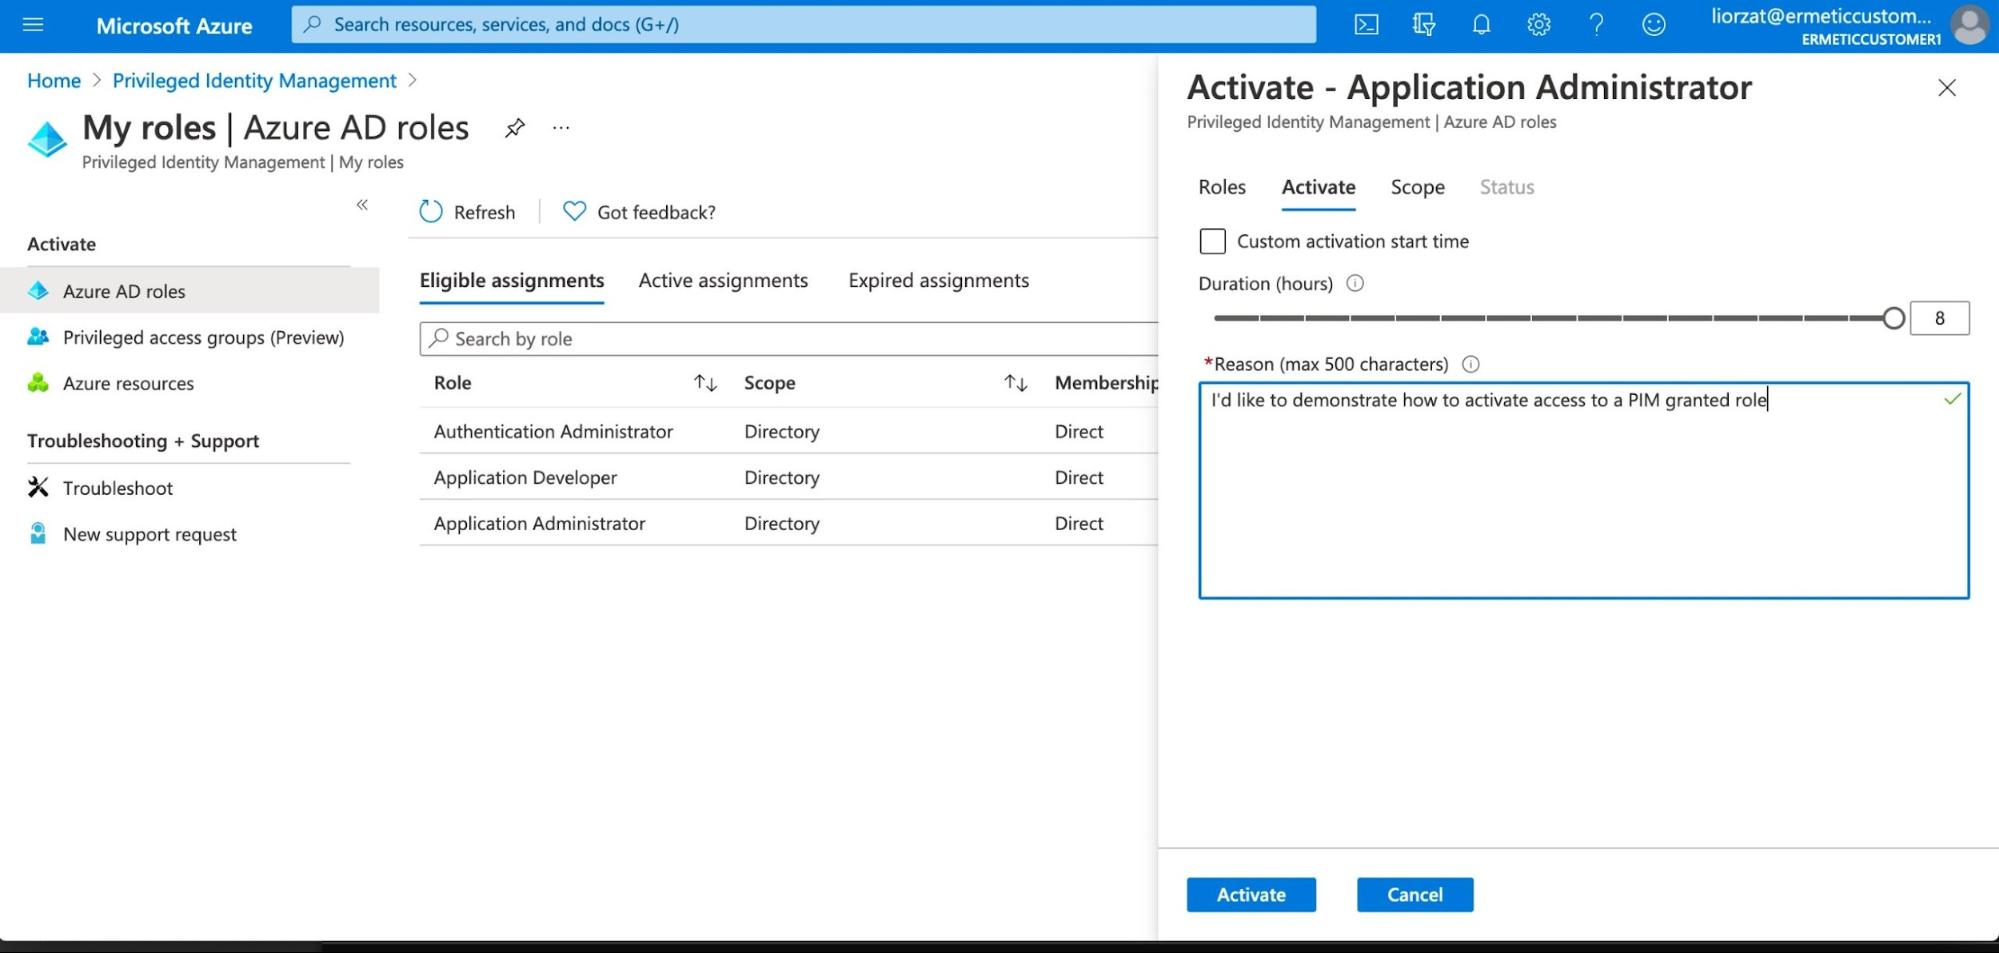
Figure 17 - Requesting activation of a role
Conditional Access
Another tool Azure offers for better controlling access is Azure AD Conditional Access. This tool allows for the creation of access policies to cloud apps and/or to perform actions such as register security information or register or join a device. As the name suggests, such policies are conditional, based on certain terms. A conditional access policy may grant or block access from a user and/or set certain configurations on a session (such as the frequency with which the user is required to sign in), based on certain conditions.
When creating a new conditional access policy, the first thing you should configure is who the policy applies to. It is recommended that you apply such policies to a limited set of users, at least at first - especially when it’s a blocking policy - as you don’t want to lock yourself out of your account. The policy can apply to all users, selected users/groups or users with a selected directory role. Using conditional access policies for selected roles can be very useful for organizations that want to set a more restrictive policy on users who have certain sensitive roles.
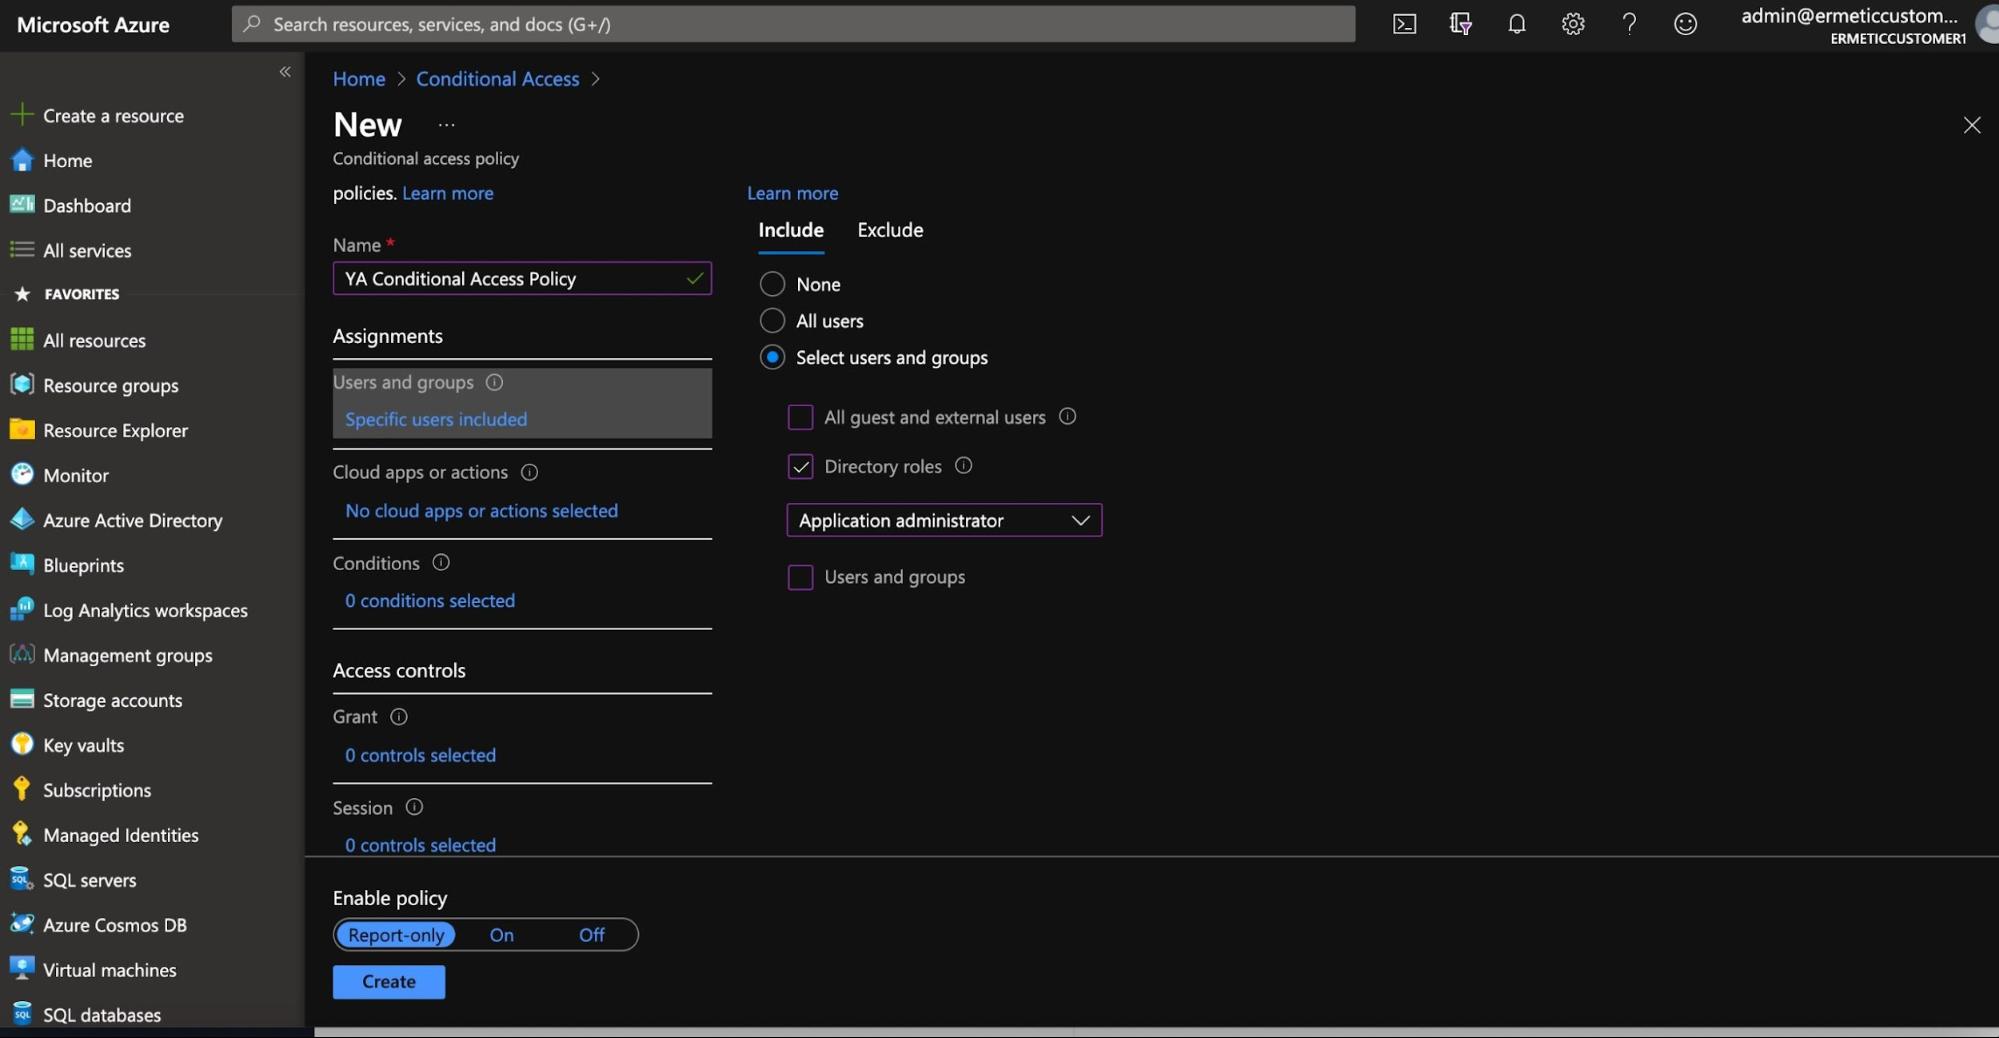
Figure 18 - Selecting to which users or groups the conditional access policy will apply
Next, you need to select for which cloud apps or actions the policy is relevant.
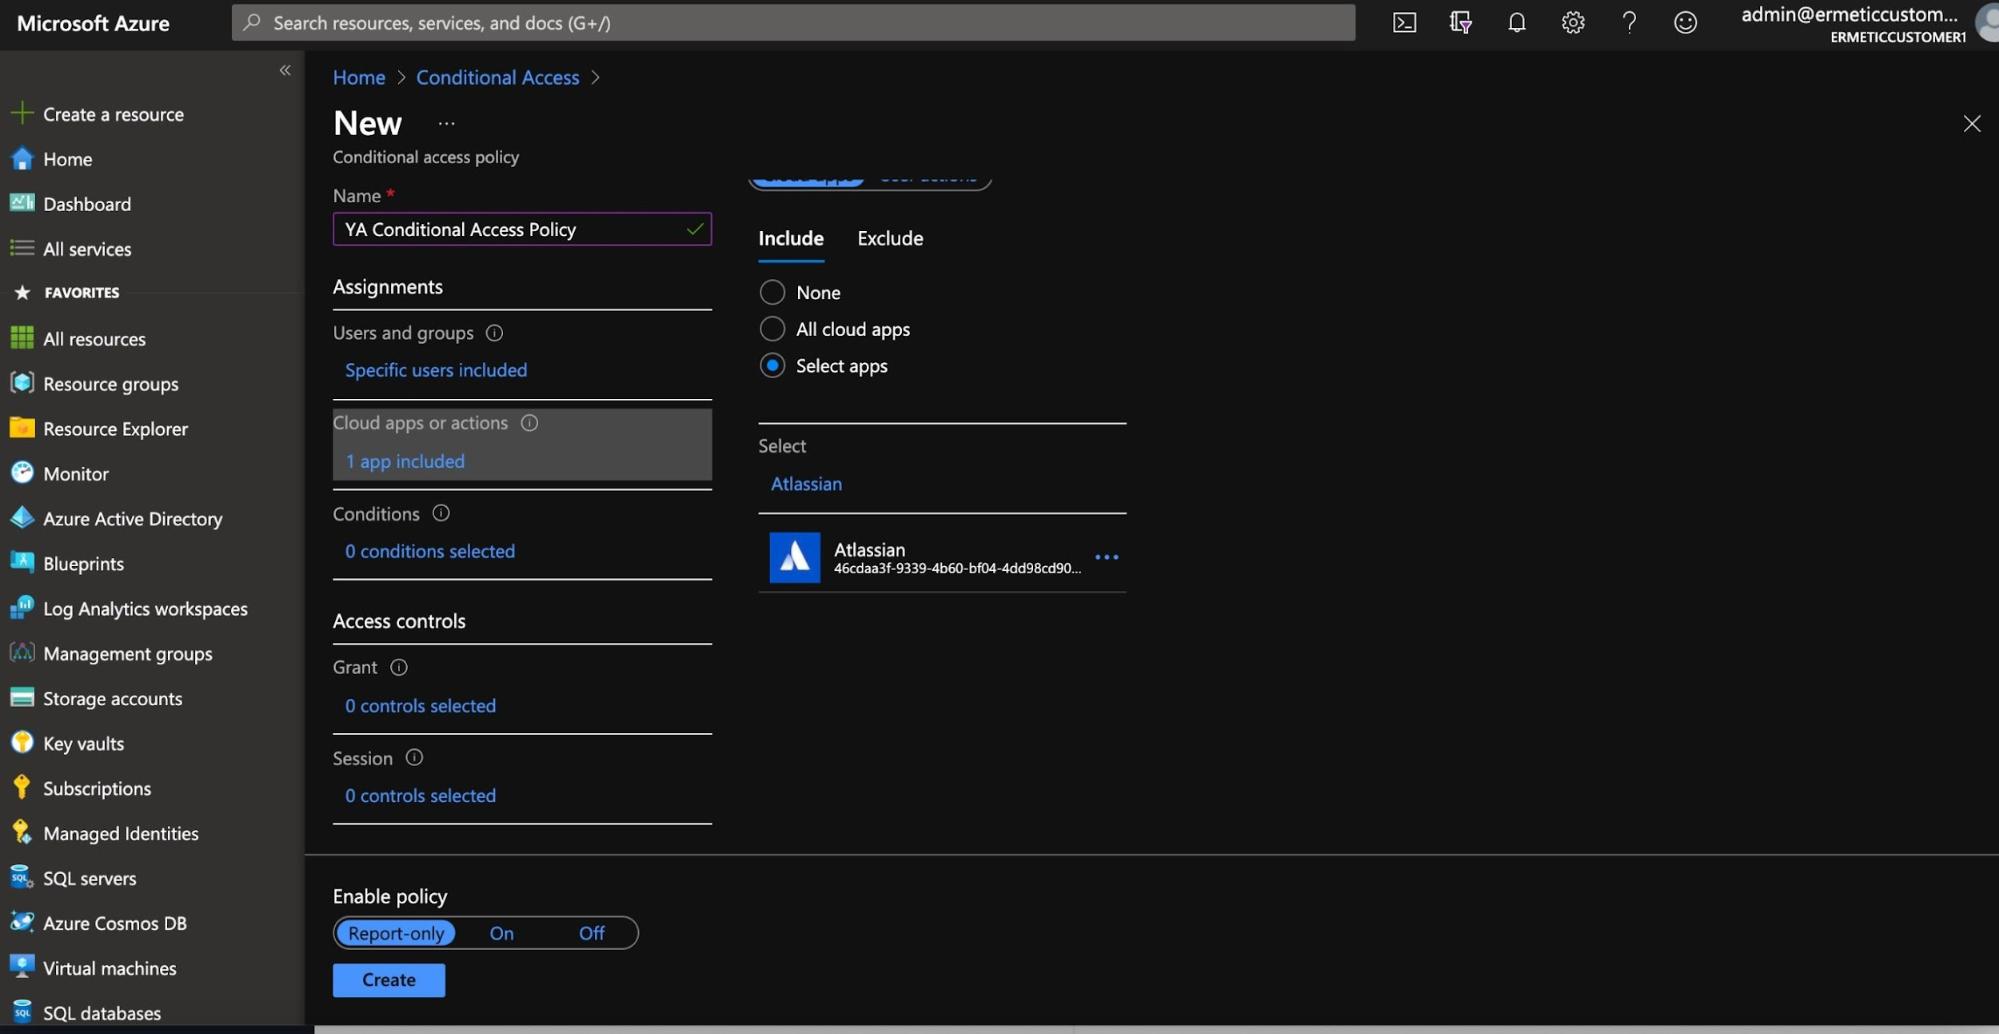
Figure 19 - Choosing apps and/or actions for a conditional access policy
You can then determine the conditions required for the policy to apply. These may include the platform of the device the user is using, the network location the user is logging in from and the risk level of the user or authentication (according to Azure AD’s Identity Protection, if available).

Figure 20 - Setting conditions for a conditional access policy
Finally, you choose if the policy grants or blocks the access based on requiring one or several access control mechanisms.
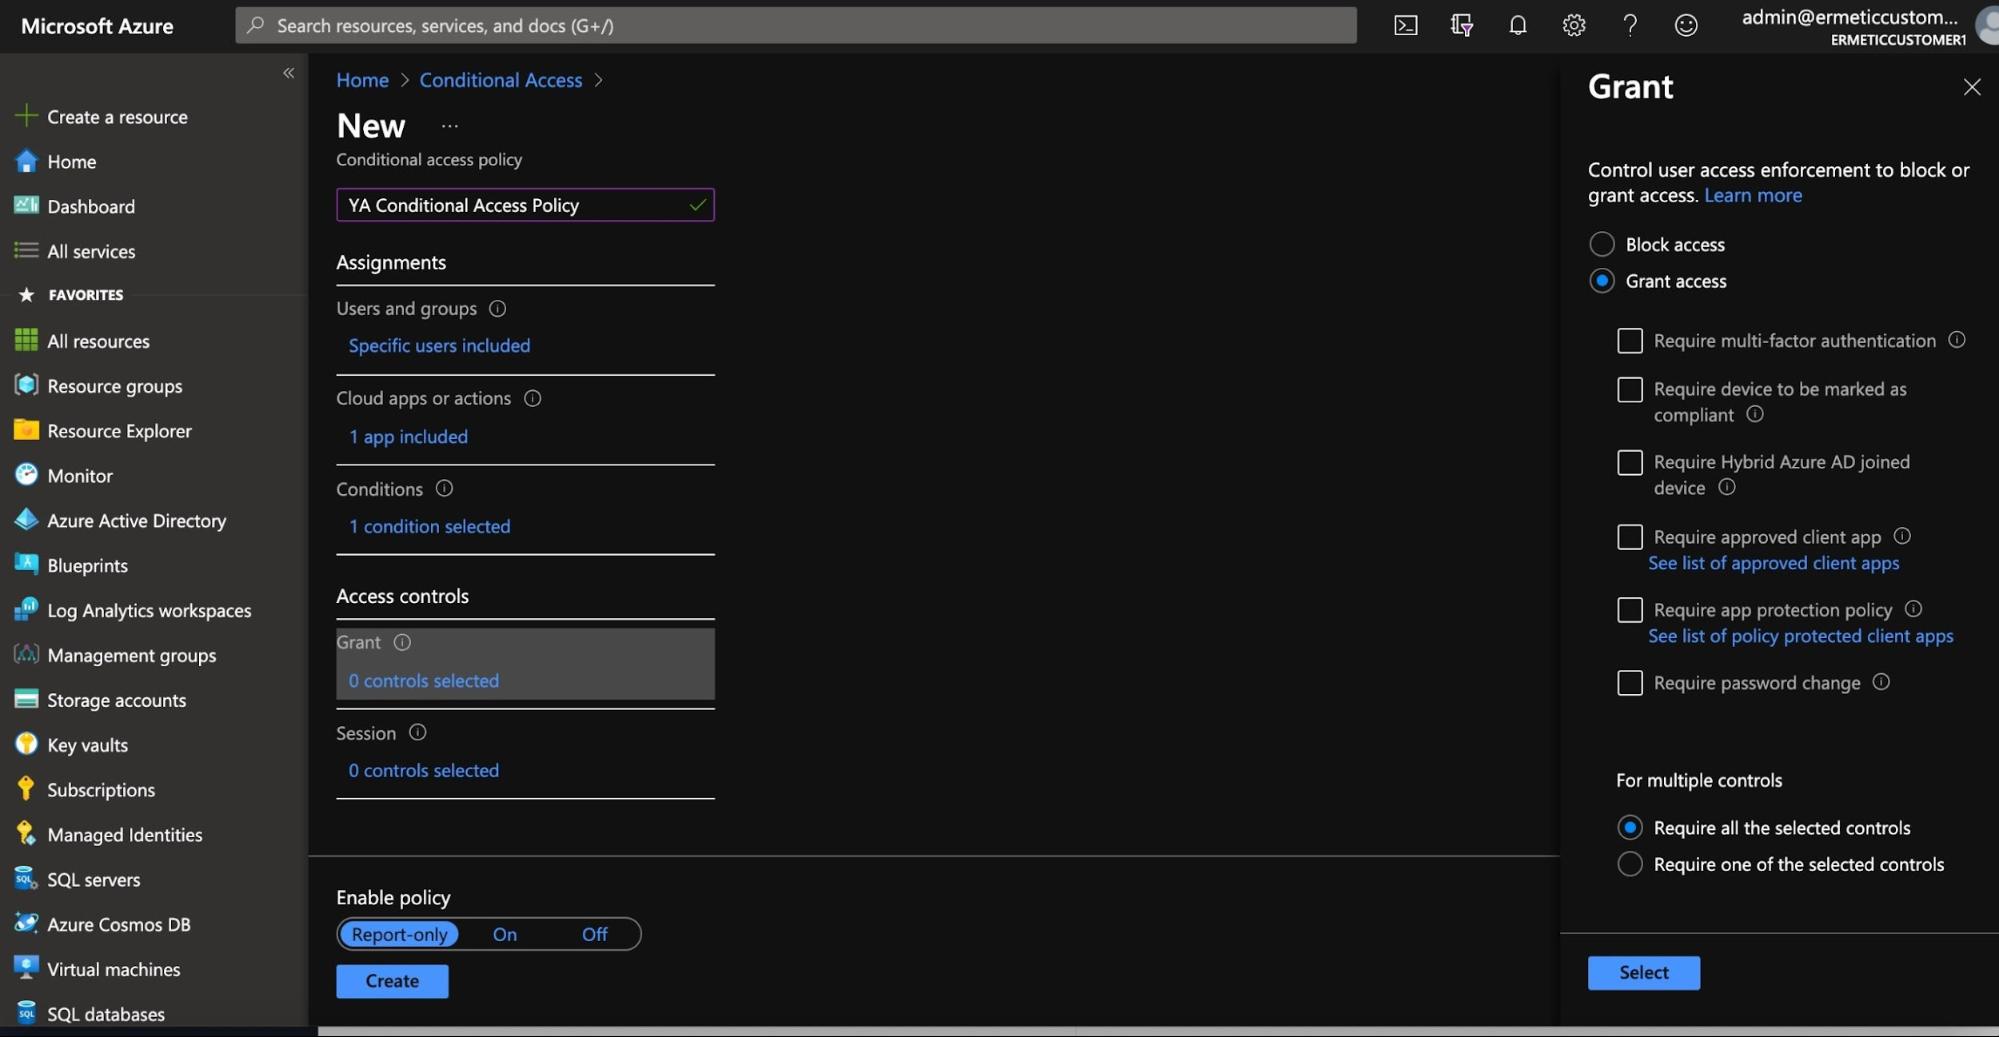
Figure 21 - Setting granting/blocking for a conditional access policy
In the above screenshots, you may have noticed that a “report only” option is available when configuring a policy. This option helps you simulate what the impact of a policy will be if not applied. For example, if a policy is configured to be in “Report Only” mode and blocks a user from having access to a certain application, that effect will be reported under the “Report Only” tab of the sign-ins monitoring blade yet won’t actually block the access for the user.
The case for automated analysis
As we’ve said before, the tools reviewed here are a testimony to Microsoft’s commitment to making it easier for its customers to apply least privilege access to the resources in their tenants. It’s important to get to know these tools, and we highly recommend doing a deeper dive into the relevant documentation and utilizing them. However, even when using them, there’s still a long way to go to adequately protect your Azure environment from excessive permissions and entitlement misuse.
First of all, the tools reviewed above are focused on users - that is, human users. Yet, a significant part of the excessive-permissions problem occurs with service identities or, in the case of Azure, with service principals and/or managed identities used by functions or VMs. Such machines can also be part of a “toxic” combination, e.g., a machine with public access to the internet and very sensitive excessive permissions in the environment - a configuration that would be very hard to pick up on using Azure cloud native tools.
On top of this, the analysis and enforcement provided by these tools is, to put it mildly, not very granular. As mentioned before, the test criteria of access review is a bit too naïve - looking only at the sign-in activity of users doesn’t indicate the validity of the permissions. This assessment won’t tell you if a user has not used a specific action they’re allowed to use while using others. It would be nearly impossible for you to know if the user has signed in and used the allowed actions on only some of the resources the user can access using an admin role.
Finally, this analysis is done within Azure and by design does not cover multi-cloud environments, so it’s not effective in scenarios in which Azure AD users are granted permissions in AWS accounts. Also, there appears to be no support for integrations with ticketing systems such as Jira and ServiceNow or communication channels such as Slack - falling short of the need to incorporate insights from such analysis within security and DevOps workflows.
It is possible to detect and perform advance remediation of excessive permissions settings in a multi-cloud environment by analyzing audit logs and configurations. However, doing so manually is virtually impossible. Luckily, tools such as the Tenable Cloud Security automated analysis platform solve these issues by providing continuous analysis of the entitlements granted by the configuration of human and service identities, and network and data resources, including logs, to provide specific information about which identities have excessive permissions and the right size policy to apply. Tenable also helps you find “toxic” combinations, such as identities with extremely permissive policies used by machines that have public access to the internet or by users that can access their account without MFA.
- Cloud


