Deconstructing Azure Access Management using RBAC

Take a focused look at the basics of Azure RBAC (role based access control) -- the main mechanism in Azure for granting permissions to resources. Familiarize you with Azure AD identities and find out how to grant them access to your organization’s resources.
Core to the Azure RBAC mechanism is role assignments, which connect a trio of components: security principal, role and scope. A service principal is the entity that receives the permissions, a role is a combination of permissions and the scope is the resource, or container of resources, for which the permissions are being granted.
For readers familiar with AWS’s IAM service, we note similarities and differences between the AWS and Azure IAM mechanisms, and provide a comparative chart at the end that we hope you find useful.
What is scope?
As mentioned, scope is the Azure AD component that determines to which resource, or set of resources, a role assignment applies -- and, therefore, the resources that a security principal has permissions to access.
To understand how scope works, we first need to understand how Azure organizes and structures resources. In addition to the resources themselves, Azure provides three logical constructs for their organization: management groups, subscriptions and resource groups.
In the subsections below, we explore each construct and its purpose. These constructs are essentially containers of resources that can be defined as the “scope” of a role assignment. So it is possible to assign a role to not just a single resource but to a set of resources for which it makes business sense, for reasons of policy management, to cluster together. In short, in Azure, one uses scope, with the three constructs available within it, to assign a role for resources. In AWS, one typically uses a policy to list the resources that the permissions apply to, and can specify a cluster of resources using a wildcard (“*”) expression.
There is no perfect way to compare the Azure structure to that of AWS. Some try to compare Azure subscriptions to AWS accounts, yet the two are quite different. For example, you can transfer subscriptions between tenants in Azure, whereas resources created and managed in an AWS account are tied to that account. To some degree, you can consider management groups as equivalent to an organizational unit (OU) in AWS organizations as they allow you to “manage” subscriptions similar to how you would use an OU to manage AWS accounts grouped together. Figure 1, which shows the relationship between resource containers, gives you an idea of the resource structure within an Azure tenant.
Resource groups
According to Microsoft, a resource group is a container that holds resources that belong in the same project or application (or software “solution,” as developers may call it). Simply put, you should use a resource group to place together resources that share the same life cycle, management and security settings -- that is, resources that are meant to be provisioned, modified and deleted at the same time. A resource group allows you to manage all these needs easily. The same of course applies to granting access to these resources.
Subscriptions
An Azure subscription is another logical construct for containing resources (or, more precisely, for containing the resource groups that hold the resources). The main job of a subscription is to group together resources that have the same billing model. You can also use a subscription as the scope for a role assignment.
Management group
A management group is a container for subscriptions and other management groups. It allows you to construct a nested tree of management groups (up to six levels of depth), with subscriptions as the “leaves” of the tree. These management groups should correspond with the business needs of the organization for management and security, as they are meant to allow the easy application of policies including, of course, access policies using the RBAC mechanism.
Each directory/tenant has a single, top-level root management group. This management group is used to apply global policies as it, of course, holds all the management groups and, in turn, all the subscriptions, resource groups and resources within the organization.
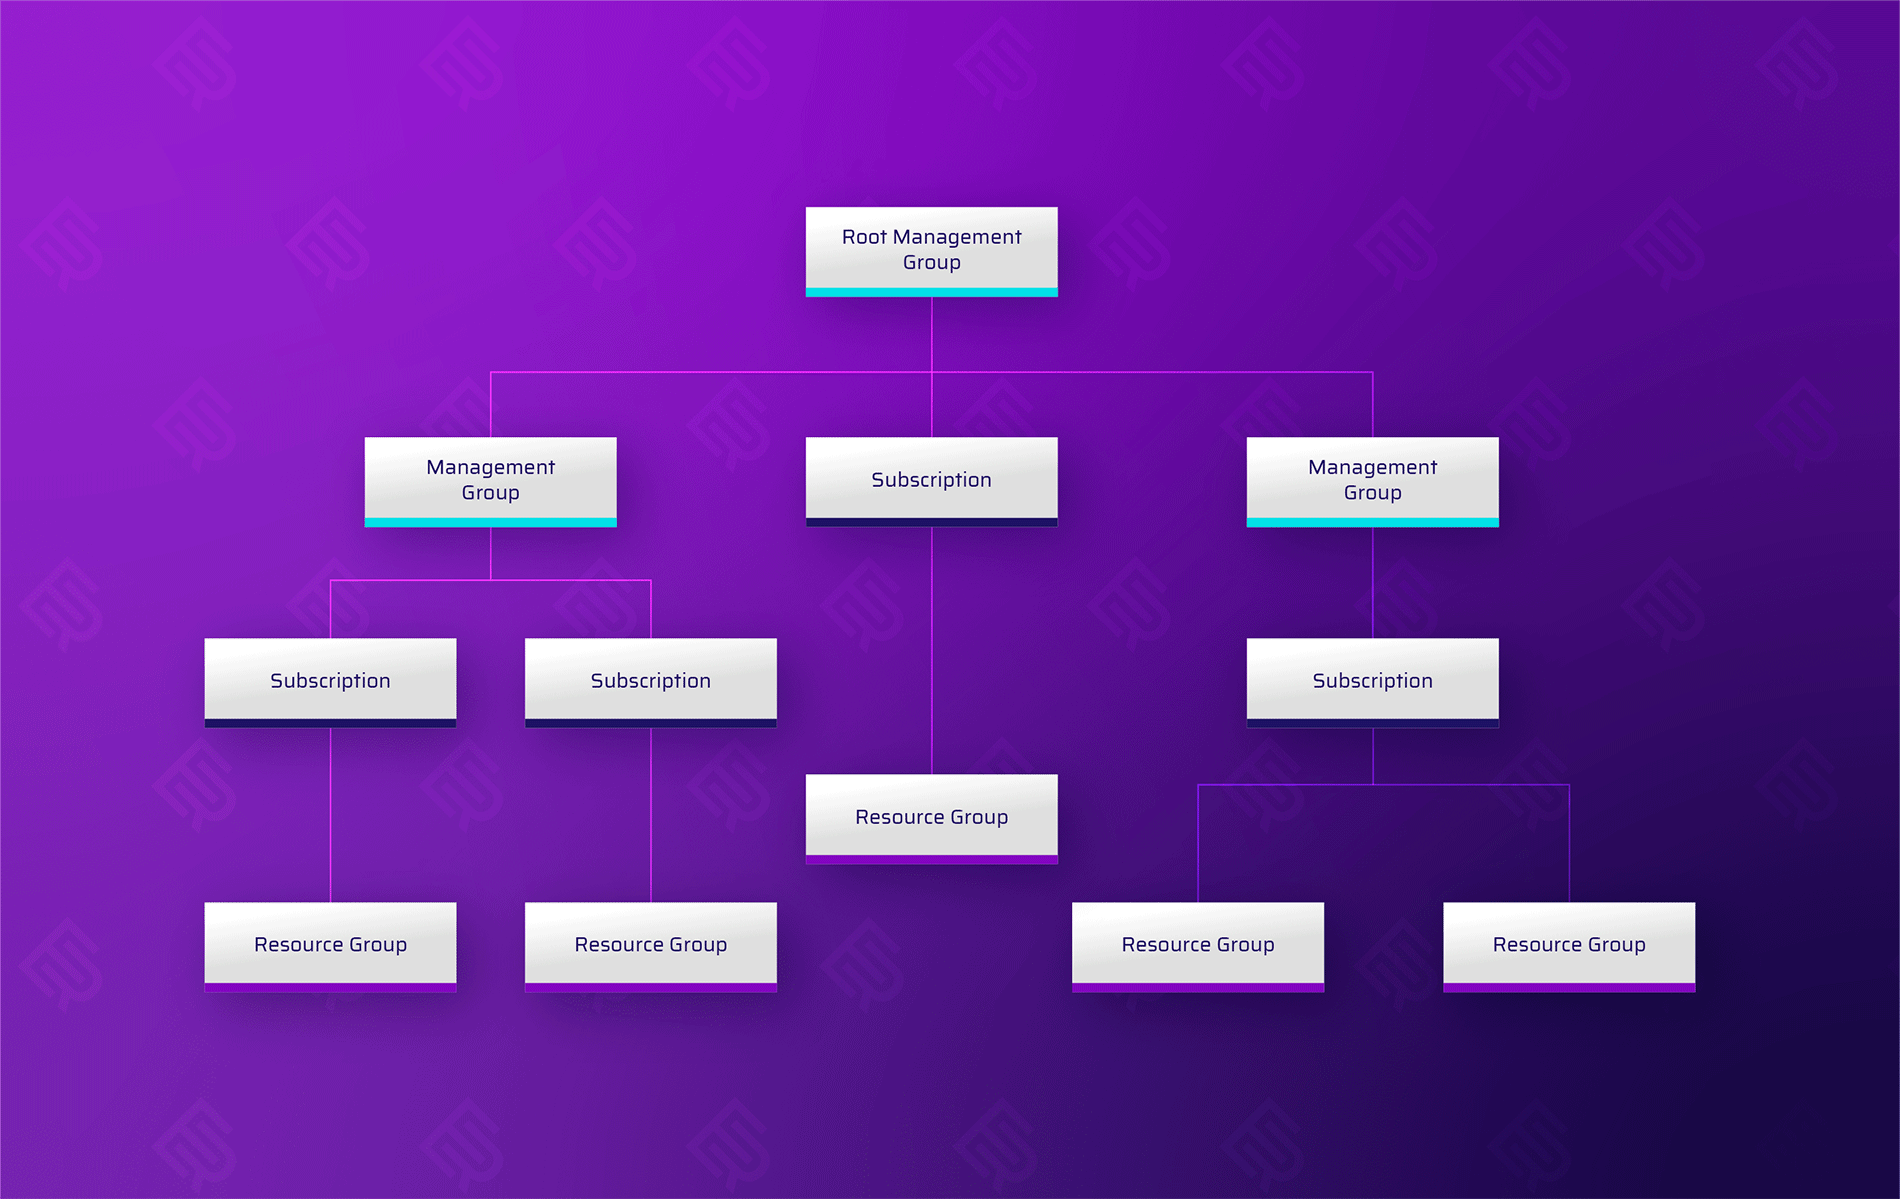
Figure 1 - Resource management hierarchy in Azure
What is a role?
The second main component of the role assignment trio is the role. Despite the name, be careful not to confuse an Azure role with an AWS IAM role! An Azure role is quite different from an AWS IAM role; in fact, it is more similar to an AWS IAM policy. This comparison is not perfect, either: as we will see, an Azure role does not determine, as does an IAM policy, the resources that the permissions apply to. An Azure role does have a definition for “assignable scope,” which is a definition of where the role may be -- but is not necessarily -- applied. An Azure role is simply a set of permissions which the role assignment grants an entity associated with the defined scope.
Let’s see how the role object is constructed.
Each role is a subset of the possible operations available to be performed on the various registered resource providers in the tenant.
A resource provider is a service that supplies Azure resources. For example, Microsoft.Storage is a service that supplies storage accounts. When looking up a specific resource provider, you see the permissions it allows, split into management actions and data actions. Management actions are actions that involve managing the resource provider’s resources, such as managing access to and creating, updating or deleting resources. Data actions are actions that involve manipulating, deleting or accessing the data held in the resources.
For example, the management actions in the Microsoft.Storage service allow the creation, updating and deletion of containers or the managing of access to them. The data actions for that same service allow the manipulation of the data held in the blobs, i.e., the files kept in the blobs. For each component of the resource, Azure displays which, among the read, write, delete and other actions available, the role allows. This approach is quite different from the highly granular nature of the actions one can define for AWS resources. AWS lets you select specific actions from a versatile and resource specific catalog of actions, and also choose to assign an entire hierarchy of them using wildcards (“*”).
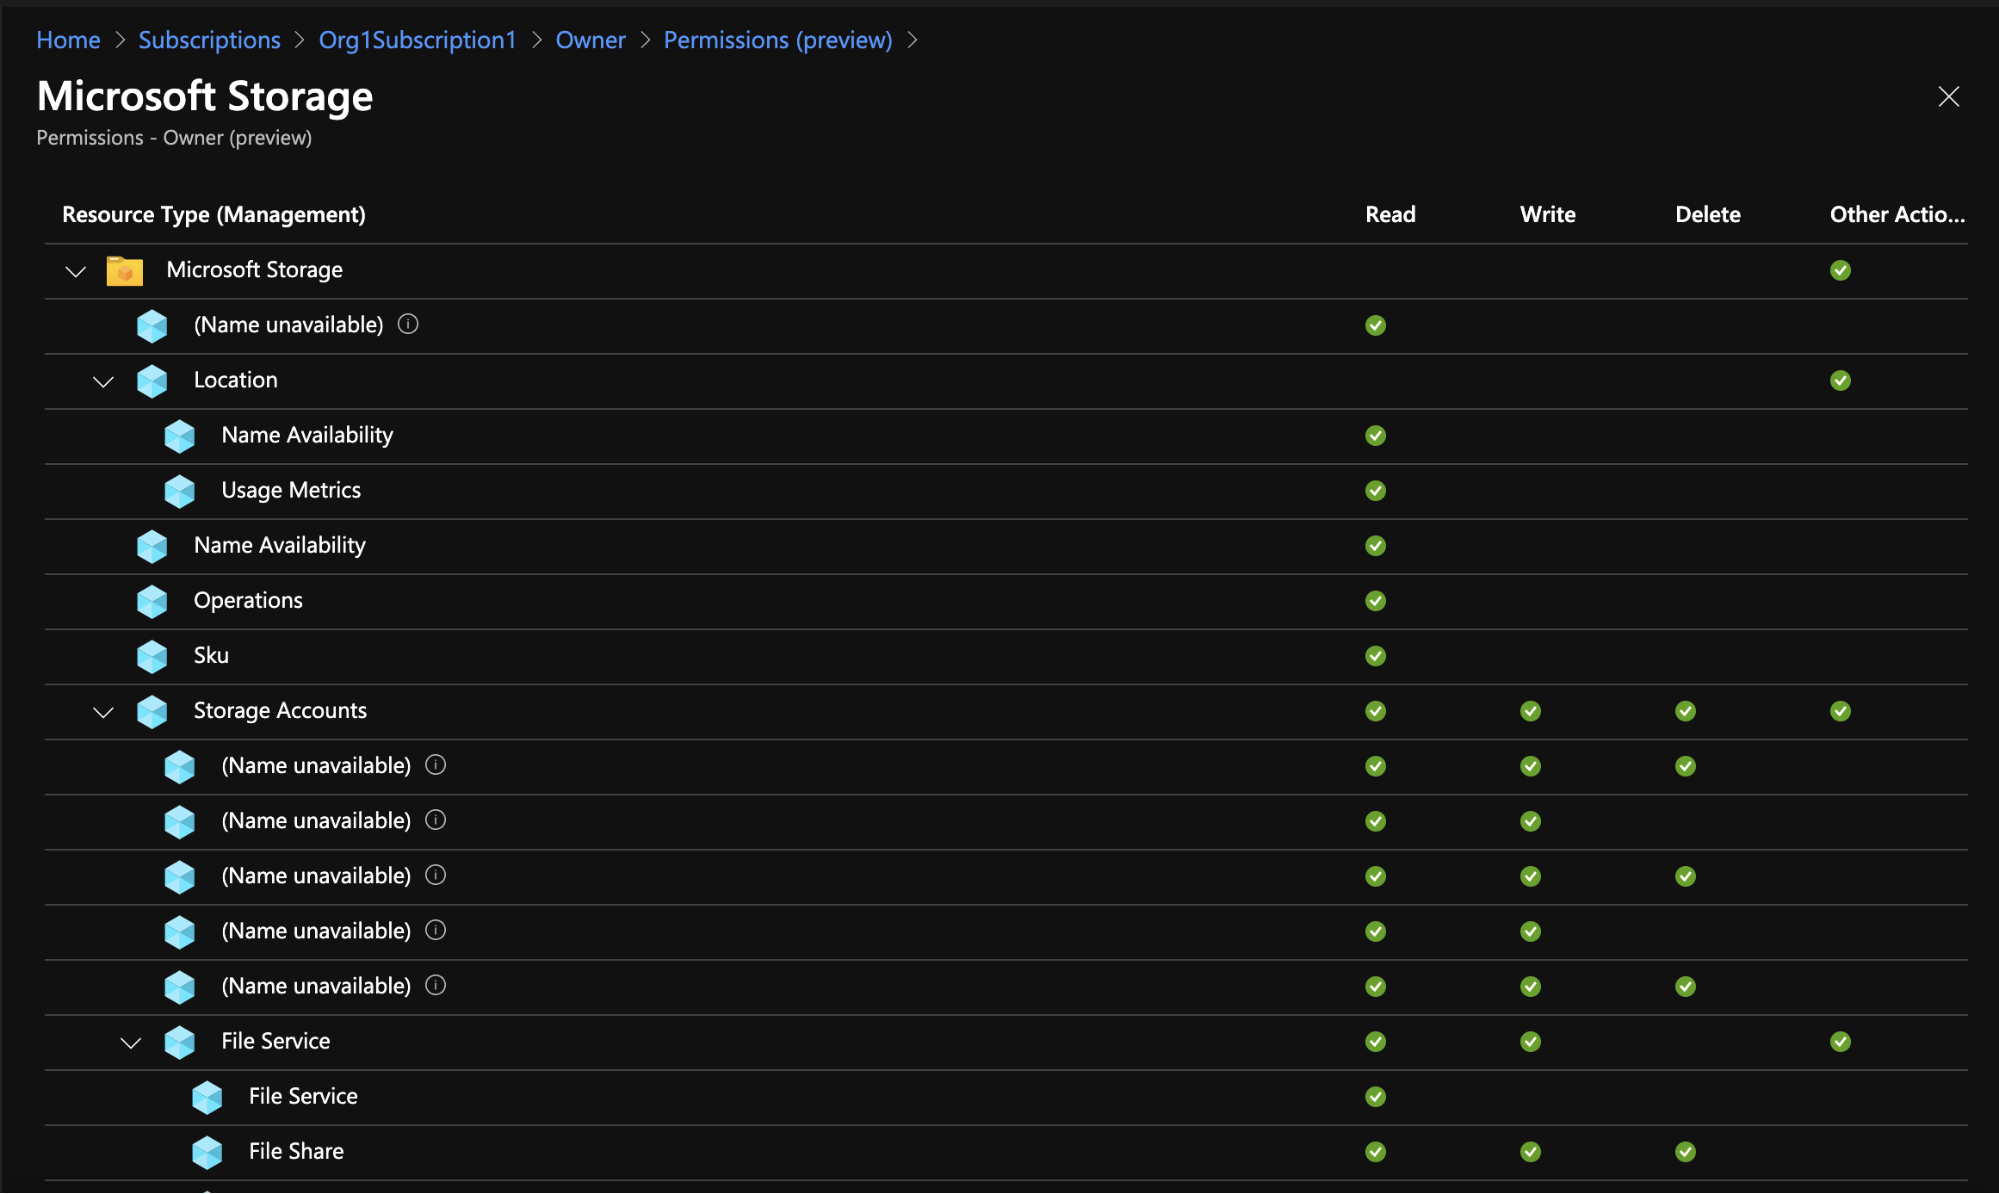
Figure 2 - Management actions, including access to resources, for the Owner role in the Microsoft storage resource provider
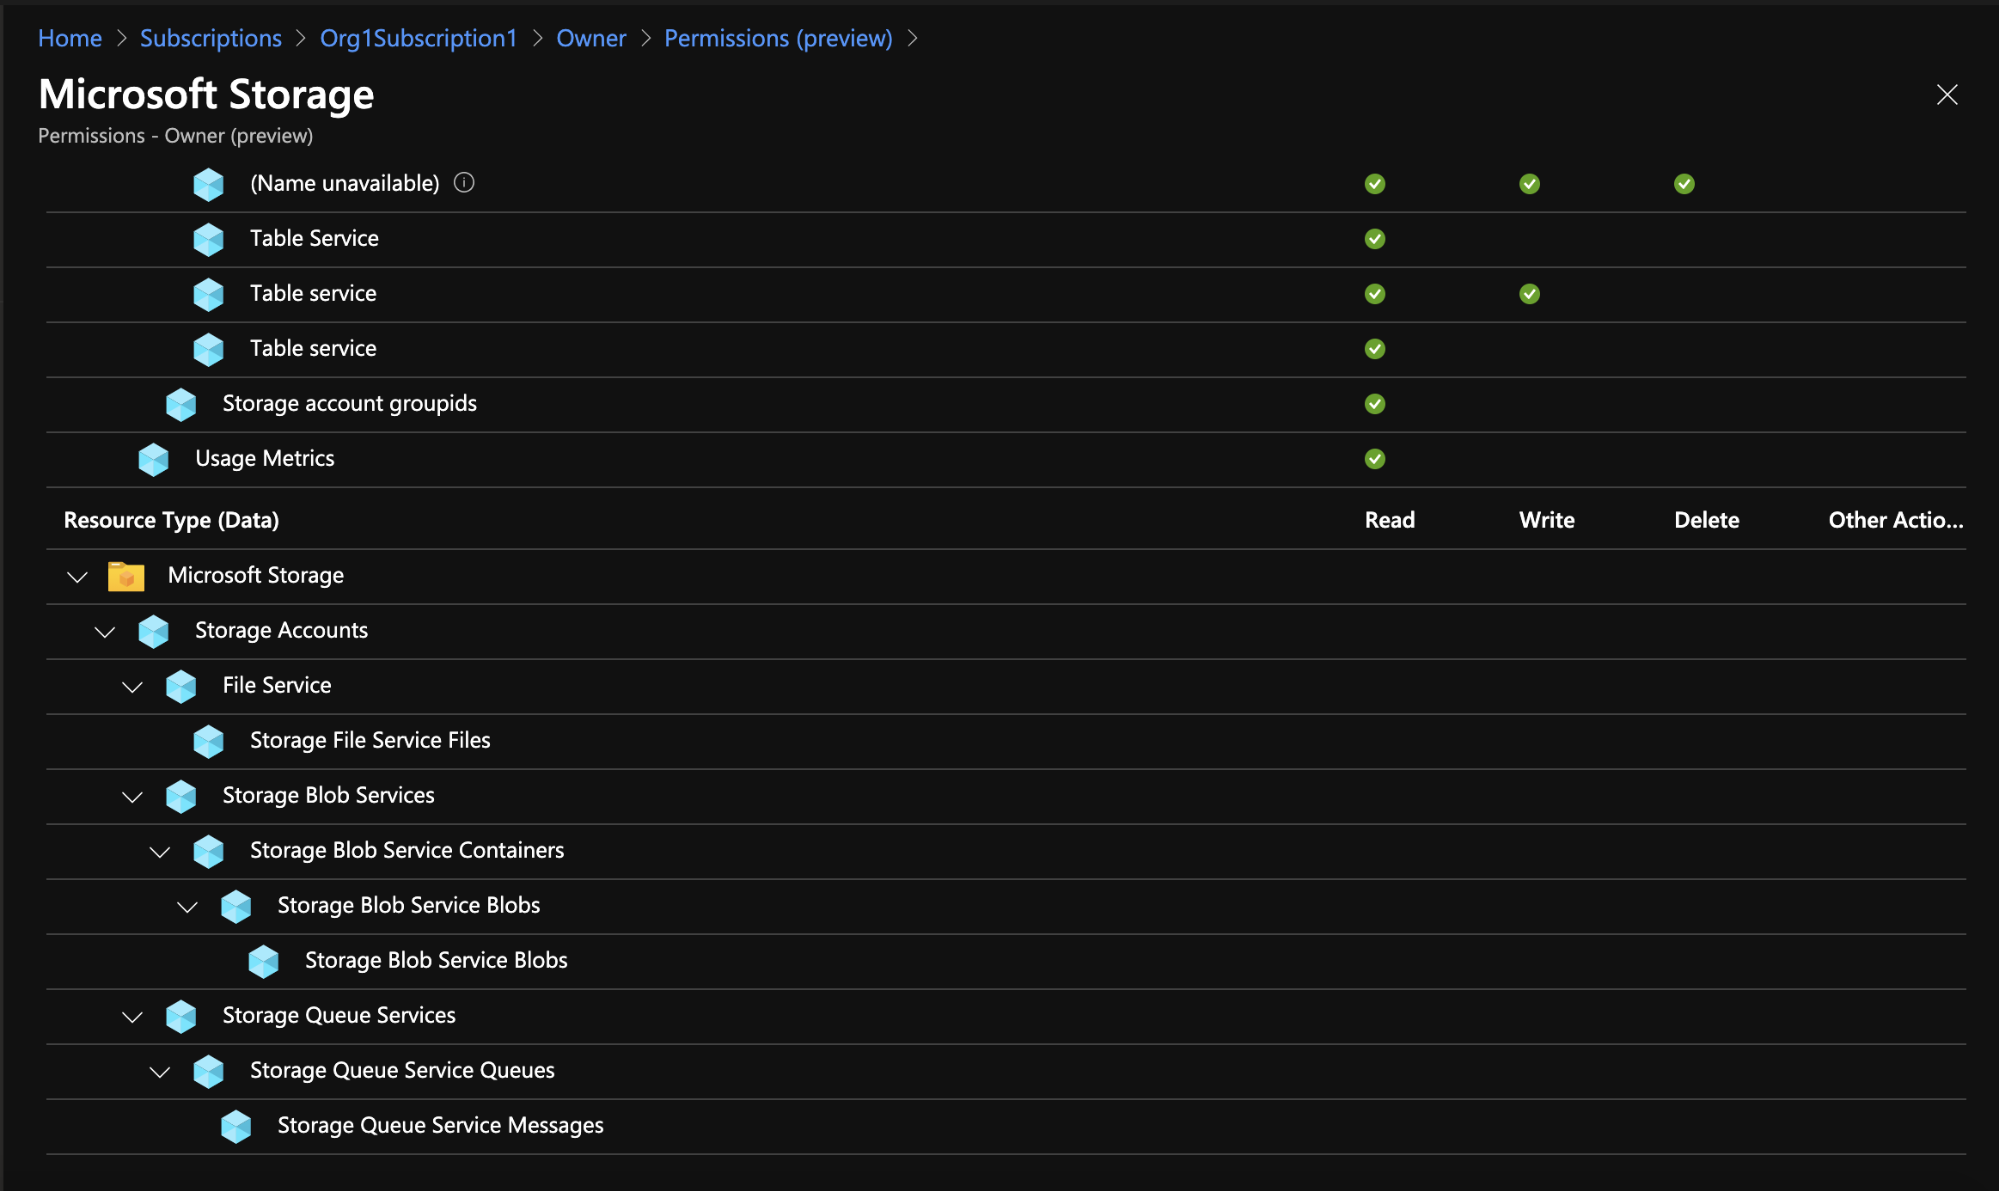
Figure 3 - Data actions, including access to the data in a resource, for the Owner role in the Microsoft storage resource provider
Roles can be built-in, which are roles that are managed and provided by Azure, or custom, which are roles that you create yourself based on specific business requirements that are not provided by any of the Azure preconfigured built-in roles.
There are a few notable built-in roles, such as owner, reader and contributor, which you can easily use to provide access at a desirable level for a certain resource. An AWS-managed policy includes the resources that the policy applies to (usually for all resources in an account, designated by a wildcard “*”). However, in Azure you can assign a built-in role to a specific resource or resource container, thereby achieving a more precise assignment.
A few items of note when creating a custom role:
- First: You need to select the assignable scopes that determine where the role can be assigned. As noted, an assignable scope is a list of subscriptions, resource groups or management groups (management groups are currently a preview feature) for which you can create a role assignment.
- Second, and probably most important: You need to select the permissions that make up the role. As shown in Figure 4, you can create a custom role in several ways:
- Clone an existing role, using the clone as a baseline to tweak for the new role
- Start from scratch: configure all the components of the roles yourself
- Start from a JSON file that will be used as the baseline
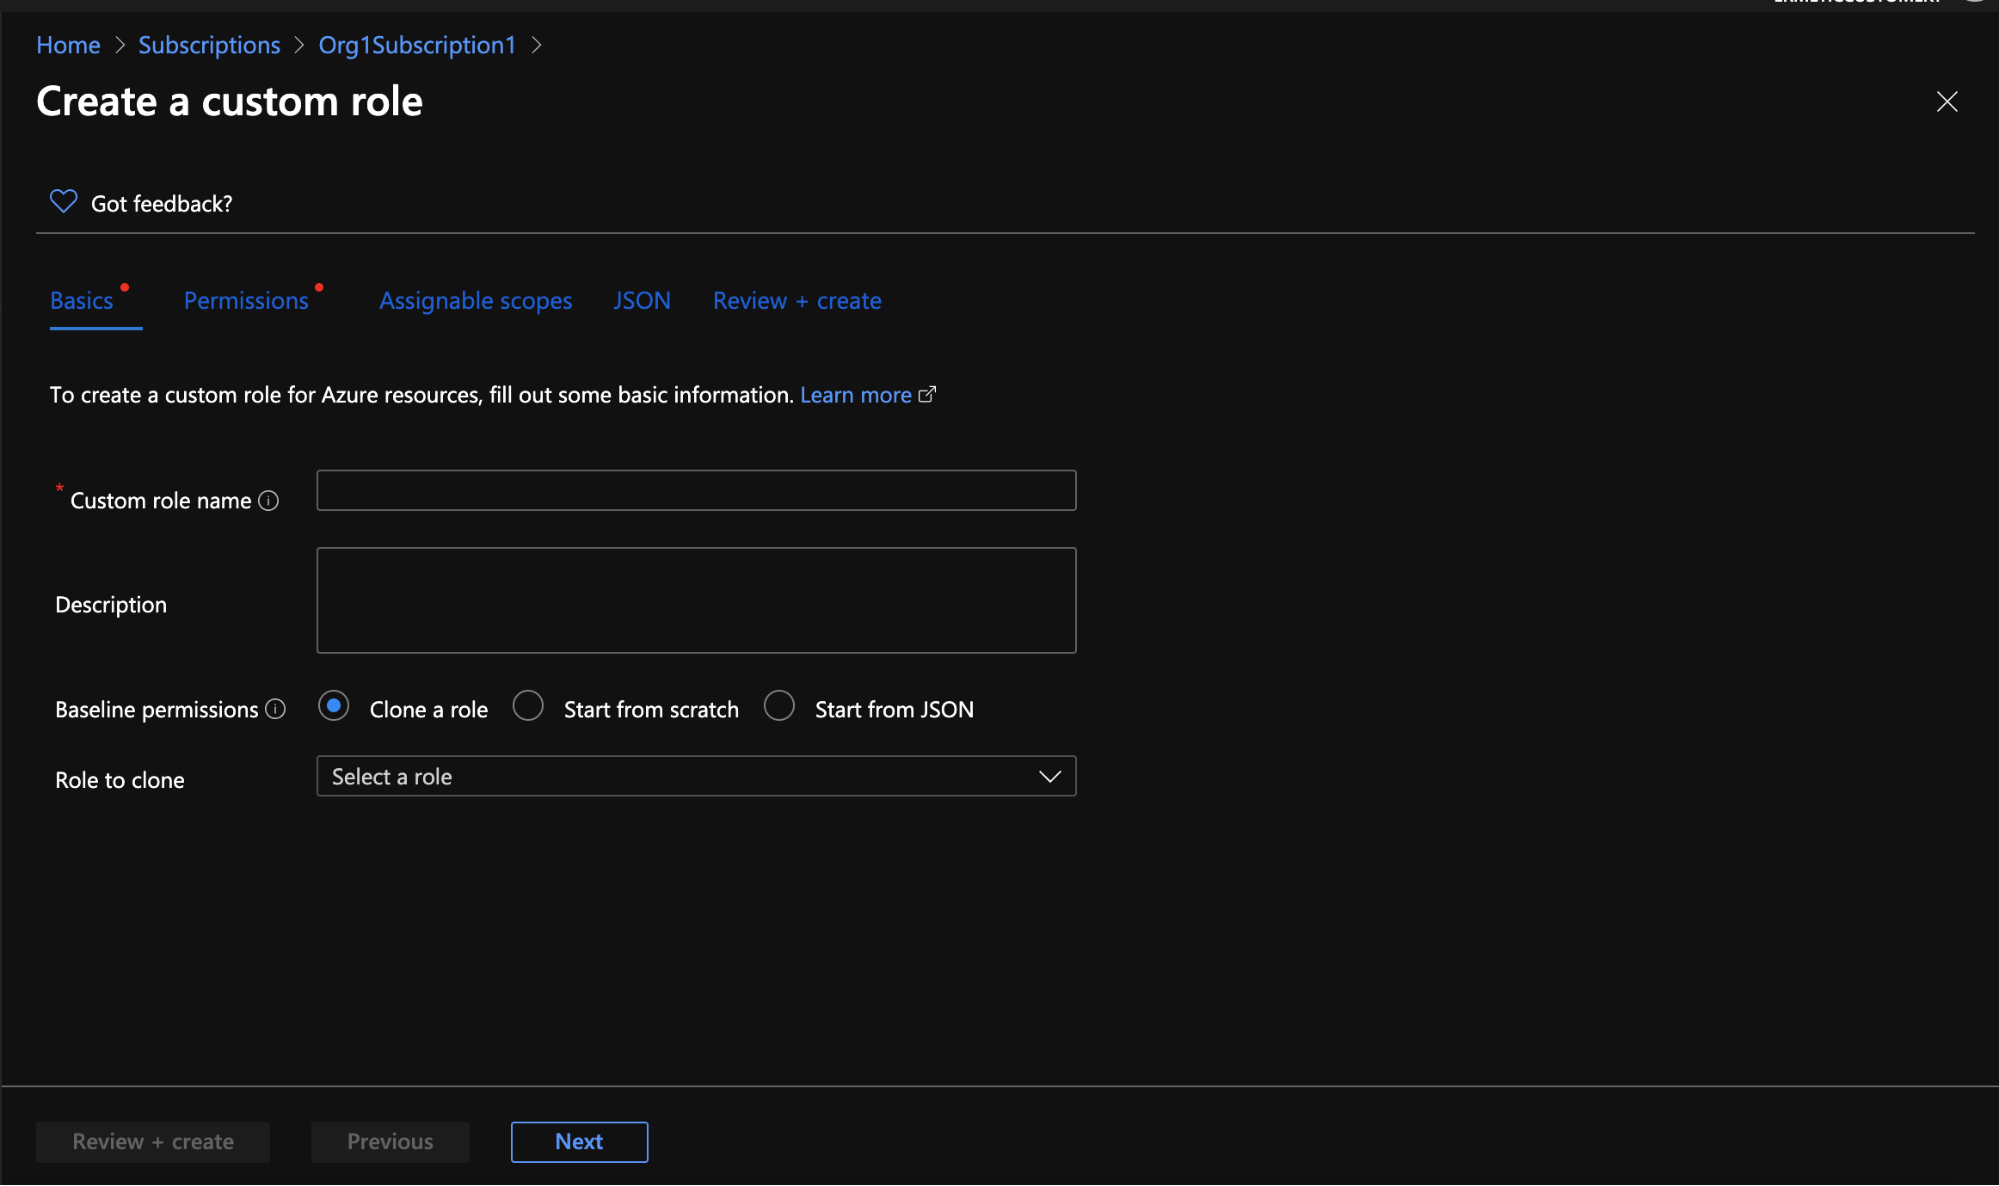
Figure 4 - Wizard for creating a custom role
You can add a permission using the GUI, which will prompt you to select a resource provider and then choose the actions (which refers to management actions, as explained before) and data actions you want the role to include.
Even when you do not start from a JSON, you may find it helpful to look at the JSON version of the role you created. For example, let’s look at a JSON for a built-in role called “Reader”:
{
    "assignableScopes": [
      "/"
    ],
    "description": "View all resources, but does not allow you to make any changes.",
    "id": "/subscriptions/<SUBSCRIPTION_ID>/providers/Microsoft.Authorization/roleDefinitions/<ROLE_ID>",
    "name": "<ROLE_ID>",
    "permissions": [
      {
        "actions": [
          "*/read"
        ],
        "dataActions": [],
        "notActions": [],
        "notDataActions": []
      }
    ],
    "roleName": "Reader",
    "roleType": "BuiltInRole",
    "type": "Microsoft.Authorization/roleDefinitions"
  }
Figure 5 - JSON for the built-in role “Reader”
In addition to the descriptive information for the role, the JSON shows the permissions granted by the role for both management actions and data actions (“actions'' are the management actions; “dataActions” are the data actions). The role JSON also lets you specify, for management actions (“notActions”) and data actions (“notDataActions”), any actions to be excluded from being granted via its assignment. The JSON representation is important as there are certain configurations you can make only by editing the JSON; for example, use of the * character to indicate wildcard actions (i.e. all possible combinations). In the “Reader” JSON above, you see use of the * character to specify that all actions with the suffix “/read” be included.
Let’s say that you want to allow all the available actions on the exports in the CostManagement resource provider. To do so, you would add the following permission: “Microsoft.CostManagement/exports/*”. You would also be able to edit the JSON to exclude actions by adding them to “notActions” or “notDataActions”. Excluded permissions will not be granted even if included in a wildcard expression.
Similar to role assignments, Azure also lets you set deny assignments -- that is, explicitly deny permissions to perform actions on resources even if a role assignment exists for them. Deny assignments cannot be created directly and are a bit more complicated to grasp, so we’ll leave the deep dive into them for a future article.
If you are an AWS user you’ve probably realized by now that a “built-in” role is somewhat similar to an AWS managed policy and a custom role is in some way the equivalent of an AWS customer managed policy. However the inline policy that we are familiar with in AWS has no equivalent mechanism in Azure.
Security principal
The final (or initial, depending on your point of view) component of a role assignment is the security principal, which represents the entity that is the subject of the role assignment -- that is, the entity the role is assigned to and to which the permissions defined for the specified scope are granted (or denied). The security principal can be a representation of an Azure AD user or Azure AD group, or a service or application that needs access to Azure resources. We will now review the types of security principals to which you can apply a role assignment.
Azure AD users and groups
Azure Active Directory is Microsoft’s cloud-based identity and access management service. It’s important not to confuse Azure AD with the traditional Microsoft Active Directory, which is responsible for managing domains and users on prem, as they are two completely separate things.
A user in Azure AD is an object that represents the identity of a person who has access to resources in your tenant. This object is comparable to an AWS IAM user although some of the mechanisms involved in using it are different. For example, access keys, which an AWS IAM user can use for programmatic access, have no equivalent in Azure. In addition, since Azure AD is Microsoft’s identity management solution and has no AWS-like equivalent for assuming a role to federate an external identity provider, it also serves to manage external users and guests.
A group is an object that allows the placement of several users together for easier management. Both a user and a group are principals that can be assigned a role in Azure. An Azure AD group is very similar to an IAM group (which can also have an AWS IAM policy attached to it).
It’s important to note that in AWS an entity can, if allowed, assume an IAM role and thus have access to its permissions via the policies assigned to that role. Azure does not have a similar mechanism so it addresses needs such as external access to apps and/or users differently.
Service principal
According to Microsoft, an Azure service principal is “an identity created for use with applications, hosted services, and automated tools to access Azure resources.” To understand the relationship between an application and a service principal, you’ll want to understand conceptually how an application in Azure is registered and can be provisioned to access resources and work in other tenants.
Simply put, a service principal is, according to Microsoft, the “local representation, or application instance, of a global application object in a single tenant or directory. A service principal is a concrete instance created from the application object and inherits certain properties from that application object.“ This means that what represents the application as an entity within a tenant (and can thus be used to provide it with access to resources in the tenant) is the service principal created for it. The service principal is a different object from the application object, which is created upon the registration of the app in its home tenant (the tenant where it was registered).
When registering an application, you choose whether it can only be used by accounts in the organizational directory where it was created (which would make it a single tenant application) or by accounts in other tenants (making it a multi-tenant application).

Figure 6 - Registering an application - the point at which you determine its single or multi tenancy
An application has only one application object but has a separate service principal that represents it in each tenant where it is granted access:
- In the home tenant, Azure creates the service principal and the application object when you register the application.
- In the other tenants, Azure creates a new service principal when the admin consents to granting the application the permissions that its configuration requests.
This mechanism is in some way equivalent to the AWS role assumption mechanism for cross-accounts that is used to allow external access.
Managed identity
A managed identity is an object used by some Azure resources, such as a function or Virtual Machine, to access other Azure resources and also authenticate to Azure services that support AD authentication. You can find more information on how managed identities work: here.
The main goal of a managed identity is to allow developers to deploy code that can access Azure resources without the need to manage credentials, tokens or certificates of any kind.
For example, on an Azure function page you see an “Identity” blade.

Figure 7 - Azure function page with Identity blade
We see that we can assign an identity to the function in one of two ways:
- A system-assigned managed identity, which is a managed identity created by Azure solely for the purpose of authenticating this particular function
- A user-assigned managed identity, which can be one or more managed identities created by the admin of the tenant and which, of course, can be used elsewhere as well
The managed identity mechanism can be considered the equivalent of using an AWS IAM role to allow services such as EC2 and Lambda to access resources.
Putting RBAC together
Now that we have an understanding of the various components of role assignment, let’s explore how to create and apply role assignment in Azure.
Every resource in Azure has an “Access control (IAM)” blade. For example, let’s look at the IAM blade for one of our subscriptions - Org1Subscription1:
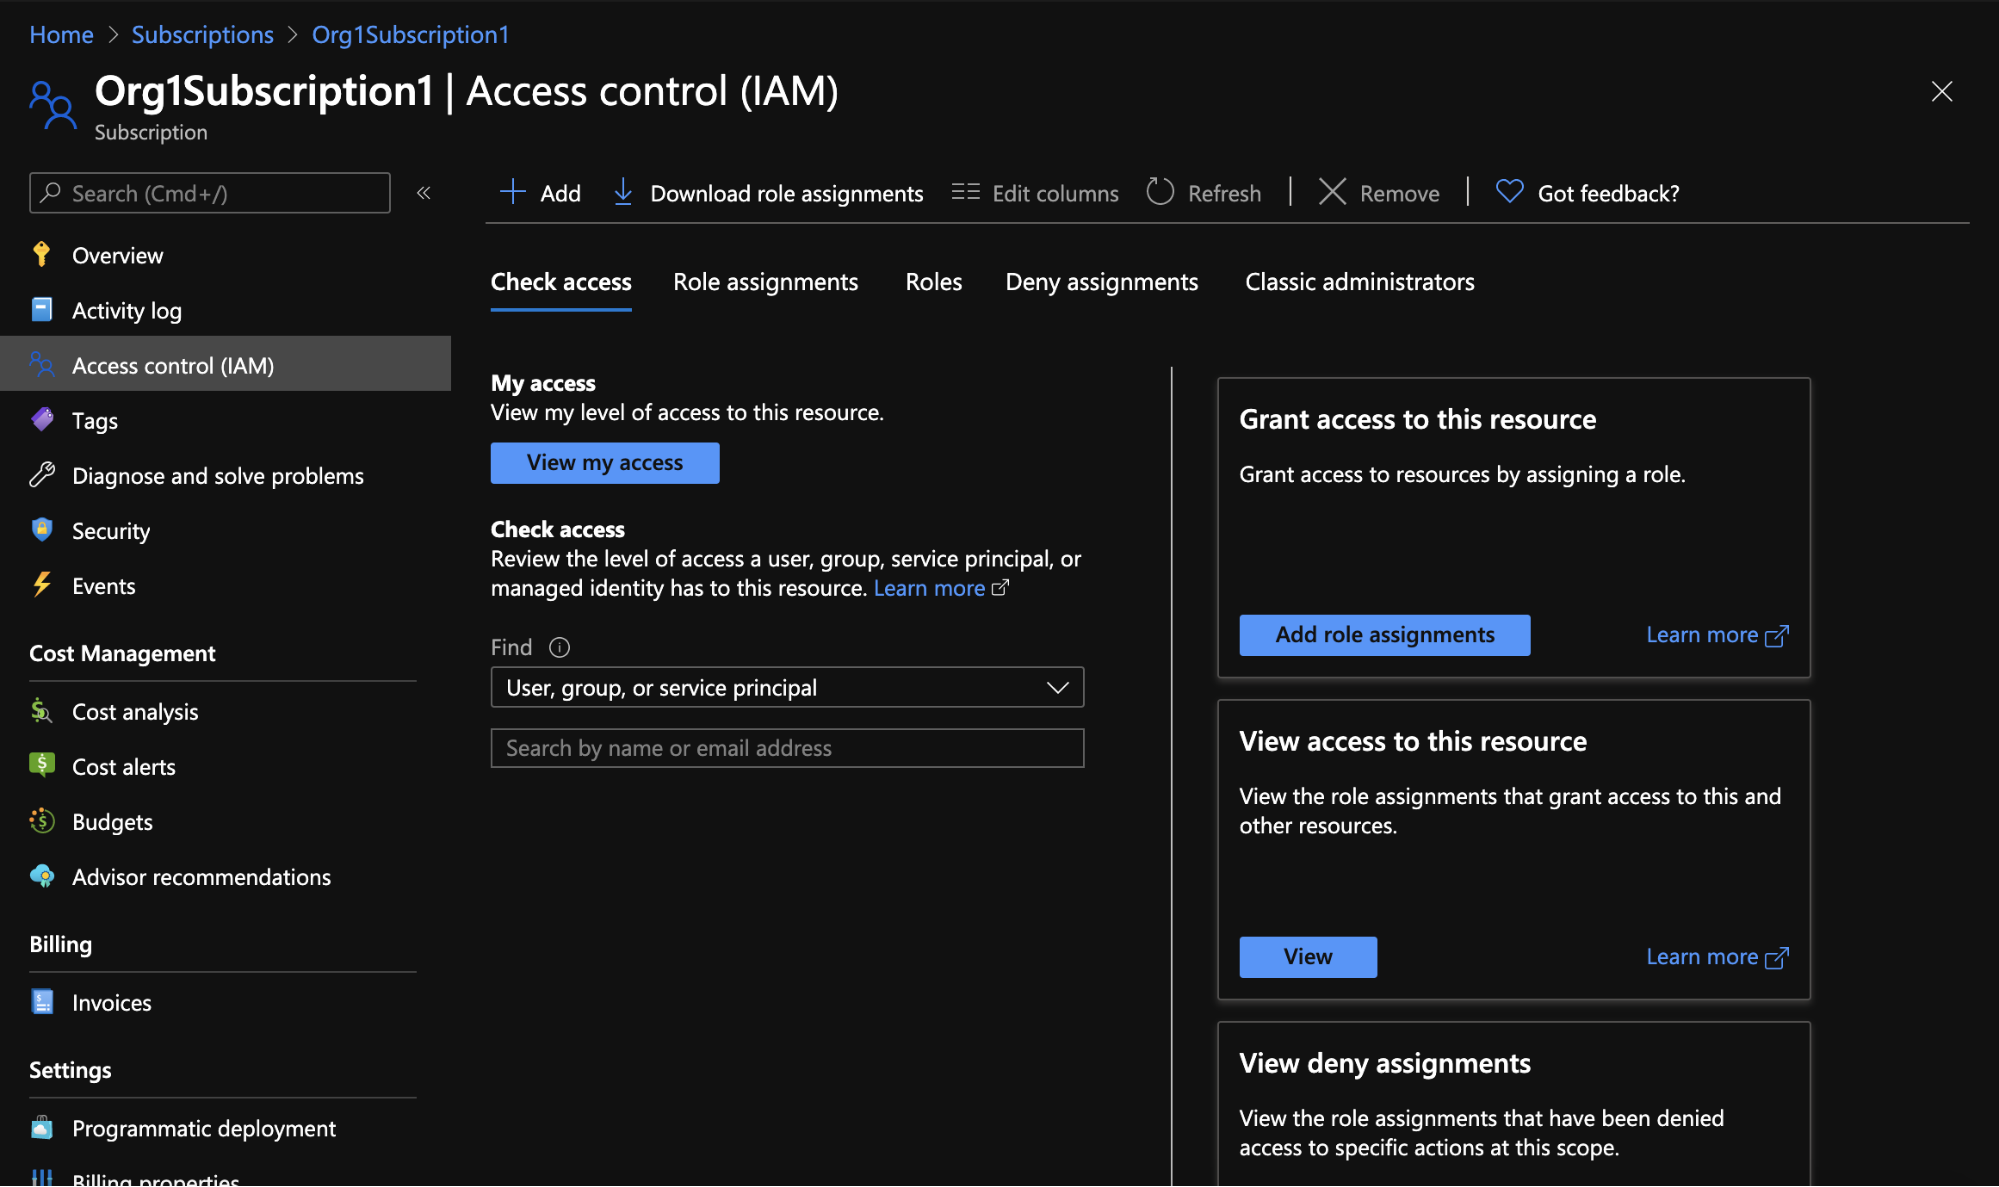
Figure 8 - IAM blade for a subscription
To create a new role assignment that will apply to this resource, you click “Add” and then choose “Add role assignment”. This opens a panel through which you can select a role and one or several security principals, which combine to create the role assignment.
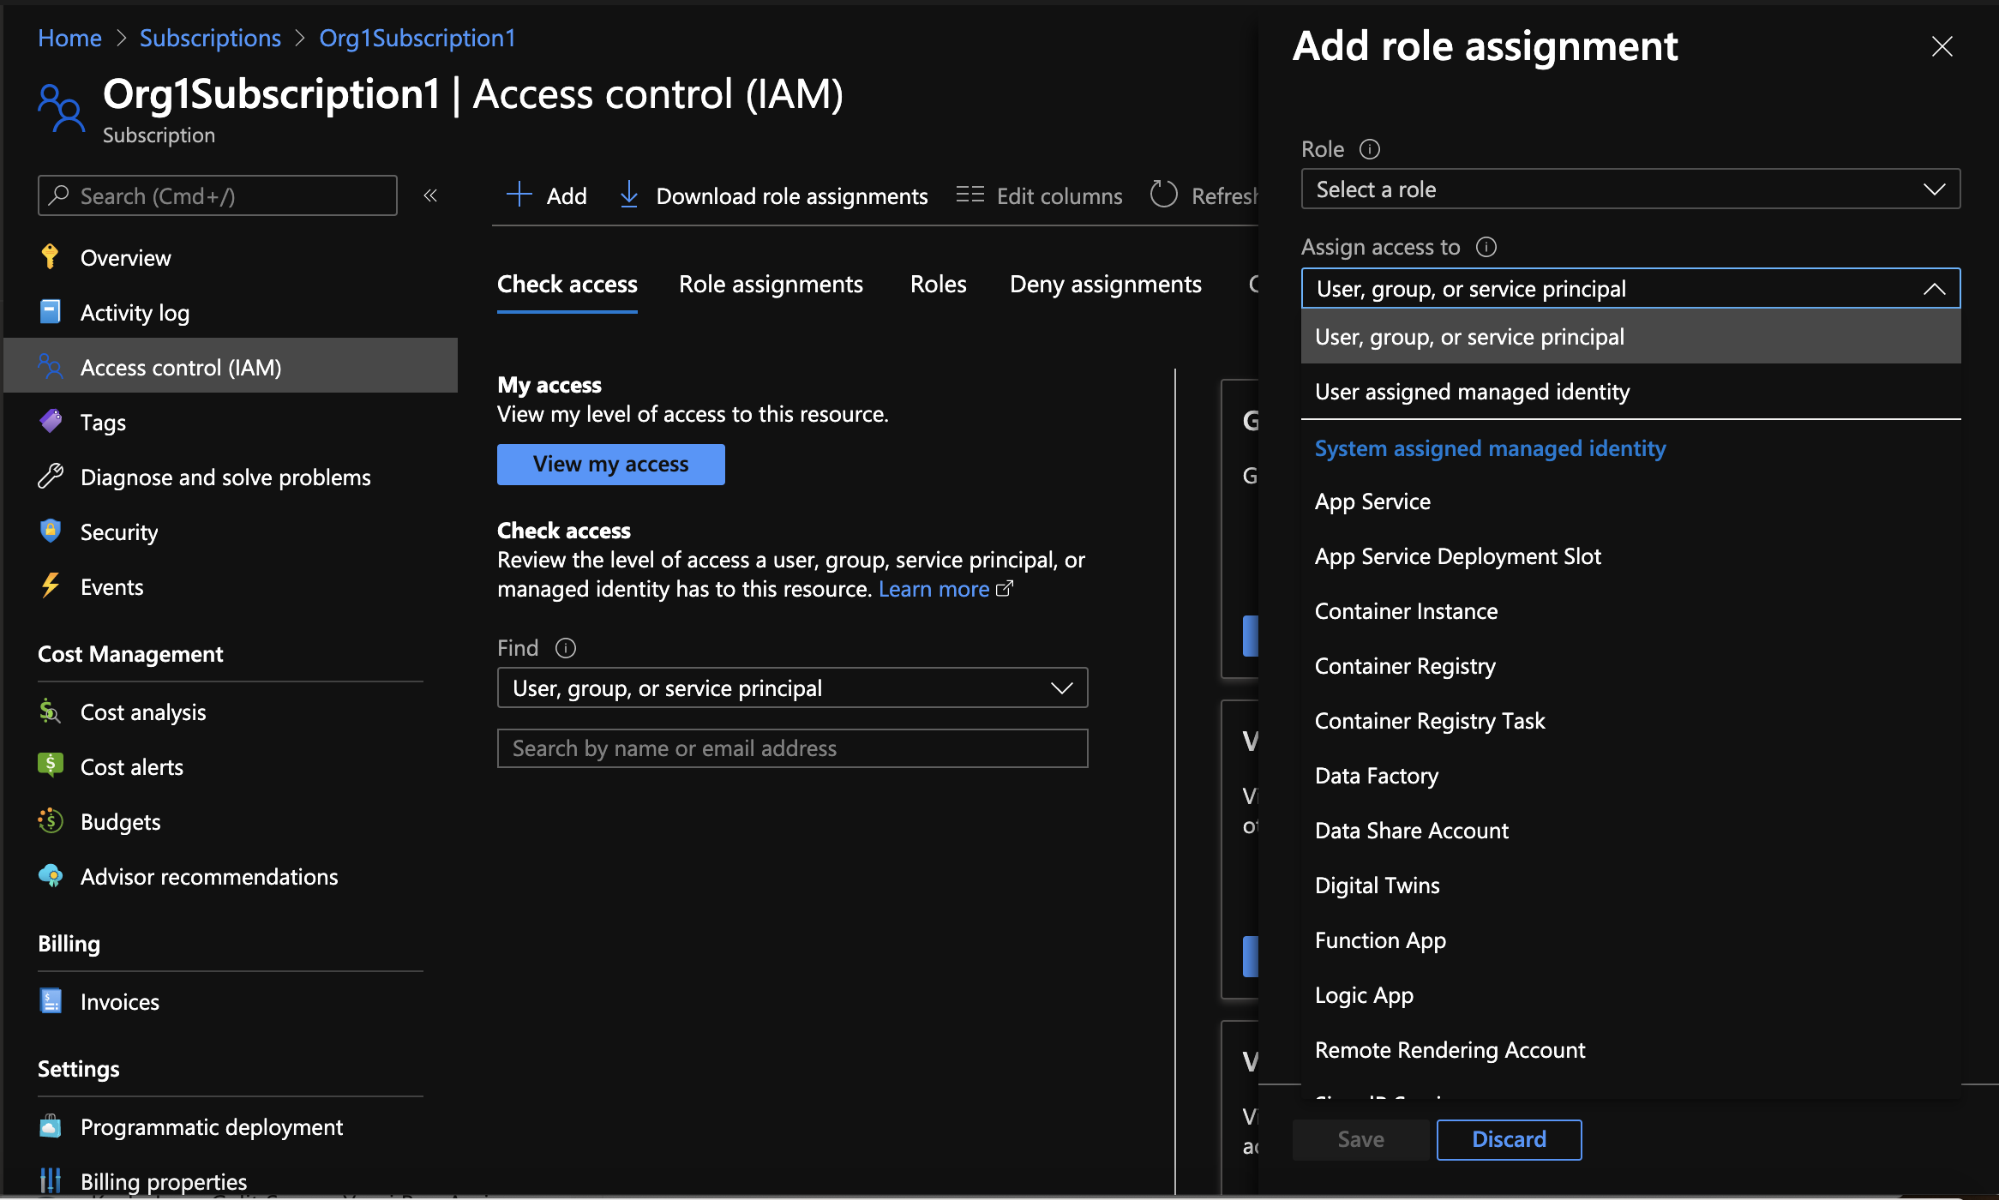
Figure 9 - Creating a new role assignment
The “Check access” function lets you answer the question: What kind of access (if any) to this resource is granted to a specific security principal? In addition, the Roles tab shows a list of roles with applicable permissions to the resource.
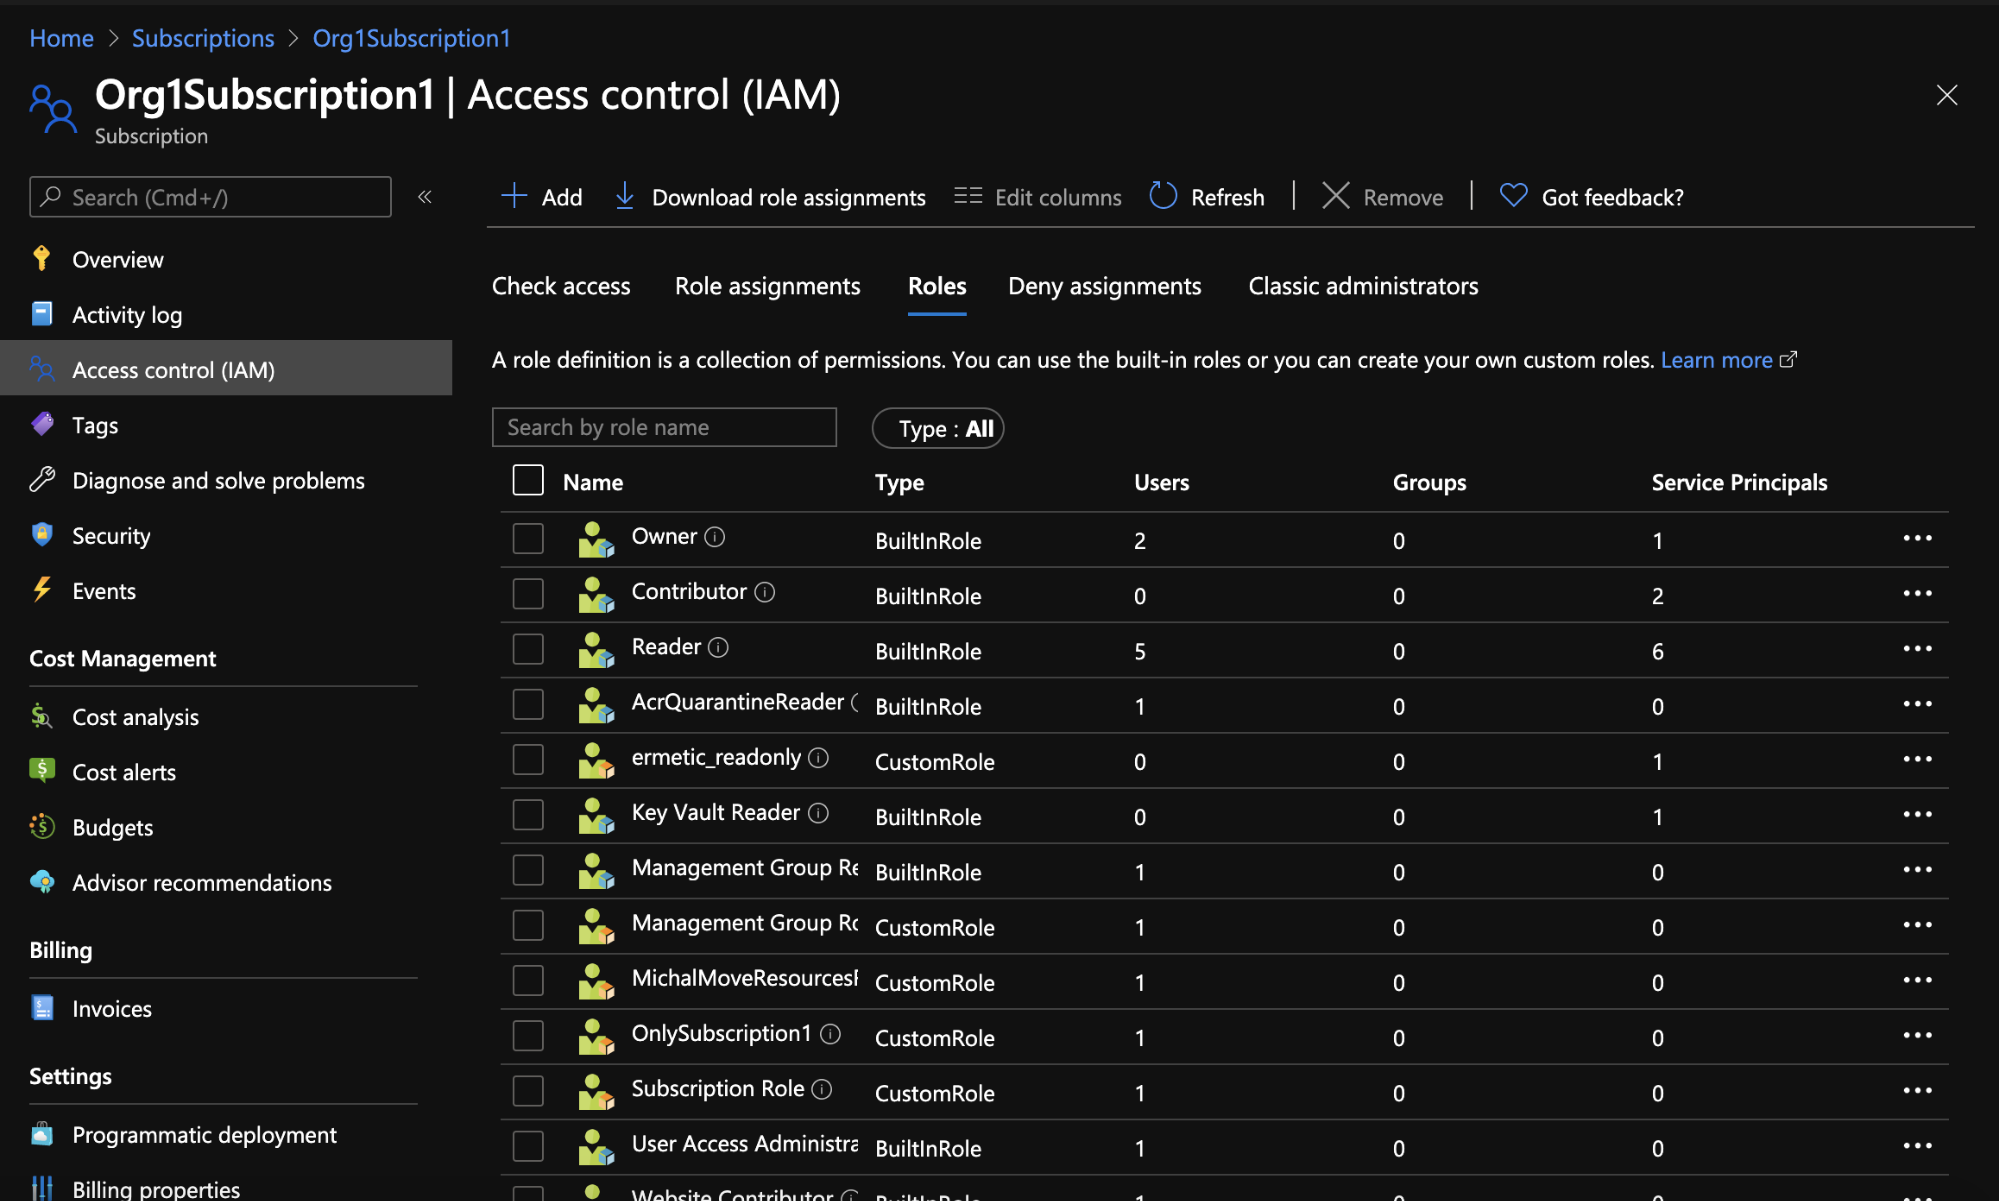
Figure 10 - Roles for Org1Subscription1
By choosing “Role assignments,'' you can see the current role assignments that apply to the resource. In this case, we can see all the role assignments that provide various security principals with access to the Org1Subscription1 subscription, and at different levels (based on the role configuration).
It’s important to note that this list will include role assignments for the containers that the resource belongs to, as the containers also apply to the resource. This means that we will see role assignments assigned directly to the resource as a scope, as well as role assignments assigned to a container that contains the resource as an “inherited” scope.
For example, in Figure 11 we can see that:
- There’s a role assignment for the management group the user Nitzan belongs to that provides it with access to the permissions for the “Management Group Reader” role for the subscription. In the Scope column, we see clearly that the assignment is effective via inheritance (through the “Inherited” indication)
- As indicated under “This resource”, the MichalMoveResourceRole is assigned to the michaltest user using a role assignment for the subscription itself as the scope.
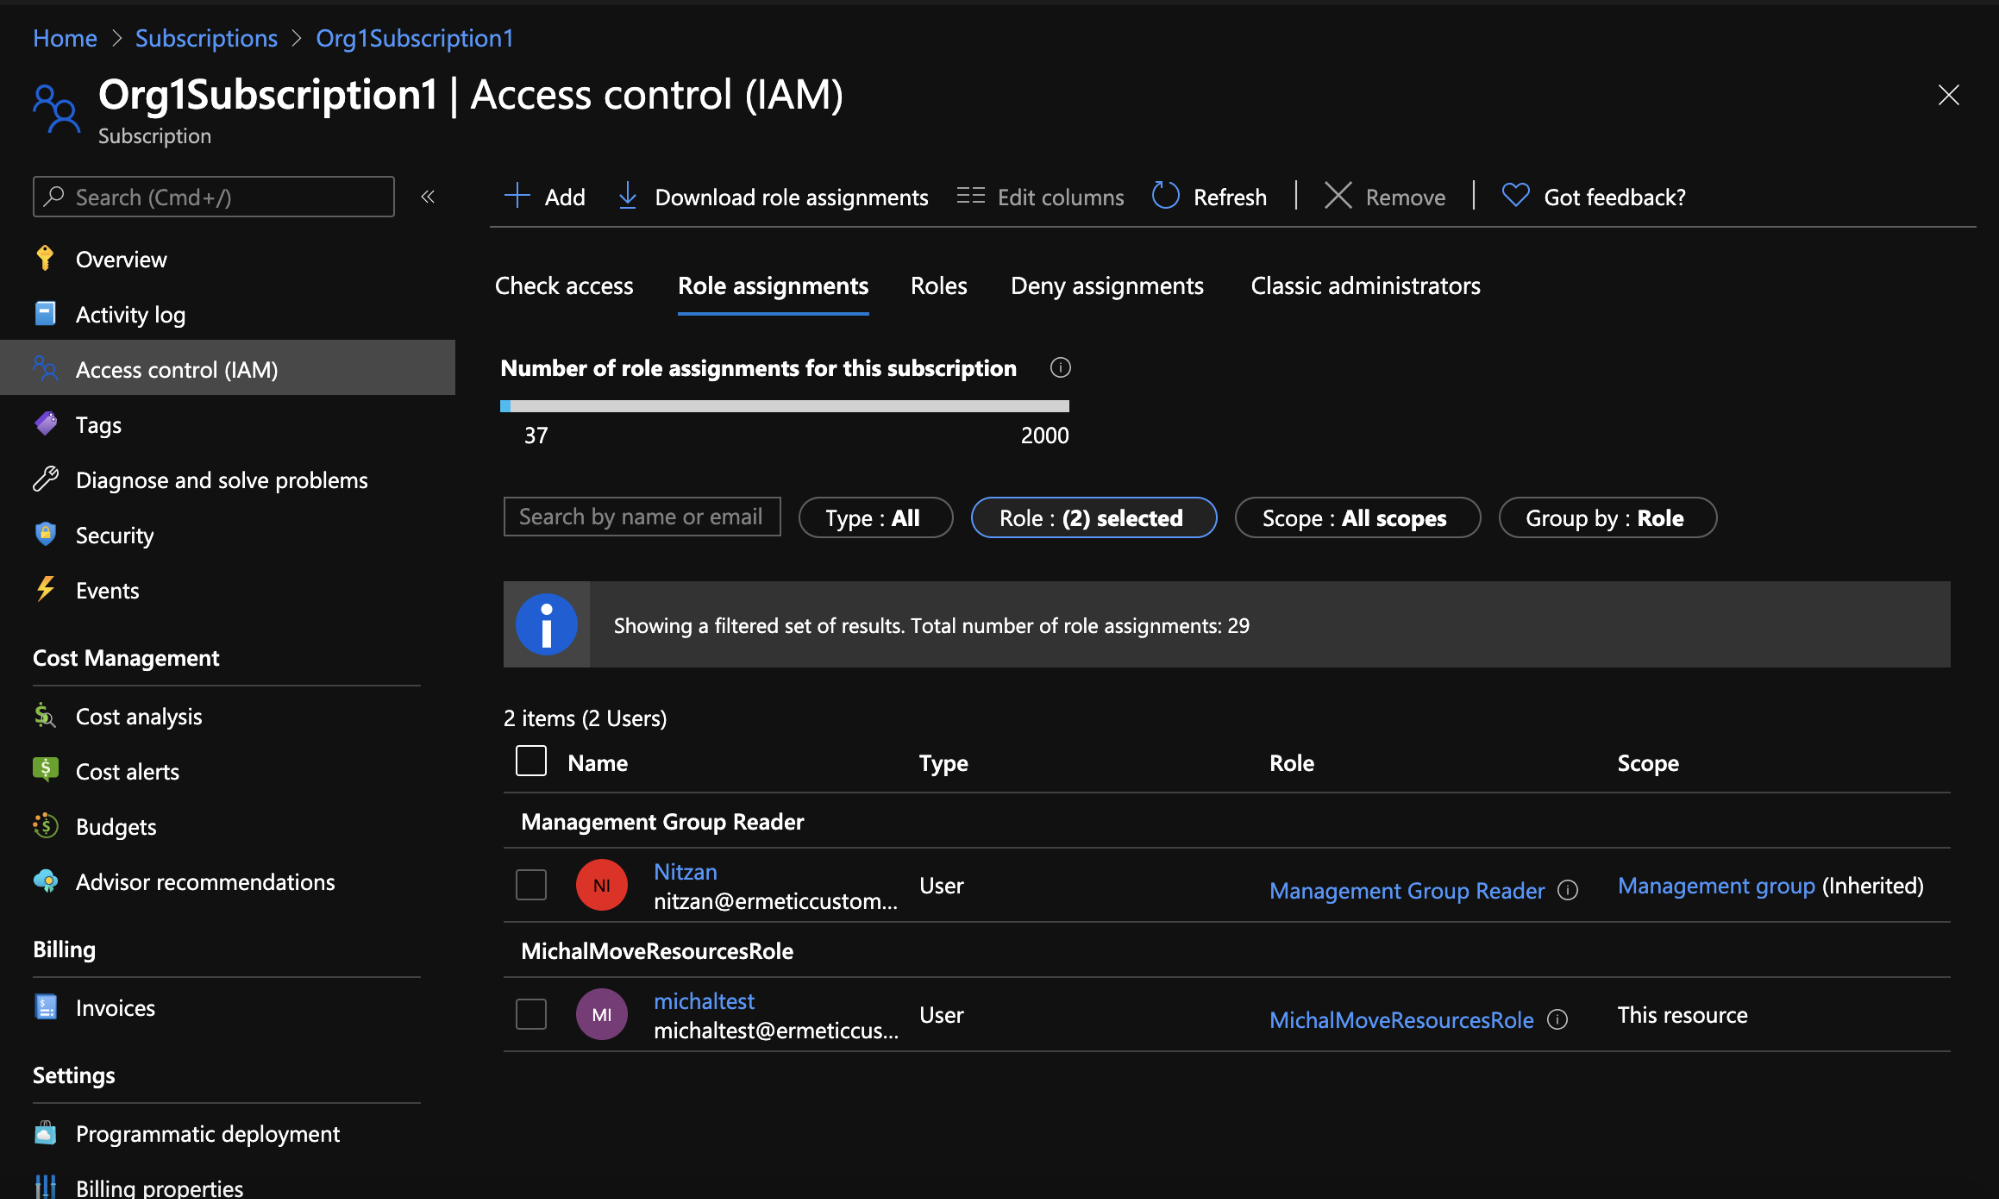
Figure 11 - Role assignments for Org1Subscription1
Using the IAM blade we can similarly start the flow for creating a new custom role that can be applied to the resource (by default, the resource is the role’s assignable scope).
Figure 12 provides a comparison of Azure AD and AWS IAM service terms by means of an abstraction of identity, permissions and their assigned resources.
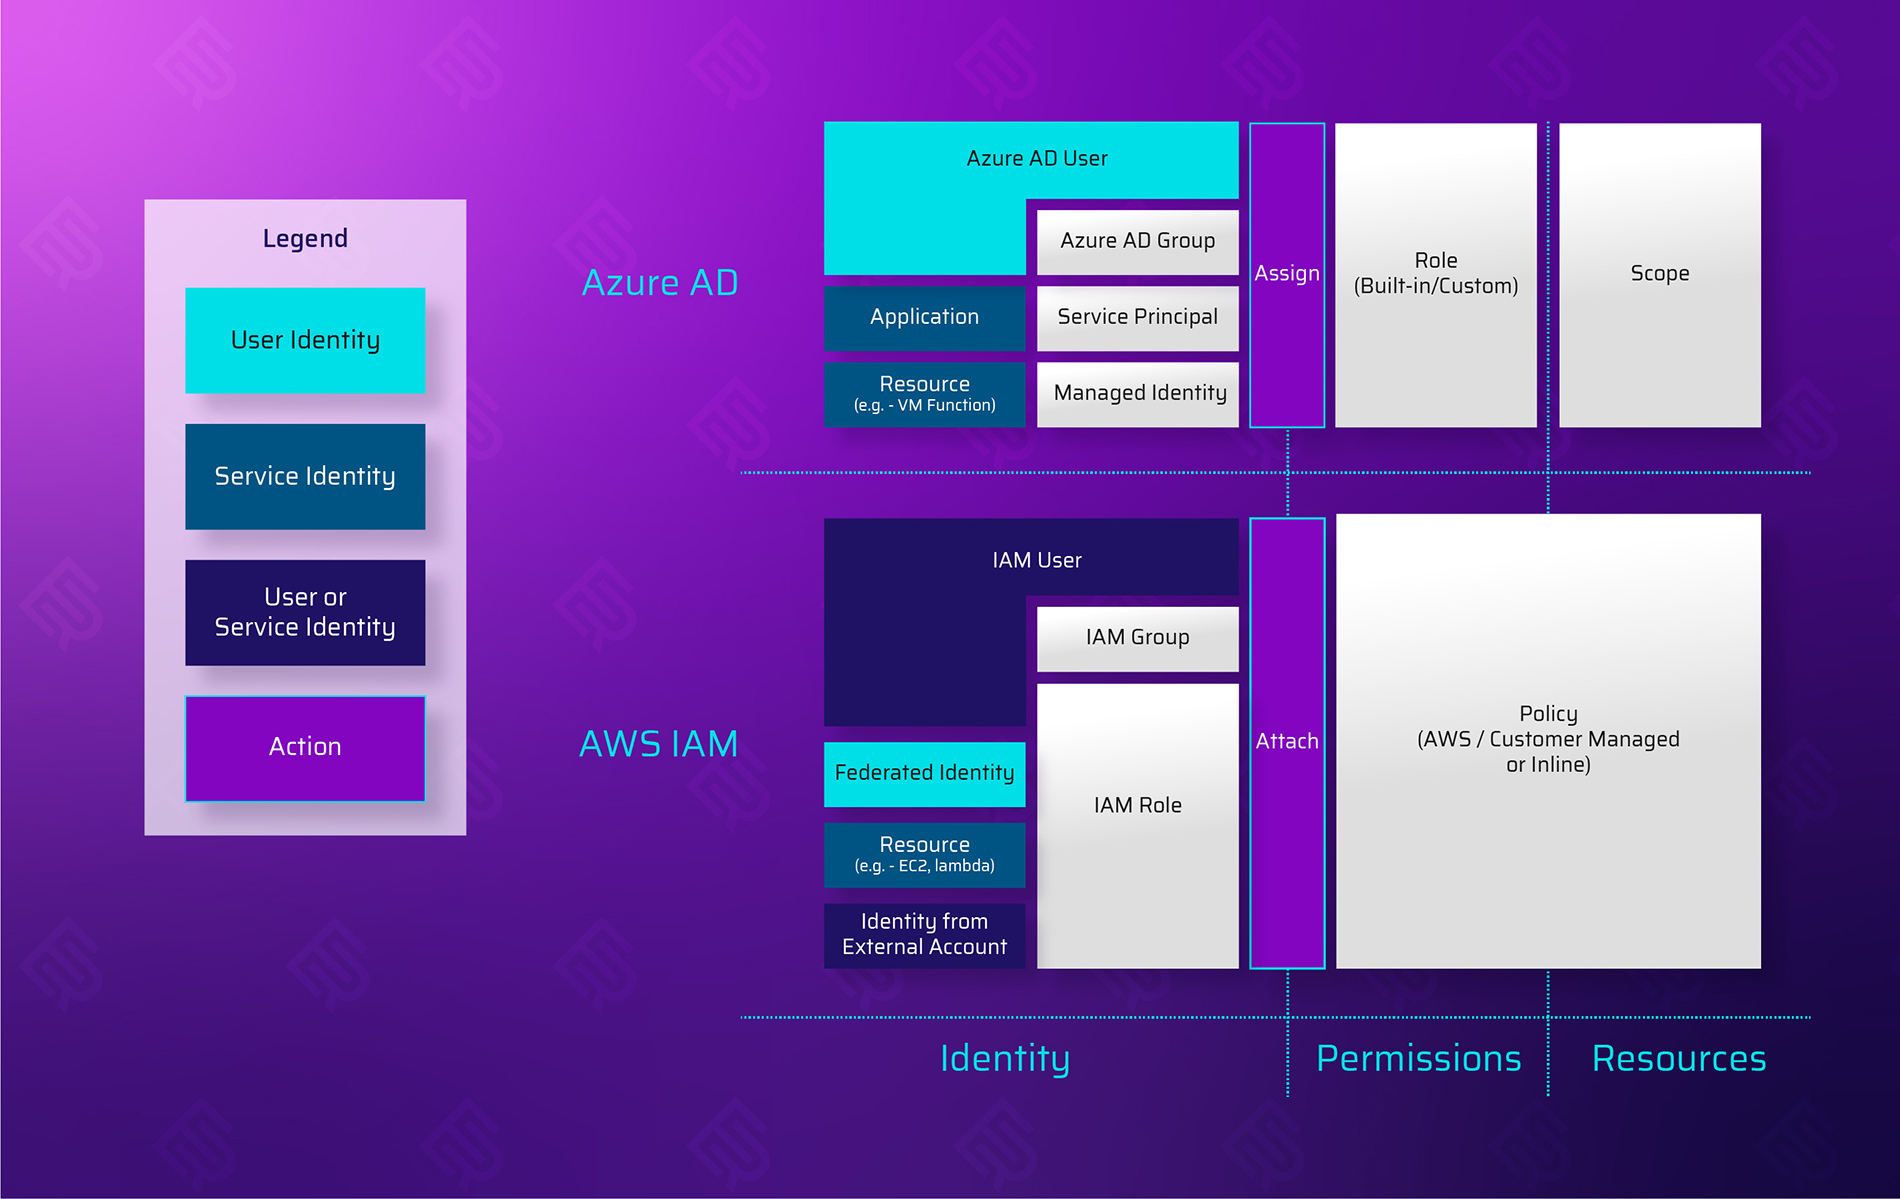
Figure 12 - Azure AD and AWS IAM terms comparison
What’s next?
We hope you’ve found this a useful clarification of the basics of the RBAC mechanism in Azure. Stay tuned for future posts in which we explore other mechanisms, such as Conditional Access, Privileged Identity Management and the Deny assignments mentioned earlier -- all of which you’ll want to be familiar with to effectively manage access in your Azure environment.
- Cloud


